The cpio command in Linux is used to create, extract, and copy archive files. The name cpio stands for copy in, copy out. It gets file lists from standard input (often via find and a pipe) rather than direct arguments, and then performs the selected archive or copy operation.
- Creates archive files from a list of files
- Extracts files from archives while keeping directory structure
- Copies files between directories in pass-through mode
- Preserves file permissions, ownership, and timestamps
Examples
Before using the cpio command, we need a list of files. This list is usually generated using the find command and passed to cpio through a pipe (|).
Example 1: Create a cpio Archive from Files
This example shows how to create a simple cpio archive containing all .txt files from the current directory and its subdirectories.
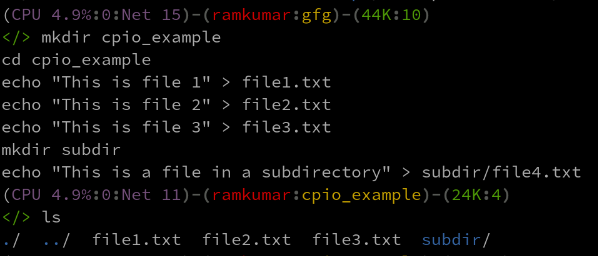
Step 1: Create Sample Files (for understanding)
Create some dummy data that we will use in all our examples:
mkdir cpio_example
cd cpio_example
echo "This is file 1" > file1.txt
echo "This is file 2" > file2.txt
echo "This is file 3" > file3.txt
mkdir subdir
echo "This is a file in a subdirectory" > subdir/file4.txt
This was a simple example with the structure of the directory containing three files in the upper directory and one file in the subdirectory.
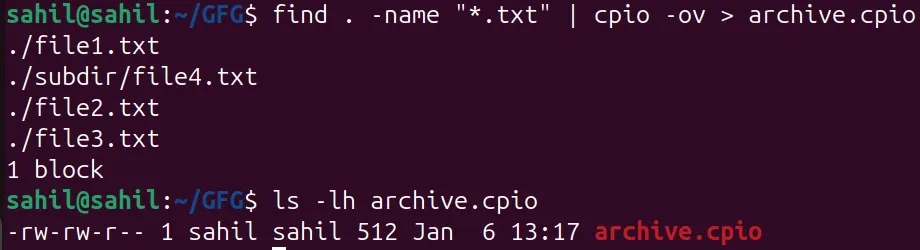
Step 2: Create the Archive
Here is how to archive our dummy data with cpio:
find . -name "*.txt" | cpio -ov > archive.cpio- find . -name "*.txt": Finds all text files in the current directory and subdirectories.
- | (pipe): Sends the list of found files to the cpio command.
- cpio -o: Uses copy-out mode to create an archive.
- -v: Displays the names of files being added to the archive.
- > archive.cpio: Redirects the output into a file named archive.cpio.
This command finds all the .txt files in the current directory and subdirectories and builds a cpio archive called archive.cpio containing them.
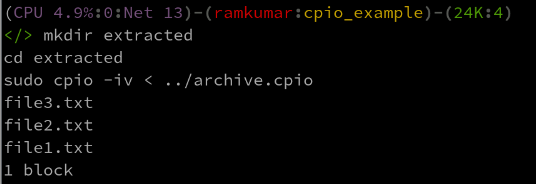
Example 2: Extract Files from a cpio Archive (Copy-in Mode)
This example demonstrates extracting files from a cpio archive.
mkdir extracted
cd extracted
sudo cpio -iv < ../archive.cpio
- mkdir extracted; cd extracted: Creates a new directory to extract files into.
- cpio -iv < ../archive.cpio: -i extracts files (copy-in mode), -v shows verbose output.
- < ../archive.cpio: Reads the archive file as input.
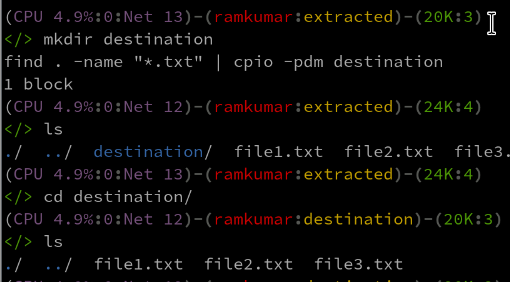
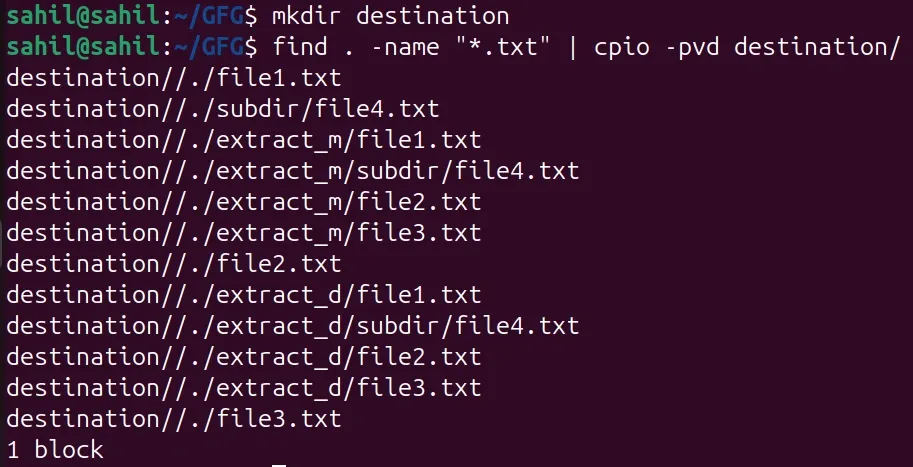
Example 3: Copy Files Between Directories (Copy-pass Mode)
This example shows how to copy multiple files from one directory to another using cpio.
mkdir destination
find . -name "*.txt" | cpio -pdm destination
- mkdir destination: Creates the target directory.
- find . -name "*.txt": Finds all .txt files.
- cpio -pdm destination: -p copy-pass mode, -d creates directories as needed, -m preserves modification times.
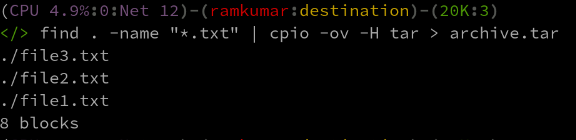
Example 4: Create a tar Archive Using cpio
This example shows how the cpio command can be used to create a tar-format archive.
find . -name "*.txt" | cpio -ov -H tar > archive.tar- find . -name "*.txt": Finds all text files recursively
- -o: Copy-out mode (create archive)
- -v: Displays file names during archiving
- -H tar: Specifies the archive format as tar
- >: Redirects output to archive.tar
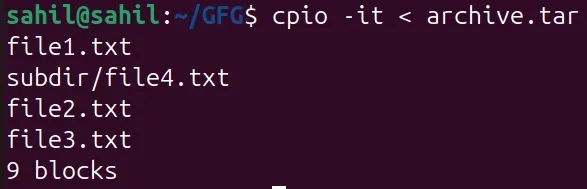
Example 5: View Contents of an Archive Without Extracting
This example demonstrates how to list the contents of a cpio or tar archive without extracting files. This is useful for quickly inspecting archives.
cpio -it < archive.tar- -i: Copy-in mode
- -t: Lists archive contents only
- < archive.tar: Reads archive data from the file
Syntax
The cpio command works in three different modes. Each mode has a slightly different syntax and purpose.
- cpio always expects file names from standard input
- It is commonly used with commands like find
- One of the modes (-o, -i, or -p) must be specified
1. Copy-out Mode (Create Archive)
This mode is used to create a cpio archive from a list of files.
cpio -o [options] > archive_file- -o: Enables copy-out mode
- [options]: Optional flags that control behavior such as verbose output or archive format
- >: Output redirection operator (sends the archive output to a file)
- archive_file: Name of the archive to be created
- File names are provided through standard input (usually using find)
2. Copy-in Mode (Extract Archive)
This mode is used to extract files from a cpio archive.
cpio -i [options] < archive_file- -i: Enables copy-in mode
- [options]: Optional flags to control extraction behavior
- <: Input redirection operator (reads archive data from a file)
- archive_file: Archive file to extract
- Files are extracted into the current directory
3. Copy-pass Mode (Copy Files Between Directories)
This mode copies files directly from one directory to another without creating an archive.
cpio -p [options] destination_directory- -p: Enables copy-pass mode
- [options]: Optional flags to preserve permissions, timestamps, etc.
- destination_directory: Directory where files will be copied
- File list is again provided through standard input
Commonly Used Options in cpio Command
The cpio command provides several options to control how files are archived, extracted, or copied. Below are the most commonly used options.
1. -v: Verbose Mode
The -v option displays the name of each file as it is processed. This helps users see what cpio is doing step by step.
Example: Create an Archive with Verbose Output
Creating a cpio archive containing some files:
find . -name "*.txt" | cpio -ov > archive.cpio- -o: create archive (copy-out mode)
- -v: print file names while archiving
- Output shows each .txt file being added
2. -d: Create Directories When Extracting
By default, cpio does not create missing directories during extraction. The -d option ensures required directories are created automatically.
- Prevents extraction errors due to missing directories
- Maintains original directory structure
Example: Extract Archive and Create Directories
cpio -id < ../archive.cpio- -i: extract files
- -d: create directories if they do not exist
- Files are restored correctly into their folders

3. -m: Preserve File Modification Time
The -m option keeps the original modification timestamps of files when extracting or copying.
- Preserves file history
- Important for backups and system files
Example: Extract Files While Preserving Timestamps
cpio -idm < archive.cpio- Files retain their original modification dates
- Useful in backup restoration
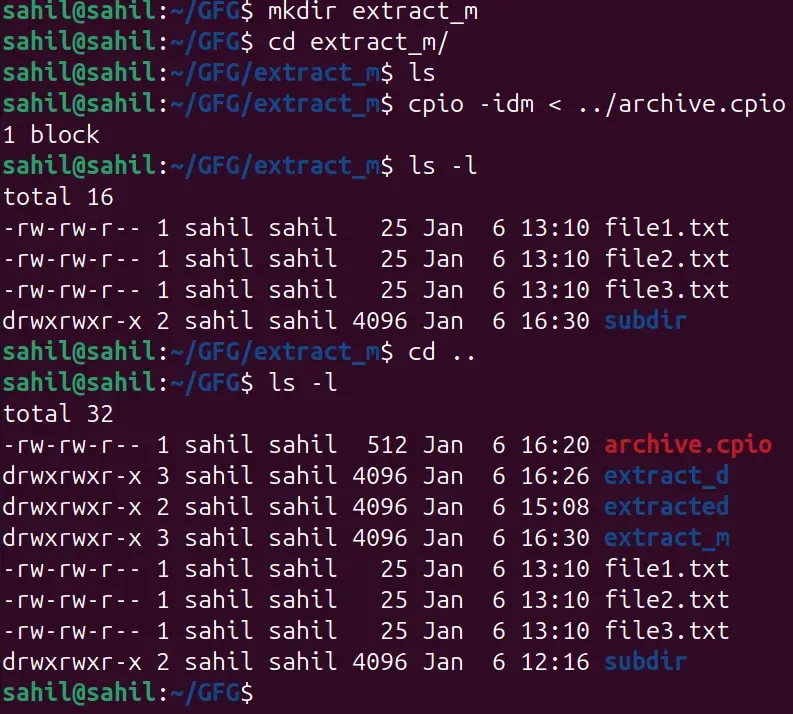
4. -p: Pass-through Mode (Copy Files)
This option is used to copy files from one directory to another without creating an archive.
- Copies files directly
- Faster than creating and extracting an archive
Example: Copy Files to Another Directory
find . -name "*.txt" | cpio -pvd destination- -p: enables pass-through mode
- Files are copied into the destination directory
5. --no-absolute-filenames: Avoid Absolute Paths
This option prevents files with absolute paths from being extracted outside the current directory.
- Improves safety during extraction
- Prevents overwriting system files
Example: Safe Extraction
Files are extracted relative to the current directory, recommended when extracting unknown archives
cpio -idvm --no-absolute-filenames < archive.cpio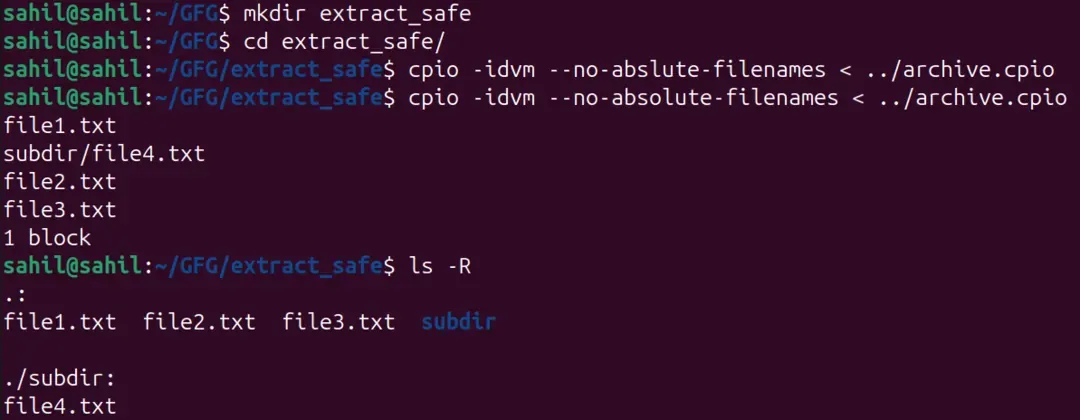
Advanced Usage of cpio Command
The cpio command provides advanced features that help in selective extraction, preserving file attributes, and working with compressed archives. These use cases are especially useful in backups, system recovery, and automation scripts.
1. Extract Specific Files Using Pattern Matching
- This shows how to extract only selected files from an archive using filename patterns.
- It is useful when you do not want to extract the entire archive.
cpio -iv "*.txt" < archive.cpio- -i: Copy-in mode (extract files)
- -v: Displays file names during extraction
- "*.txt": Extracts only files ending with .txt
- < archive.cpio: Reads archive input from file
Expected Output
./file1.txt
./file2.txt
./file3.txt
128
128
128
2. Preserve File Ownership, Permissions, and Timestamps
This example demonstrates how to restore files exactly as they were archived, including:
- Ownership
- Permissions
- Modification timestamps
Command
sudo cpio -idvm --no-absolute-filenames < archive.cpio- -i: Extract files
- -d: Create directories automatically
- -v: Show extracted files
- -m: Preserve modification time
- --no-absolute-filenames: Prevent unsafe absolute path extraction
- sudo: Required to restore ownership and permissions
Expected Output
./file1.txt
./file2.txt
./file3.txt
./subdir/file4.txt
128
128
128
160
3. Create a Compressed cpio Archive Using gzip
- This shows how to compress a cpio archive using gzip.
- Compressed archives save disk space and are commonly used for backups.
Command
find . -name "*.txt" | cpio -ov | gzip > archive.cpio.gz- find: Generates list of files
- cpio -o: Creates archive from file list
- | gzip: Compresses the archive stream
- >: Saves compressed output to archive.cpio.gz
Expected Output
./file1.txt
./file2.txt
./file3.txt
./subdir/file4.txt
