Spring Batch is a powerful framework in the Spring ecosystem used for batch processing of large volumes of data. It provides robust features for reading, processing, and writing data efficiently, along with built-in support for transactions, job management, and scalability.
- Processes large amounts of data in bulk efficiently
- Supports chunk-based processing and transaction management
- Provides reliable components for job execution and monitoring
Key Terminologies
- Spring Boot Integration: Simplifies configuration and deployment of Spring Batch using auto-configuration.
- Job: Represents the complete batch process consisting of one or more steps.
- ItemReader: Reads data from sources like databases, CSV, or flat files.
- ItemProcessor: Processes data (filtering, transformation, validation) before writing.
- ItemWriter: Writes processed data to a destination like a database or file.
- Chunk: Processes data in small groups to improve performance and efficiency.
- Job Repository: Stores metadata such as job and step execution details.
- Listeners: Used to monitor the batch lifecycle and execute custom logic before or after job and step execution.
Prerequisites
Before starting, ensure you have the following tools and technologies installed:
Spring Tool Suite (STS): For developing and running Spring Boot applications
MySQL Workbench: For database management and data storage
Spring Boot: For building and running the batch processing application
Steps to Implement Batch Processing Using Spring Data JPA to CSV File
Step 1: Create Spring Boot Project & Add Dependencies
Add required dependencies:
- Spring Boot Starter Batch
- Spring Data JPA
- Spring Web
- MySQL Driver
- Lombok
pom.xml
<dependencies>
    <dependency>
        <groupId>org.springframework.boot</groupId>
        <artifactId>spring-boot-starter-batch</artifactId>
    </dependency>

    <dependency>
        <groupId>org.springframework.boot</groupId>
        <artifactId>spring-boot-starter-data-jpa</artifactId>
    </dependency>

    <dependency>
        <groupId>org.springframework.boot</groupId>
        <artifactId>spring-boot-starter-web</artifactId>
    </dependency>

    <dependency>
        <groupId>mysql</groupId>
        <artifactId>mysql-connector-java</artifactId>
        <version>8.0.23</version>
    </dependency>

    <dependency>
        <groupId>org.projectlombok</groupId>
        <artifactId>lombok</artifactId>
        <scope>provided</scope>
    </dependency>
</dependencies>

Step 2: Prepare Database (books table)
Ensure a books table exists with some data.
- Batch processing requires existing data to read and process.
- Table acts as the input source for the batch job.
Below we have the books table which has some data inside it.

Step 3: Create Main Class
Use @EnableBatchProcessing in the main class.
- Enables batch-related configurations automatically.
- Allows use of Job, Step, Reader, Processor, and Writer components.
package com.batch.app;

import org.springframework.batch.core.configuration.annotation.EnableBatchProcessing;
import org.springframework.boot.SpringApplication;
import org.springframework.boot.autoconfigure.SpringBootApplication;

@SpringBootApplication
@EnableBatchProcessing
public class BatchApplication {

    public static void main(String[] args)
    {
        SpringApplication.run(BatchApplication.class, args);
    }
}
Step 4: Create Entity Class
Define Book entity with fields like id, author, name, price.
@Entitymaps class to database table.- Represents data that will be read and written in batch processing.
Below provided that code for better understanding.
package com.batch.app;

import javax.persistence.Entity;
import javax.persistence.GeneratedValue;
import javax.persistence.GenerationType;
import javax.persistence.Id;
import javax.persistence.Table;
import lombok.AllArgsConstructor;
import lombok.Data;
import lombok.NoArgsConstructor;

@Data
@AllArgsConstructor
@NoArgsConstructor
@Entity
@Table(name = "book")
public class Book {

    @Id
    @GeneratedValue(strategy = GenerationType.IDENTITY)
    private int id;
    private String author;
    private String name;
    private String price;
}
Step 5: Create Repository Layer
Create BookEntityRepository extending JpaRepository.
- Provides easy database access without writing SQL queries.
- Helps in interacting with database if needed outside batch.
package com.batch.app;

import org.springframework.data.jpa.repository.JpaRepository;
import org.springframework.data.jpa.repository.config.EnableJpaRepositories;
import org.springframework.stereotype.Repository;

@Repository
@EnableJpaRepositories
public interface BookEntityRepository
    extends JpaRepository<Book, Integer> {
}
Step 6: Create Item Processor
Implement ItemProcessor<Book, Book>.
- Used to apply business logic on data (e.g., filtering, transformation).
- In this case, it simply passes data as-is (no transformation).
package com.batch.app;

import org.springframework.batch.item.ItemProcessor;
import org.springframework.stereotype.Component;

@Component
public class BookEntityItemProcessor
    implements ItemProcessor<Book, Book> {

    @Override
    public Book process(Book item) throws Exception
    {
        return item;
    }
}
Step 7: Create CSV Writer
Created one more Java class with named BookEntityCsvWriter for Handling getting the processed data and write into CSV file. Implement ItemWriter<Book> to write data into CSV file.
- Responsible for writing processed data into output file.
- CSV file (output.csv) is created dynamically if not present.
package com.batch.app;

import java.io.File;
import java.util.List;
import org.springframework.batch.item.ItemWriter;
import org.springframework.batch.item.file.FlatFileItemWriter;
import org.springframework.batch.item.file.transform.BeanWrapperFieldExtractor;
import org.springframework.batch.item.file.transform.DelimitedLineAggregator;
import org.springframework.core.io.FileSystemResource;

public class BookEntityCsvWriter
    implements ItemWriter<Book> {
    private static final String CSV_FILE = "output.csv";
    private FlatFileItemWriter<Book> writer;

    public BookEntityCsvWriter()
    {
        initializeCsvFile();
        this.writer = new FlatFileItemWriter<>();
        this.writer.setResource(
            new FileSystemResource(CSV_FILE));
        this.writer.setLineAggregator(
            new DelimitedLineAggregator<Book>() {
                {
                    setDelimiter(",");
                    setFieldExtractor(
                        new BeanWrapperFieldExtractor<
                            Book>() {
                            {
                                setNames(new String[] {
                                    "id", "author", "name",
                                    "price" });
                            }
                        });
                }
            });
    }

    private void initializeCsvFile()
    {
        File file = new File(CSV_FILE);
        if (!file.exists()) {
            try {
                file.createNewFile();
            }
            catch (Exception e) {
                throw new RuntimeException(
                    "Error creating CSV file", e);
            }
        }
    }

    public void write(List<? extends Book> items)
        throws Exception
    {

        writer.write(items);
    }
}
Step 8: Configure Batch
Create BatchConfiguration class.
- Reader: Reads data from DB using JpaPagingItemReader.
- Processor: Processes each record.
- Writer: Writes data to CSV file.
package com.batch.app;

import java.util.Properties;
import javax.persistence.EntityManagerFactory;
import javax.sql.DataSource;
import org.springframework.batch.core.Job;
import org.springframework.batch.core.Step;
import org.springframework.batch.core.configuration.annotation.EnableBatchProcessing;
import org.springframework.batch.core.configuration.annotation.JobBuilderFactory;
import org.springframework.batch.core.configuration.annotation.StepBuilderFactory;
import org.springframework.batch.core.launch.support.RunIdIncrementer;
import org.springframework.batch.item.ItemProcessor;
import org.springframework.batch.item.ItemReader;
import org.springframework.batch.item.ItemWriter;
import org.springframework.batch.item.database.JpaPagingItemReader;
import org.springframework.beans.factory.annotation.Autowired;
import org.springframework.context.annotation.Bean;
import org.springframework.context.annotation.Configuration;
import org.springframework.jdbc.datasource.DriverManagerDataSource;
import org.springframework.orm.jpa.LocalContainerEntityManagerFactoryBean;
import org.springframework.orm.jpa.vendor.HibernateJpaVendorAdapter;

@Configuration
@EnableBatchProcessing
public class BatchConfiguration {

    @Autowired private JobBuilderFactory jobBuilderFactory;

    @Autowired
    private StepBuilderFactory stepBuilderFactory;

    @Bean
    public ItemReader<Book>
    reader(EntityManagerFactory entityManagerFactory)
    {
        JpaPagingItemReader<Book> reader
            = new JpaPagingItemReader<>();
        reader.setEntityManagerFactory(
            entityManagerFactory);
        reader.setQueryString(
            "SELECT b FROM Book b"); // Use the entity name
                                     // 'Book'
        reader.setPageSize(10);
        return reader;
    }

    @Bean public ItemProcessor<Book, Book> processor()
    {
        return new BookEntityItemProcessor();
    }

    @Bean public ItemWriter<Book> writer()
    {
        return new BookEntityCsvWriter();
    }

    @Bean public Job exportJob(Step exportStep)
    {
        return jobBuilderFactory.get("exportJob")
            .incrementer(new RunIdIncrementer())
            .flow(exportStep)
            .end()
            .build();
    }

    @Bean
    public Step
    exportStep(ItemReader<Book> reader,
               ItemProcessor<Book, Book> processor,
               ItemWriter<Book> writer)
    {
        return stepBuilderFactory.get("exportStep")
            .<Book, Book>chunk(10)
            .reader(reader)
            .processor(processor)
            .writer(writer)
            .build();
    }

    @Bean public EntityManagerFactory entityManagerFactory()
    {
        LocalContainerEntityManagerFactoryBean emf
            = new LocalContainerEntityManagerFactoryBean();
        emf.setDataSource(dataSource());
        emf.setPackagesToScan("com.batch.app");
        emf.setJpaVendorAdapter(
            new HibernateJpaVendorAdapter());
        emf.setJpaProperties(jpaProperties());
        emf.afterPropertiesSet();
        return emf.getObject();
    }

    @Bean public DataSource dataSource()
    {
        DriverManagerDataSource dataSource
            = new DriverManagerDataSource();
        dataSource.setDriverClassName(
            "com.mysql.cj.jdbc.Driver");
        dataSource.setUrl(
            "jdbc:mysql://localhost:3306/books");
        dataSource.setUsername("root");
        dataSource.setPassword("password");
        return dataSource;
    }

    @Bean public Properties jpaProperties()
    {
        Properties properties = new Properties();
        properties.setProperty(
            "hibernate.dialect",
            "org.hibernate.dialect.MySQLDialect");
        return properties;
    }
}
Output
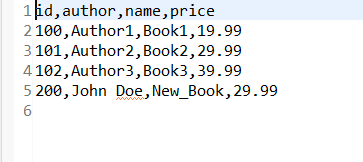
After running this project as Spring Boot Application, one CSV file is created. Then it will fetch data from database then write that data into that CSV File. Below we have provided the CSV file output.
CSV File Output: