Spring IoC (Inversion of Control) Container is the core component of the Spring Framework. It is responsible for creating, managing, and configuring application objects (beans). Using Dependency Injection:
- Automatically injects required dependencies into beans.
- Manages bean creation, initialization, and destruction.
- Supports XML, annotation-based, and Java-based configuration.
- Separates object creation from business logic, making applications more flexible and testable.
Types of Ioc Containers
There are two types of IoC containers in Spring:
1. BeanFactory
BeanFactory is the basic IoC container that provides fundamental features like dependency injection and bean lifecycle management.
Syntax:
Resource resource = new ClassPathResource("beans.xml");
BeanFactory factory = new XmlBeanFactory(resource);
2. ApplicationContext
ApplicationContext is an advanced IoC container that extends BeanFactory and provides additional features such as event handling, internationalization, and annotation-based configuration.
Syntax:
ApplicationContext context = new ClassPathXmlApplicationContext("beans.xml");
Steps to using Ioc container in Spring Application
Step 1: Create a Maven Project
- Launch IntelliJ IDEA
- Click on New Project
- Select Maven
- Check Create from archetype (optional)
- Click Next
- Project Details: GroupId: com.example, ArtifactId: spring-ioc-demo, Version: 1.0-SNAPSHOT, Packaging: jar
- Click Finish
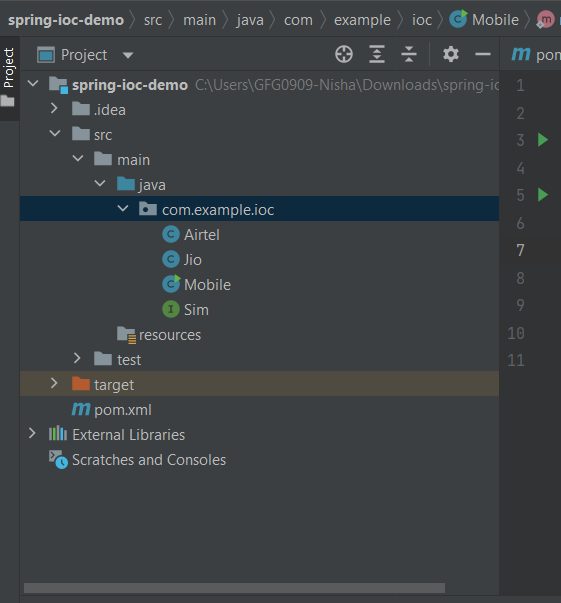
Step 2: Project Structure
Step 3: Add Spring Dependencies in pom.xml
Open pom.xml and add the following inside <dependencies>:
<dependencies>
    <!-- Spring Context -->
    <dependency>
        <groupId>org.springframework</groupId>
        <artifactId>spring-context</artifactId>
        <version>6.1.3</version>
    </dependency>

</dependencies>
After adding dependencies: Click Load Maven Changes (top right)
Step 4: Create the Sim Interface
So now let's understand what is IoC in Spring with an example. Suppose we have one interface named Sim and it has some abstract methods calling() and data().
public interface Sim
{
    void calling();
    void data();
}
Step 5: Implement the Sim interface
Now we have created another two classes, Airtel and Jio which implement the Sim interface and override its methods..
Airtel.Java
public class Airtel implements Sim {
    @Override
    public void calling() {
        System.out.println("Airtel Calling");
    }

    @Override
    public void data() {
        System.out.println("Airtel Data");
    }
}
Jio.Java
package com.example.ioc;
public class Jio implements Sim {

    @Override
    public void calling() {
        System.out.println("Jio Calling");
    }

    @Override
    public void data() {
        System.out.println("Jio Data");
    }
}
Step 6: Running Without Spring IoC
Without Spring IoC, we would manually create instances of the Sim implementation in the main method.
Mobile.java
public class Mobile {

    // Main driver method
    public static void main(String[] args)
    {
        // Manually creating an instance of Jio
        Sim sim = new Jio();

        // Calling methods
        sim.calling();
        sim.data();
    }
}
Output:
This approach tightly couples the Mobile class to the Jio implementation. If we want to switch to Airtel, we need to modify the source code.
Step 7: Using Spring IoC with XML Configuration
To avoid tight coupling, we can use the Spring IoC container. First, we create an XML configuration file (beans.xml) to define the beans.
beans.xml
<?xml version="1.0" encoding="UTF-8"?>
<beans xmlns="http://www.springframework.org/schema/beans"
       xmlns:xsi="http://www.w3.org/2001/XMLSchema-instance"
       xsi:schemaLocation="
           http://www.springframework.org/schema/beans
           https://www.springframework.org/schema/beans/spring-beans.xsd">

    <bean id="sim" class="com.example.ioc.Jio"/>

</beans>
Explanation: In the beans.xml file, we define beans by giving each a unique id and specifying the class name. Later, in the main method, we can use these beans - which will be shown in the next example.
Step 8: Update Mobile.java
In the Mobile class, we use the ApplicationContext to retrieve the bean:
package com.example.ioc;

import org.springframework.context.ApplicationContext;
import org.springframework.context.support.ClassPathXmlApplicationContext;

public class Mobile {

    public static void main(String[] args) {

        ApplicationContext context =
                new ClassPathXmlApplicationContext("beans.xml");

        Sim sim = context.getBean("sim", Sim.class);
        sim.calling();
        sim.data();
    }
}
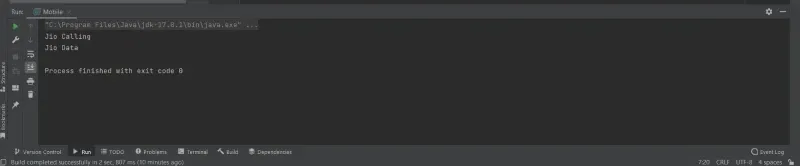
Step 9. Run the Application
Right-click Mobile.java -> Run
Output:
Step 10: Switch SIM Without Code Change
And now if you want to use the Airtel sim so you have to change only inside the beans.xml file. The main method is going to be the same. Open beans.xml:
<bean id="sim" class="com.example.ioc.Airtel"/>
Run again
Output:

Step 11: Run Using Java-Based Configuration
Modern Spring applications often use Java-based configuration instead of XML. Let’s see how to configure the same example using Java-based configuration.
1. Create a Configuration Class: Define a configuration class using the @Configuration annotation. Use the @Bean annotation to define beans.
package com.example.ioc;

import org.springframework.context.annotation.Bean;
import org.springframework.context.annotation.Configuration;

@Configuration
public class AppConfig {

    @Bean
    public Sim sim() {
        return new Jio(); // Change to new Airtel()
    }
}
2. Update Mobile.java
package com.example.ioc;

import org.springframework.context.ApplicationContext;
import org.springframework.context.annotation.AnnotationConfigApplicationContext;

public class Mobile {

    public static void main(String[] args) {

        ApplicationContext context =
                new AnnotationConfigApplicationContext(AppConfig.class);

        Sim sim = context.getBean(Sim.class);
        sim.calling();
        sim.data();
    }
}
Output:
Step 12: Using Annotations for Dependency Injection
Spring also supports annotation-based configuration, which is widely used in modern applications. Let’s update the example to use annotations.
1. Enable Component Scanning: Add the @ComponentScan annotation to the configuration class to enable component scanning.
AppConfig.Java
import org.springframework.context.annotation.ComponentScan;
import org.springframework.context.annotation.Configuration;

@Configuration
@ComponentScan(basePackages = "com.example")
public class AppConfig {
}
2. Annotate Classes with @Component: Annotate the Airtel and Jio classes with @Component
import org.springframework.stereotype.Component;

@Component
public class Airtel implements Sim {
    @Override
    public void calling() {
        System.out.println("Airtel Calling");
    }

    @Override
    public void data() {
        System.out.println("Airtel Data");
    }
}

@Component
public class Jio implements Sim {
    @Override
    public void calling() {
        System.out.println("Jio Calling");
    }

    @Override
    public void data() {
        System.out.println("Jio Data");
    }
}
3. Inject the Dependency Using @Autowired: Update the Mobile class to use @Autowired for dependency injection.
import org.springframework.beans.factory.annotation.Autowired;
import org.springframework.context.ApplicationContext;
import org.springframework.context.annotation.AnnotationConfigApplicationContext;
import org.springframework.stereotype.Component;

@Component
public class Mobile {

    @Autowired
    private Sim sim;

    public void useSim() {
        sim.calling();
        sim.data();
    }

    public static void main(String[] args) {
        ApplicationContext context = new AnnotationConfigApplicationContext(AppConfig.class);
        Mobile mobile = context.getBean(Mobile.class);
        mobile.useSim();
    }
}
Output:
Note: When we run the above code, Spring will throw a NoUniqueBeanDefinitionException because it finds two beans (Airtel and Jio) of type Sim. To resolve this, we need to specify which bean to inject.
Fixing The NoUniqueBeanDefinitionException
1. Use @Primary Annotation
Mark one of the beans as the primary bean using the @Primary annotation.
import org.springframework.context.annotation.Primary;
import org.springframework.stereotype.Component;

@Component
@Primary
public class Airtel implements Sim {
    public void calling() {
        System.out.println("Airtel Calling");
    }

    public void data() {
        System.out.println("Airtel Data");
    }
}
2. Use @Qualifier Annotation
Use the @Qualifier annotation to specify which bean to inject
import org.springframework.beans.factory.annotation.Autowired;
import org.springframework.beans.factory.annotation.Qualifier;
import org.springframework.stereotype.Component;
@Component
public class Mobile {

    @Autowired
    @Qualifier("jio")
    private Sim sim;

    public void useSim() {
        sim.calling();
        sim.data();
    }
}
3. Explicit Bean Names
Explicitly name the beans and use those names in the @Qualifier annotation.
@Component("airtelBean")
public class Airtel implements Sim {
    // Methods implementation
}

@Component("jioBean")
public class Jio implements Sim {
    // Methods implementation
}
Then in the Mobile class,
@Component
public class Mobile {

    @Autowired
    @Qualifier("jioBean") // Use the explicit bean name
    private Sim sim;

    public void useSim() {
        sim.calling();
        sim.data();
    }

    public static void main(String[] args) {
        ApplicationContext context = new AnnotationConfigApplicationContext(AppConfig.class);
        Mobile mobile = context.getBean(Mobile.class);
        mobile.useSim();
    }
}
