Spring MVC CRUD refers to implementing Create, Read, Update, and Delete operations in a web application using the Spring MVC framework. It follows the MVC pattern to separate concerns and efficiently manage data through controllers, services, and views.
- Uses Controller, Service, and Repository layers to handle application flow
- Integrates with databases using Spring Data JPA or JDBC
- Supports dynamic UI rendering using view technologies like JSP or Thymeleaf
Real-world example: In a Student Management System, administrators can add new students, view the list of students, update student details, and delete student records. These operations are handled using Spring MVC controllers, services, and views to manage student data efficiently.
Steps to Implements CRUD Operation in Spring MVC using Spring Data JPA
Below down are the steps to create a simple course-tracking CRUD application focused on the Spring MVC module.
Step 1: Create a Maven Project
- Open STS IDE.
- Click File - New - Maven Project.
- Select Create a simple project (Select archetype ) and click Next.

Then Enter the following details:
- Group Id: com.gfg
- Artifact Id: CourseManagements
- Packaging: war
Click Finish.
Step 2: Add Required Dependencies
Add the following maven dependencies and plugin to your pom.xml file.
<project xmlns="http://maven.apache.org/POM/4.0.0"
         xmlns:xsi="http://www.w3.org/2001/XMLSchema-instance"
         xsi:schemaLocation="http://maven.apache.org/POM/4.0.0
         https://maven.apache.org/xsd/maven-4.0.0.xsd">

    <modelVersion>4.0.0</modelVersion>

    <groupId>com.gfg</groupId>
    <artifactId>CourseCRUD</artifactId>
    <version>0.0.1-SNAPSHOT</version>
    <packaging>war</packaging>

    <properties>
        <spring.version>5.3.39</spring.version>
        <hibernate.version>5.6.15.Final</hibernate.version>
        <java.version>1.8</java.version>
    </properties>

    <dependencies>

        <!-- Spring MVC -->
        <dependency>
            <groupId>org.springframework</groupId>
            <artifactId>spring-webmvc</artifactId>
            <version>${spring.version}</version>
        </dependency>

        <!-- Spring ORM -->
        <dependency>
            <groupId>org.springframework</groupId>
            <artifactId>spring-orm</artifactId>
            <version>${spring.version}</version>
        </dependency>

        <!-- Spring Data JPA -->
        <dependency>
            <groupId>org.springframework.data</groupId>
            <artifactId>spring-data-jpa</artifactId>
            <version>2.7.18</version>
        </dependency>

        <!-- Hibernate -->
        <dependency>
            <groupId>org.hibernate</groupId>
            <artifactId>hibernate-core</artifactId>
            <version>${hibernate.version}</version>
        </dependency>

        <!-- MySQL Driver -->
        <dependency>
            <groupId>mysql</groupId>
            <artifactId>mysql-connector-java</artifactId>
            <version>8.0.33</version>
        </dependency>

        <!-- JSP -->
        <dependency>
            <groupId>javax.servlet.jsp</groupId>
            <artifactId>javax.servlet.jsp-api</artifactId>
            <version>2.3.3</version>
            <scope>provided</scope>
        </dependency>

        <!-- Servlet -->
        <dependency>
            <groupId>javax.servlet</groupId>
            <artifactId>javax.servlet-api</artifactId>
            <version>4.0.1</version>
            <scope>provided</scope>
        </dependency>

        <!-- JSTL -->
        <dependency>
            <groupId>javax.servlet</groupId>
            <artifactId>jstl</artifactId>
            <version>1.2</version>
        </dependency>

        <!-- Lombok -->
        <dependency>
            <groupId>org.projectlombok</groupId>
            <artifactId>lombok</artifactId>
            <version>1.18.38</version>
            <scope>provided</scope>
        </dependency>

        <!-- Test -->
        <dependency>
            <groupId>junit</groupId>
            <artifactId>junit</artifactId>
            <version>4.13.2</version>
            <scope>test</scope>
        </dependency>

    </dependencies>

    <build>
        <finalName>ROOT</finalName>

        <plugins>

            <plugin>
                <artifactId>maven-compiler-plugin</artifactId>
                <version>3.11.0</version>
                <configuration>
                    <source>${java.version}</source>
                    <target>${java.version}</target>
                </configuration>
            </plugin>

            <plugin>
                <groupId>org.apache.maven.plugins</groupId>
                <artifactId>maven-war-plugin</artifactId>
                <version>3.4.0</version>
            </plugin>

        </plugins>
    </build>

</project>
Step 3: Create Database and Table
Create the database and table that will store course information. The CRUD operations performed by the application will be reflected in this table.
CREATE DATABASE course_db;
USE course_db;
CREATE TABLE courses(
id INT PRIMARY KEY AUTO_INCREMENT,
course_name VARCHAR(100),
instructor VARCHAR(100),
email VARCHAR(100)
);
Step 4: Configure Spring MVC
Create a configuration class to enable Spring MVC and configure the JSP View Resolver. This configuration helps Spring locate JSP pages and manage MVC components.
@Configuration
@EnableWebMvc
@ComponentScan(basePackages = {"com.gfg"})
public class AppConfig {

    @Bean
    public InternalResourceViewResolver resolver() {

        InternalResourceViewResolver resolver =
                new InternalResourceViewResolver();

        resolver.setViewClass(JstlView.class);
        resolver.setPrefix("/WEB-INF/views/");
        resolver.setSuffix(".jsp");

        return resolver;
    }
}
Step 5: Configure Dispatcher Servlet
The DispatcherServlet acts as the front controller and handles all incoming requests.
import org.springframework.web.servlet.support.
AbstractAnnotationConfigDispatcherServletInitializer;

public class SpringMvcDispatcherServletInitializer
        extends AbstractAnnotationConfigDispatcherServletInitializer {

    @Override
    protected Class<?>[] getRootConfigClasses() {
        return null;
    }

    @Override
    protected Class<?>[] getServletConfigClasses() {
        return new Class[] { AppConfig.class };
    }

    @Override
    protected String[] getServletMappings() {
        return new String[] { "/" };
    }
}
Step 6: Configure Database(DatabaseConfig.java)
This configuration connects Spring MVC with MySQL using Hibernate and JPA.
@Configuration
@EnableTransactionManagement
public class DatabaseConfig {

    @Bean
    public DataSource dataSource() {

        DriverManagerDataSource ds =
                new DriverManagerDataSource();

        ds.setDriverClassName(
                "com.mysql.cj.jdbc.Driver");

        ds.setUrl(
                "jdbc:mysql://localhost:3306/course_db");

        ds.setUsername("root");
        ds.setPassword("root");

        return ds;
    }

    @Bean
    public LocalContainerEntityManagerFactoryBean
            entityManagerFactory() {

        LocalContainerEntityManagerFactoryBean emf =
                new LocalContainerEntityManagerFactoryBean();

        emf.setDataSource(dataSource());
        emf.setPackagesToScan("com.gfg.model");

        HibernateJpaVendorAdapter adapter =
                new HibernateJpaVendorAdapter();

        emf.setJpaVendorAdapter(adapter);

        Properties props = new Properties();

        props.put("hibernate.dialect",
                "org.hibernate.dialect.MySQL8Dialect");

        props.put("hibernate.show_sql", "true");

        emf.setJpaProperties(props);

        return emf;
    }

    @Bean
    public PlatformTransactionManager
            transactionManager(
            EntityManagerFactory emf) {

        return new JpaTransactionManager(emf);
    }
}
Step 7: Create Model Layer
Create an entity class Course using JPA annotations.
- Use @Entity and @Table
- Define primary key with @Id
- Use Lombok annotations like @Data
import lombok.*;
import javax.persistence.*;

@NoArgsConstructor
@AllArgsConstructor
@Data
@Entity
@Table(name = "courses")
public class Course {
    @Id
    @GeneratedValue(strategy = GenerationType.IDENTITY)
    private Long id;

    @Column(name = "course_name")
    private String courseName;

    @Column(name = "instructor")
    private String instructor;

    @Column(name = "email")
    private String email;
}
Step 8: Create Repository Layer
Create a repository interface extending JpaRepository.
- Extend JpaRepository<Course, Long>
- No implementation required
- Supports CRUD, pagination, and sorting
import com.example.testing_001.model.Course;
import org.springframework.data.jpa.repository.JpaRepository;

@Repository
public interface CourseRepository extends JpaRepository<Course, Long> {

}
Step 9: Create Service Layer
Define service interface and implement it.
- Create CourseService interface
- Implement in CourseServiceImpl
- Use @Service and @Autowired
import com.example.testing_001.model.Course;
import java.util.List;
import org.springframework.data.domain.Page;

public interface CourseService {
    List<Course> getAllCourses();
    void saveCourse(Course course);
    Course getCourseById(long id);
    void deleteCourseById(long id);
    Page<Course> findPaginated(int pageNum, int pageSize,
                               String sortField,
                               String sortDirection);
}
Step 10: Create Service Implemetation(CourseServiceImpl)
The class CourseServiceImpl implements the CourseService interface and provides us with all the CRUD operations logic which is our business logic here.
import com.example.testing_001.model.Course;
import com.example.testing_001.repository.CourseRepository;
import org.springframework.beans.factory.annotation.Autowired;
import org.springframework.data.domain.Page;
import org.springframework.data.domain.PageRequest;
import org.springframework.data.domain.Pageable;
import org.springframework.data.domain.Sort;
import org.springframework.stereotype.Service;

import java.util.List;
import java.util.Optional;

@Service
public class CourseServiceImpl implements CourseService{

    @Autowired
    private CourseRepository courseRepository;

    @Override
    public List<Course> getAllCourses() {
        return courseRepository.findAll();
    }

    @Override
    public void saveCourse(Course course) {
        this.courseRepository.save(course);
    }

    @Override
    public Course getCourseById(long id) {
        Optional<Course> optionalCourse = courseRepository.findById(id);
        Course course = null;
        if (optionalCourse.isPresent()) {
            course = optionalCourse.get();
        } else {
            throw new RuntimeException("Course not found for id : " + id);
        }
        return course;
    }

    @Override
    public void deleteCourseById(long id) {
        this.courseRepository.deleteById(id);
    }

    @Override
    public Page<Course> findPaginated(int pageNum, int pageSize, String sortField, String sortDirection) {
        Sort sort = sortDirection.equalsIgnoreCase(Sort.Direction.ASC.name()) ? Sort.by(sortField).ascending() :
                Sort.by(sortField).descending();

        Pageable pageable = PageRequest.of(pageNum - 1, pageSize, sort);
        return this.courseRepository.findAll(pageable);
    }
}
Step 11: Create Controller Layer
Create a controller class to handle requests.
- Use
@Controllerannotation - Map requests using
@GetMapping,@PostMapping - Use
Modelto pass data
import com.example.testing_001.model.Course;
import com.example.testing_001.service.CourseService;
import org.springframework.beans.factory.annotation.Autowired;
import org.springframework.data.domain.Page;
import org.springframework.stereotype.Controller;
import org.springframework.ui.Model;
import org.springframework.web.bind.annotation.*;

import java.util.List;

@Controller
public class CourseController {

    @Autowired
    private CourseService courseService;

    @GetMapping("/")
    public String viewHomePage(Model model) {
        return findPaginated(1, "courseName", "asc", model);
    }

    @GetMapping("/add")
    public String showNewCourseForm(Model model) {
        Course Course = new Course();
        model.addAttribute("course", Course);
        return "new_course";
    }

    @PostMapping("/save")
    public String saveCourse(@ModelAttribute("course") Course course) {
        // save Course to database
        courseService.saveCourse(course);
        return "redirect:/";
    }

    @GetMapping("/update/{id}")
    public String showFormForUpdate(@PathVariable( value = "id") long id, Model model) {

        Course course = courseService.getCourseById(id);
        model.addAttribute("course", course);
        return "update_course";
    }

    @GetMapping("/delete/{id}")
    public String deleteCourse(@PathVariable (value = "id") long id) {

        this.courseService.deleteCourseById(id);
        return "redirect:/";
    }


    @GetMapping("/page/{pageNo}")
    public String findPaginated(@PathVariable (value = "pageNo") int pageNo,
                                @RequestParam("sortField") String sortField,
                                @RequestParam("sortDir") String sortDir,
                                Model model) {
        int pageSize = 5;

        Page<Course> page = courseService.findPaginated(pageNo, pageSize, sortField, sortDir);
        List<Course> listCourses = page.getContent();

        model.addAttribute("currentPage", pageNo);
        model.addAttribute("totalPages", page.getTotalPages());
        model.addAttribute("totalItems", page.getTotalElements());

        model.addAttribute("sortField", sortField);
        model.addAttribute("sortDir", sortDir);
        model.addAttribute("reverseSortDir", sortDir.equals("asc") ? "desc" : "asc");

        model.addAttribute("listCourses", listCourses);
        return "index";
    }
}
Note: Change the GET mapping for course update and delete course to PUT mapping and DELETE mapping respectively. It is considered best practice to use mappings based on the functionality of the api.
Step 12: Create Thymeleaf Views
Create HTML templates for UI.
- Create pages:
index.html,new_course.html,update_course.html - Use
th:text,th:each,th:href - Implement forms for add/update
Step 13: Create Home page
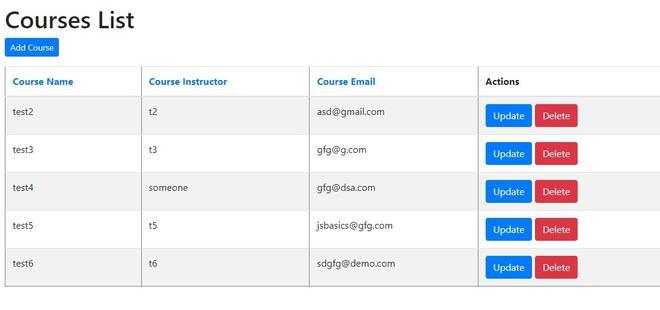
This file displays all available courses.
<!DOCTYPE html>
<html lang="en" xmlns:th="https://www.thymeleaf.org/">
<head>
<meta charset="ISO-8859-1">
<title>Course Tracker</title>
<link rel="stylesheet"
href="https://stackpath.bootstrapcdn.com/bootstrap/4.1.3/css/bootstrap.min.css"
integrity="sha384-MCw98/SFnGE8fJT3GXwEOngsV7Zt27NXFoaoApmYm81iuXoPkFOJwJ8ERdknLPMO"
crossorigin="anonymous">
</head>
<body>
<div class="container my-2">
<h1>Courses List</h1>
<a th:href = "@{/add}" class="btn btn-primary btn-sm mb-3"> Add Course </a>
<table border="1" class = "table table-striped table-responsive-md">
<thead>
<tr>
<th>
<a th:href="@{'/page/' + ${currentPage} + '?sortField=courseName&sortDir=' + ${reverseSortDir}}">
Course Name</a>
</th>
<th>
<a th:href="@{'/page/' + ${currentPage} + '?sortField=instructor&sortDir=' + ${reverseSortDir}}">
Course Instructor</a>
</th>
<th>
<a th:href="@{'/page/' + ${currentPage} + '?sortField=email&sortDir=' + ${reverseSortDir}}">
Course Email</a>
</th>
<th> Actions </th>
</tr>
</thead>
<tbody>
<tr th:each="course : ${listCourses}">
<td th:text="${course.courseName}"></td>
<td th:text="${course.instructor}"></td>
<td th:text="${course.email}"></td>
<td> <a th:href="@{/update/{id}(id=${course.id})}" class="btn btn-primary">Update</a>
<a th:href="@{/delete/{id}(id=${course.id})}" class="btn btn-danger">Delete</a>
</td>
</tr>
</tbody>
</table>
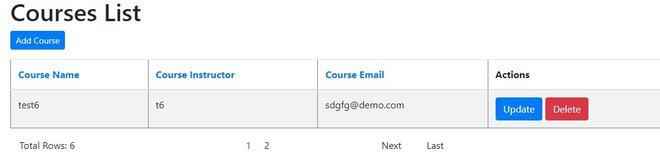
<div th:if = "${totalPages > 1}">
<div class = "row col-sm-10">
<div class = "col-sm-5">
Total Rows: [[${totalItems}]]
</div>
<div class = "col-sm-3">
<span th:each="i: ${#numbers.sequence(1, totalPages)}">
<a th:if="${currentPage != i}" th:href="@{'/page/' + ${i}+ '?sortField=' + ${sortField} + '&sortDir=' + ${sortDir}}">[[${i}]]</a>
<span th:unless="${currentPage != i}">[[${i}]]</span>
</span>
</div>
<div class = "col-sm-1">
<a th:if="${currentPage < totalPages}" th:href="@{'/page/' + ${currentPage + 1}+ '?sortField=' + ${sortField} + '&sortDir=' + ${sortDir}}">Next</a>
<span th:unless="${currentPage < totalPages}">Next</span>
</div>
<div class="col-sm-1">
<a th:if="${currentPage < totalPages}" th:href="@{'/page/' + ${totalPages}+ '?sortField=' + ${sortField} + '&sortDir=' + ${sortDir}}">Last</a>
<span th:unless="${currentPage < totalPages}">Last</span>
</div>
</div>
</div>
</div>
</body>
</html>
Step 14: Create Add course page
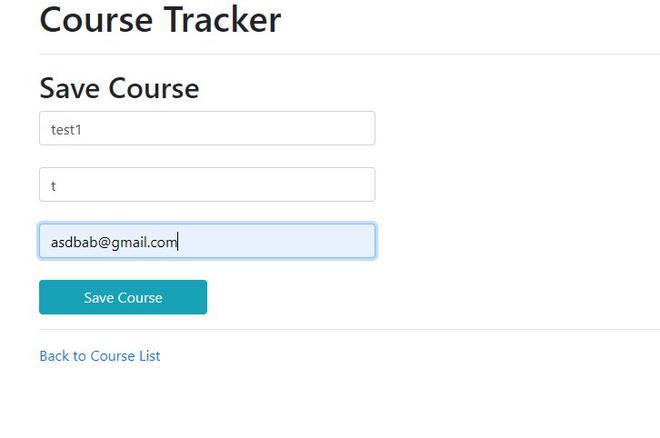
This file provides a form for adding a new course.
<!DOCTYPE html>
<html lang="en" xmlns:th="https://www.thymeleaf.org/">
<head>
    <meta charset="ISO-8859-1">
    <title>Course </title>
    <link rel="stylesheet"
          href="https://stackpath.bootstrapcdn.com/bootstrap/4.1.3/css/bootstrap.min.css"
          integrity="sha384-MCw98/SFnGE8fJT3GXwEOngsV7Zt27NXFoaoApmYm81iuXoPkFOJwJ8ERdknLPMO"
          crossorigin="anonymous">
</head>
<body>
<div class="container">
    <h1>Course Tracker</h1>
    <hr>
    <h2>Save Course</h2>

    <form action="#" th:action="@{/save}" th:object="${course}"
          method="POST">
        <input type="text" th:field="*{courseName}"
               placeholder="Course Name" class="form-control mb-4 col-4">

        <input type="text" th:field="*{instructor}"
               placeholder="Instructor Name" class="form-control mb-4 col-4">

        <input type="text" th:field="*{email}"
               placeholder="Course Email" class="form-control mb-4 col-4">

        <button type="submit" class="btn btn-info col-2"> Save Course</button>
    </form>

    <hr>

    <a th:href = "@{/}"> Back to Course List</a>
</div>
</body>
</html>
Step 15: Create Update course page
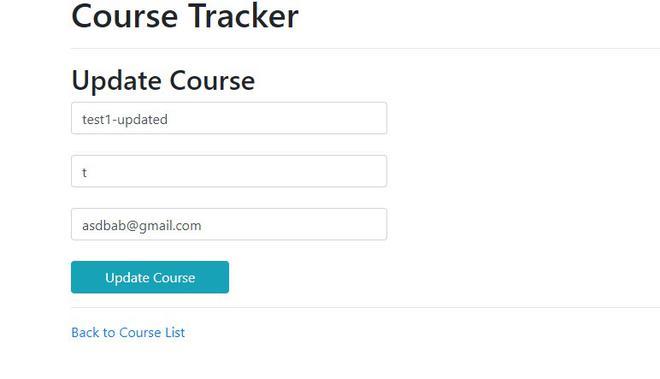
This file provides a form for updating course information.
<!DOCTYPE html>
<html lang="en" xmlns:th="https://www.thymeleaf.org/">
<head>
    <meta charset="ISO-8859-1">
    <title>Course Tracker</title>

    <link rel="stylesheet"
          href="https://stackpath.bootstrapcdn.com/bootstrap/4.1.3/css/bootstrap.min.css">
</head>
<body>
<div class="container">
    <h1>Course Tracker</h1>
    <hr>
    <h2>Update Course</h2>

    <form action="#" th:action="@{/save}" th:object="${course}"
          method="POST">

        <!-- Add hidden form field to handle update -->
        <input type="hidden" th:field="*{id}" />
        <input type="text" th:field="*{courseName}" class="form-control mb-4 col-4" placeholder="Course name">
        <input type="text" th:field="*{instructor}" class="form-control mb-4 col-4" placeholder="Course instructor">
        <input type="text" th:field="*{email}" class="form-control mb-4 col-4" placeholder="Email">
        <button type="submit" class="btn btn-info col-2"> Update Course</button>
    </form>

    <hr>

    <a th:href = "@{/}"> Back to Course List</a>
</div>
</body>
</html>
Step 16: Run the Application
- Right Click Project.
- Select Run As - Run on Server.
- Choose Apache Tomcat Server.
- Click Finish.
Open the browser and access:
http://localhost:8080/CourseManagement/
Output:
1. Creating a course:
2. Reading courses:

3. Updating course:
4. Course updated successfully:

5. Deleting course: