Spring MVC File Upload allows web applications to upload files such as images, PDFs, and documents using the MultipartFile interface. With multipart request support, Spring MVC makes it easy to validate, process, and store uploaded files securely and efficiently.
- Supports uploading single and multiple files using MultipartFile.
- Enables file validation based on size, type, and extension.
- Allows files to be stored on the local file system or external storage.
Prerequisites
- Eclipse IDE (or any other IDE of your choice)
- Apache Maven for dependency management
- Java 11 or higher
- Apache Tomcat 10 or higher (for deploying the application)
Steps to Create a Spring MVC File Uploading Project
Spring MVC framework provides support for CommonsMultipartResolver for uploading any kind of file for a web-based application. Here we will be creating a Spring MVC web application and configuring MultipartResolver to upload files (image) and also show them on the web.
Step 1: Create a Maven Project
- Open STS IDE.
- Click File - New - Maven Project.
- Select Create a simple project (Select archetype ) and click Next.

Then Enter the following details:
- Group Id: com.gfg
- Artifact Id: SpringMVCMultipleViewPage
- Packaging: war
Click Finish.
Step 2: Project Structure
The project structure would look something like this:

Step 3: Add Dependencies in pom.xml
Let's start by adding some dependencies into the pom.xml already created after creating a maven project. The pom.xml defines all the dependencies that maven has to get and manage for you. We are going to add dependencies for Spring MVC, jakarta EE and file upload libraries.
<project xmlns="https://maven.apache.org/POM/4.0.0" xmlns:xsi="https://www.w3.org/2001/XMLSchema-instance"
  xsi:schemaLocation="https://maven.apache.org/POM/4.0.0 https://maven.apache.org/xsd/maven-4.0.0.xsd">
  <modelVersion>4.0.0</modelVersion>

  <groupId>com.gfg</groupId>
  <artifactId>SpringMVCFileUpload</artifactId>
  <version>0.0.1-SNAPSHOT</version>
  <packaging>war</packaging>

  <name>SpringMVCFileUpload Maven Webapp</name>
  <url>http://www.example.com</url>

  <properties>
    <project.build.sourceEncoding>UTF-8</project.build.sourceEncoding>
    <maven.compiler.source>11</maven.compiler.source>
    <maven.compiler.target>11</maven.compiler.target>
  </properties>

  <dependencies>
    <!-- Spring MVC -->
    <dependency>
      <groupId>org.springframework</groupId>
      <artifactId>spring-webmvc</artifactId>
      <version>5.3.23</version>
    </dependency>

    <!-- Jakarta Servlet API -->
    <dependency>
      <groupId>jakarta.servlet</groupId>
      <artifactId>jakarta.servlet-api</artifactId>
      <version>5.0.0</version>
      <scope>provided</scope>
    </dependency>

    <!-- Jakarta JSTL -->
    <dependency>
      <groupId>jakarta.servlet.jsp.jstl</groupId>
      <artifactId>jakarta.servlet.jsp.jstl-api</artifactId>
      <version>2.0.0</version>
    </dependency>

    <!-- Apache Commons FileUpload -->
    <dependency>
      <groupId>commons-fileupload</groupId>
      <artifactId>commons-fileupload</artifactId>
      <version>1.5</version>
    </dependency>

    <!-- Apache Commons IO -->
    <dependency>
      <groupId>commons-io</groupId>
      <artifactId>commons-io</artifactId>
      <version>2.11.0</version>
    </dependency>

    <!-- JUnit for Testing -->
    <dependency>
      <groupId>junit</groupId>
      <artifactId>junit</artifactId>
      <version>4.13.2</version>
      <scope>test</scope>
    </dependency>
  </dependencies>

  <build>
    <finalName>SpringMVCFileUpload</finalName>
    <plugins>
      <plugin>
        <groupId>org.apache.maven.plugins</groupId>
        <artifactId>maven-compiler-plugin</artifactId>
        <version>3.8.1</version>
        <configuration>
          <source>11</source>
          <target>11</target>
        </configuration>
      </plugin>
      <plugin>
        <groupId>org.apache.maven.plugins</groupId>
        <artifactId>maven-war-plugin</artifactId>
        <version>3.3.1</version>
      </plugin>
    </plugins>
  </build>
</project>
Step 4: Configure web.xml
The web.xml file in the WEB-INF folder defines mapping with different URLs and servlets to handle requests for those URLs. In this configuration file, we have used Jakarta EE namespace and configure the DispatcherServlet.
<web-app xmlns="https://jakarta.ee/xml/ns/jakartaee/"
         xmlns:xsi="http://www.w3.org/2001/XMLSchema-instance"
         xsi:schemaLocation="https://jakarta.ee/xml/ns/jakartaee/ https://jakarta.ee/xml/ns/jakartaee/web-app_5_0.xsd"
         version="5.0">

    <display-name>Spring MVC File Upload</display-name>

    <servlet>
        <servlet-name>gfg</servlet-name>
        <servlet-class>org.springframework.web.servlet.DispatcherServlet</servlet-class>
        <init-param>
            <param-name>contextConfigLocation</param-name>
            <param-value>/WEB-INF/gfg-servlet.xml</param-value>
        </init-param>
        <load-on-startup>1</load-on-startup>
        <multipart-config>
            <max-file-size>5242880</max-file-size> <!-- 5 MB -->
            <max-request-size>20971520</max-request-size> <!-- 20 MB -->
            <file-size-threshold>0</file-size-threshold>
        </multipart-config>
    </servlet>

    <servlet-mapping>
        <servlet-name>gfg</servlet-name>
        <url-pattern>/</url-pattern>
    </servlet-mapping>
</web-app>
Step 5: Configure gfg-servlet.xml
The gfg-servlet.xml file, located at src/main/webapp/WEB-INF/gfg-servlet.xml, is the main Spring MVC configuration file. It enables annotation-based controllers, configures the view resolver to locate JSP files, scans components for Spring-managed beans, and maps static resources such as CSS, JavaScript, and images.
- A bean with id as multipartResolver will help in instantiating the CommonsMultipartResolver.
<beans xmlns="http://www.springframework.org/schema/beans"
       xmlns:context="http://www.springframework.org/schema/context"
       xmlns:mvc="http://www.springframework.org/schema/mvc"
       xmlns:xsi="http://www.w3.org/2001/XMLSchema-instance"
       xsi:schemaLocation="
        http://www.springframework.org/schema/beans https://www.springframework.org/schema/beans/spring-beans.xsd
        http://www.springframework.org/schema/mvc https://www.springframework.org/schema/mvc/spring-mvc.xsd
        http://www.springframework.org/schema/context https://www.springframework.org/schema/context/spring-context.xsd">

    <context:component-scan base-package="com.gfg" />
    <mvc:resources mapping="/resources/**" location="/WEB-INF/resources/" cache-period="31556926"/>
    <mvc:annotation-driven />

    <bean class="org.springframework.web.servlet.view.InternalResourceViewResolver">
        <property name="prefix" value="/WEB-INF/views/" />
        <property name="suffix" value=".jsp" />
    </bean>

    <!-- Modern MultipartResolver -->
    <bean id="multipartResolver"
          class="org.springframework.web.multipart.support.StandardServletMultipartResolver"/>
</beans>
Step 6: Create the Controller
The UploadFileController handles file upload requests. The upload() method displays the upload form, while the fileUpload() method receives the uploaded file, saves it to the server, and sends the file name to showupload.jsp using the Model object.
package com.gfg.controller;

import java.io.File;
import java.io.FileOutputStream;
import javax.servlet.http.HttpSession;

import org.springframework.stereotype.Controller;
import org.springframework.ui.Model;
import org.springframework.web.bind.annotation.GetMapping;
import org.springframework.web.bind.annotation.PostMapping;
import org.springframework.web.bind.annotation.RequestParam;
import org.springframework.web.multipart.MultipartFile;

@Controller
public class UploadFileController {

    @GetMapping("/upload")
    public String upload() {
        return "fileform";
    }

    @PostMapping("/uploadfile")
    public String fileUpload(@RequestParam("thisfile") MultipartFile file, HttpSession session, Model model) {
        if (file.isEmpty()) {
            model.addAttribute("message", "Please select a file to upload!");
            return "fileform";
        }

        try {
            String uploadPath = session.getServletContext().getRealPath("/") +
                    "WEB-INF" + File.separator + "resources" + File.separator + "image";
            File dir = new File(uploadPath);
            if (!dir.exists()) dir.mkdirs();

            File serverFile = new File(dir, file.getOriginalFilename());
            try (FileOutputStream fos = new FileOutputStream(serverFile)) {
                fos.write(file.getBytes());
            }

            model.addAttribute("imgName", file.getOriginalFilename());
            model.addAttribute("message", "File uploaded successfully!");

        } catch (Exception e) {
            e.printStackTrace();
            model.addAttribute("message", "File upload failed: " + e.getMessage());
        }

        return "showupload";
    }
}
Step 7: Create JSP Views
The fileform.jsp in the views folder defines the upload form with enctype as multipart/form-data. We've used bootstrap for the proper styling of the page.
<!doctype html>
<html lang="en">
  <head>
    <!-- Required meta tags -->
    <meta charset="utf-8">
    <meta name="viewport" content="width=device-width, initial-scale=1, shrink-to-fit=no">

    <!-- Bootstrap CSS -->
    <link rel="stylesheet" href="https://cdn.jsdelivr.net/npm/bootstrap@4.3.1/dist/css/bootstrap.min.css" integrity="sha384-ggOyR0iXCbMQv3Xipma34MD+dH/1fQ784/j6cY/iJTQUOhcWr7x9JvoRxT2MZw1T" crossorigin="anonymous">

    <title>File uploader</title>
  </head>
  <body>
    <h1>Upload File</h1>
    <form action="uploadfile" method="post" enctype="multipart/form-data">
        <div class="form-group">
          <label for="formFile" class="form-label">Upload Your file</label>
          <input name="thisfile" class="form-control" type="file" id="formFile">
        </div>
        <button class="btn btn-secondary">Upload</button>
    </form>

    <!-- Optional JavaScript -->
    <!-- jQuery first, then Popper.js, then Bootstrap JS -->
    <script src="https://code.jquery.com/jquery-3.3.1.slim.min.js" integrity="sha384-q8i/X+965DzO0rT7abK41JStQIAqVgRVzpbzo5smXKp4YfRvH+8abtTE1Pi6jizo" crossorigin="anonymous"></script>
    <script src="https://cdn.jsdelivr.net/npm/popper.js@1.14.7/dist/umd/popper.min.js" integrity="sha384-UO2eT0CpHqdSJQ6hJty5KVphtPhzWj9WO1clHTMGa3JDZwrnQq4sF86dIHNDz0W1" crossorigin="anonymous"></script>
    <script src="https://cdn.jsdelivr.net/npm/bootstrap@4.3.1/dist/js/bootstrap.min.js" integrity="sha384-JjSmVgyd0p3pXB1rRibZUAYoIIy6OrQ6VrjIEaFf/nJGzIxFDsf4x0xIM+B07jRM" crossorigin="anonymous"></script>
  </body>
</html>
Step 8: Create showupload.jsp
The showupload.jsp page displays the uploaded image using jsp to map the image URL.
<%@ page language="java" contentType="text/html; charset=UTF-8"
    pageEncoding="UTF-8"%>
<%@ taglib prefix="c" uri="http://www.oracle.com/technetwork/java/index.html" %>
<!DOCTYPE html>
<html>
<head>
<meta charset="UTF-8">
<title>Insert title here</title>
</head>
<body>

    <h1>File Uploaded</h1>

    <img src="<c:url value="resources/image/${imgName}"/>"/>
</body>
</html>
Note: Before running the application, you need to manually create a folder named image inside the WEB-INF/resources directory. This folder will be used to store the uploaded files (e.g., images). If the folder does not exist, the application will throw an error when trying to save the uploaded file.
Step 9: Run the Application
- Right-click the project.
- Select Run As - Run on Server.
- Choose Apache Tomcat Server.
- Click Finish.
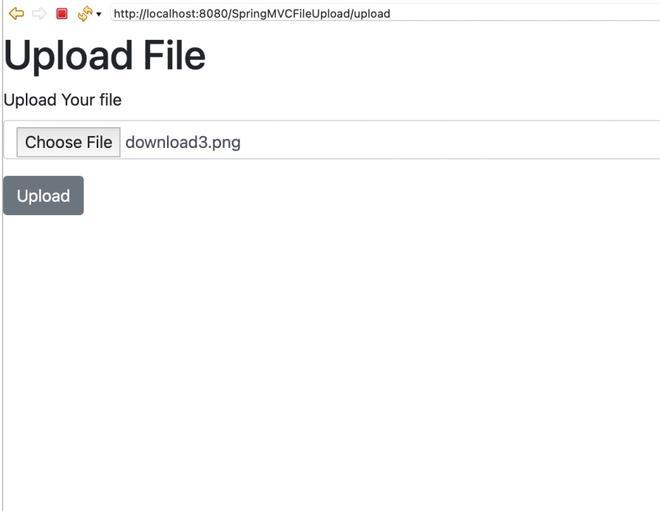
After that use the following URL to run your controller.
http://localhost:8080/SpringMVCFileUpload/upload
Output:

Upload the image and click on upload this will redirect you to the showupload page
Now, you will see your uploaded image.

