







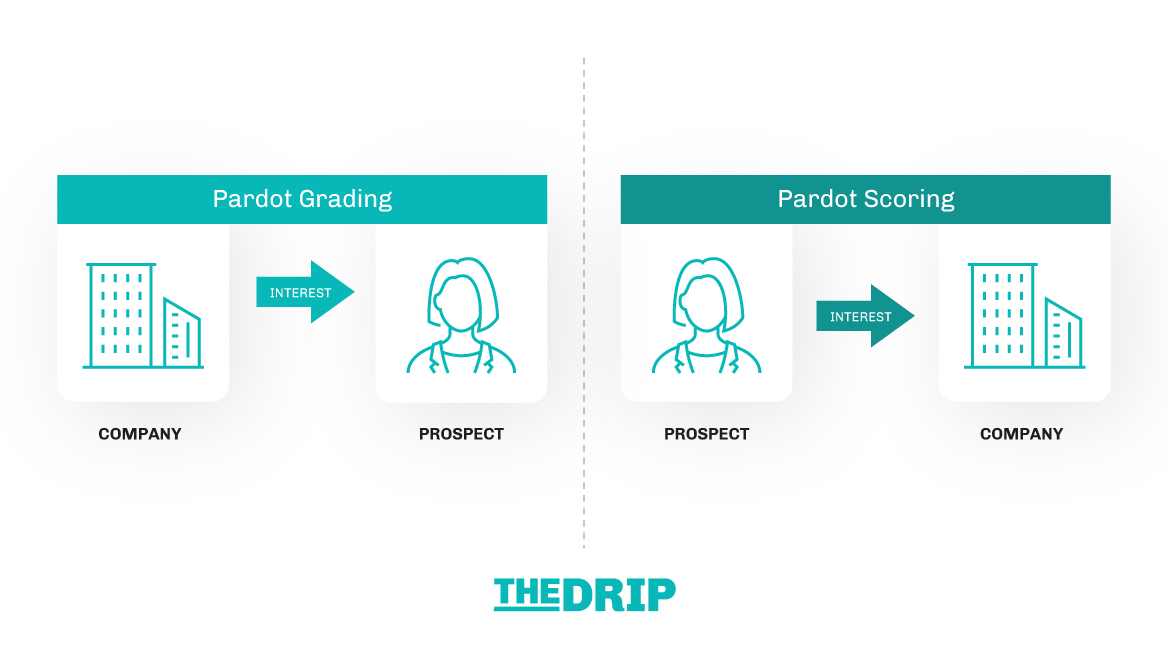
Pardot grading represents how closely a prospect fits your ideal customer profile. Each prospect is assigned a letter grade (A-F) that is calculated by matching their data with your defined ‘ideal’ criteria.
Pardot grade is essential for smarter lead qualification. When set up and used properly, prospect grading can have a big impact across your organization – the trouble is, grading is tricky to get your head around when starting out.
Pardot grading, unlike its counterpart, scoring, does not come set up out-of-the-box. That means you need to do some groundwork. Who you consider an ideal customer is unique to your organization – you have the opportunity to make grading your own!
There are six main parts to setting up and activating this Pardot feature. I will walk you through step-by-step, so you can handle the different moving parts involved.
- Select your grading criteria
- Create your grading criteria matrix
- Set up grading profiles
- Assign prospects to profiles
- Pardot grading automation
- Complete the final checks
1. Select Your Grading Criteria
Each prospect is assigned a letter grade (A-F) that is calculated by matching their data with your defined ‘ideal’ criteria.
You may already know that your product/service is a good fit for accounts with over $100 mil in revenue, or you play in the SMB space, targeting accounts with no more than 100 employees.
The way grading is structured and automated means it can get complicated quickly. I suggest you avoid the temptation to over-engineer grading at the start. Keep your grading framework simple by:
- Selecting 4 or 5 criteria, preferably dropdown, checkbox, or number fields,
- Sticking with one persona (we’ll cover ‘Grading Profiles’ further later),
- Restricting grade adjustments to basic match/no match (also covered later).
Now, think about your model buyer – which pieces of information are used to qualify a sales prospect? Have a conversation with the sales team to garner insight on qualification criteria – but be warned, some organizations have more ‘black-and-white’ criteria, and therefore easier to fit into a grading framework.
Some qualification criteria lean towards ‘gut feel’ – especially within high-touch, high-value products/services – it’s unlikely this qualitative data is captured in prospect fields, and so won’t be able to utilize it for prospect grading.
Feeling overwhelmed? Focus on what you know about a prospect at the top of the funnel – either information that is submitted on forms, or through data enrichment tools (especially for account-level data).
Some popular examples in B2B marketing are:
- Annual revenue
- Location: country or city
- Industry
- Job title, department, or seniority
- Do they belong to a target account?
2. Create Your Grading Criteria Matrix
Next, place your values into a matrix – a table that organizes your criteria, the possible values, and the extent those values match your ideal buyer.
I’ve provided two matrices: a simpler, yes/no match, and another with multiple levels of ‘match’.
Example Matrix 1: Simple (yes/no match)

Example Matrix 2: Advanced (multiple levels of ‘match’)

Sense Check Your Framework
Once you have your values placed into the matrix columns, you need to sense check. This checks that the weightings for each value make sense and will produce sensible results when put into action.
The main purpose is to check what a Pardot would consider an A grade prospect, and whether that aligns with your expectations/perception.
1. Take a blank spreadsheet, and paste one value for each criteria onto separate rows. Leave the first row blank.

2. On the first row, in the next column, put ‘D’. D is the default grade that all prospects begin on before any value matching happens.
3. In the next row down, put the grade for the relevant match strength:
- Strong match = C
- Good match = C-
- Weak match = D+
- No match = D
This is the easiest way to demonstrate how grade increases work. Grades are not restricted to only A, B, C, D, F, but also have + and – versions too, eg. A+, A, A-.
As you can see, a grade can jump one-third of a letter (1/3), two-thirds (2/3), or by a whole letter (1).

Over to you for the next criteria! What is the match strength of your next value? And so, by how much should the grade increase?
Here are some examples below:
- 1st criteria value was a strong match (D → C); 2nd criteria value is a weak match (C→ C+)
- 1st criteria value was a weak match (D → D+); 2nd criteria value is a good match (D+→ C)
- 1st criteria value was a good match (D → C-); 2nd criteria value is a no match (C-, with no change)
Keep increasing the grade for the other criteria. Your sheet would look something like this:

That’s only one example for one individual prospect. Imagine more prospects, repeating this exercise for other criteria combinations. You should pick records from your Salesforce database as real examples – even better if they converted into valuable customers, or have been disqualified. If Pardot grading had been active, would their grade be a good reflection of their quality as a prospect?
3. Set up grading profiles
Now, you have a solid idea about who your model buyer is, and even have the framework mapped out and ready to implement into Pardot.
Profiles in Pardot are the glue that holds grading together – you could think of it as a container to place all your criteria into.
There are two key facts to learn:
- Each prospect has one profile.
- Each profile is made up of multiple criteria, and the grade adjustment for each value.
Warning! Pardot grading profiles are not related to Salesforce profiles – they are totally different concepts, so don’t confuse your Salesforce Admin!
To find your profiles, navigate to: Prospects → Segmentation → Profiles
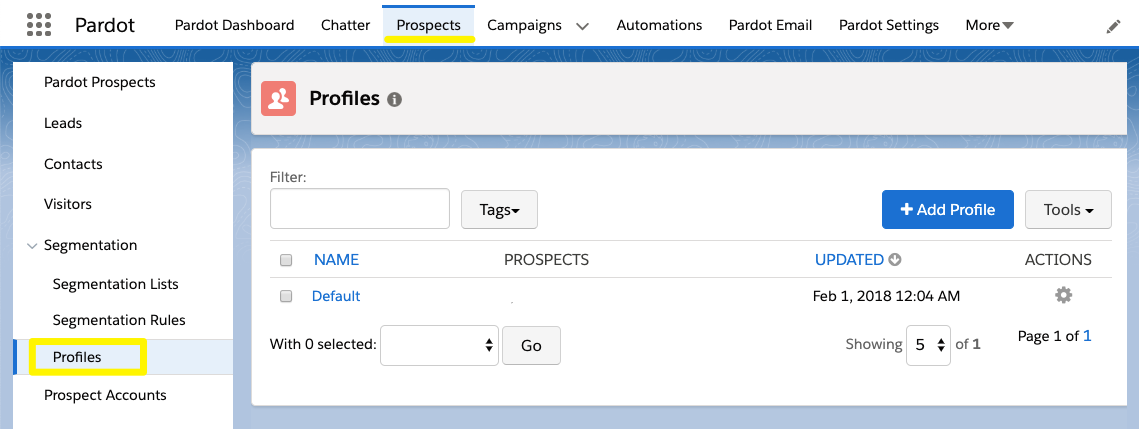
‘Default’ grading profile
Every Pardot account comes with the ‘Default’ profile, which is automatically assigned to any prospects created – if you’ve ever created a prospect manually, you will know that you had to select this as a required field.
Plan grade adjustments
Take the matrix from earlier and clear all the values.

Then in each of the columns:
- ‘Strong match’ enter ‘1’
- ‘Good match’ enter ‘2/3’
- ‘Weak match’ enter ‘1/3’
- ‘No match’ enter ‘not known’
It will look like the image below. Note that if you chose to use the simple matrix in, then your table will only include ‘strong match’ and ‘no match’ columns:

Create a Pardot profile
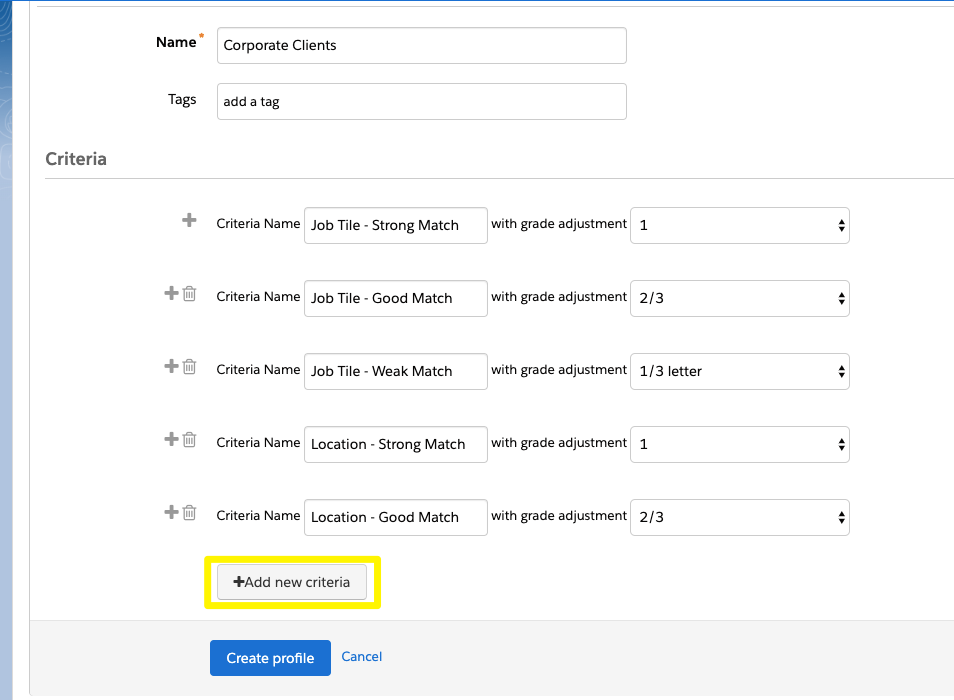
Create a new profile in Pardot, and name it accordingly, eg. “Corporate clients”.
Scroll to the ‘criteria’ section where you will find two boxes: ‘Criteria Name’ and ‘with grade adjustment’. Do the following for each box in your grading criteria matrix:
- Criteria name = name of criteria + match strength; eg. Job Tile – Strong Match
- with grade adjustment = select number in the box from the dropdown; eg. 1
Repeat this for all the boxes you need by clicking ‘+ Add new criteria’. Ignore the ‘No Match’ column. You will end up with something like this:
4. Assign Prospects to Profiles
Remember that each prospect can belong to only one profile. At the same time, I mentioned that every Pardot account comes with a ‘Default’ grading profile, which prospects will be assigned to.
Your job now is to segment and reassign any prospects who should belong to your newly created profile/s. There are a number of ways to do this:
- Manually, by editing the individual prospect’s record (I recommend this initially, for testing).
- With automation, by using automation rules to ‘Assign Prospect to Profile’ based on certain criteria, or by mass import.
If you change a prospect’s profile at this stage, nothing will happen! The grade won’t adjust because a) we haven’t told Pardot which field values to look for, and b) there’s nothing powering the adjustments. This is where automation rules come into power-up profiles…
5. Pardot Grading Automation
Think of automation rules as the instructions Pardot can use to adjust prospect grading.
Multiple automation rules are required to power a grading profile. Account organization, such as naming conventions, goes a long way in keeping your grading machine running smoothly (your future self will thank you when changes are required!)
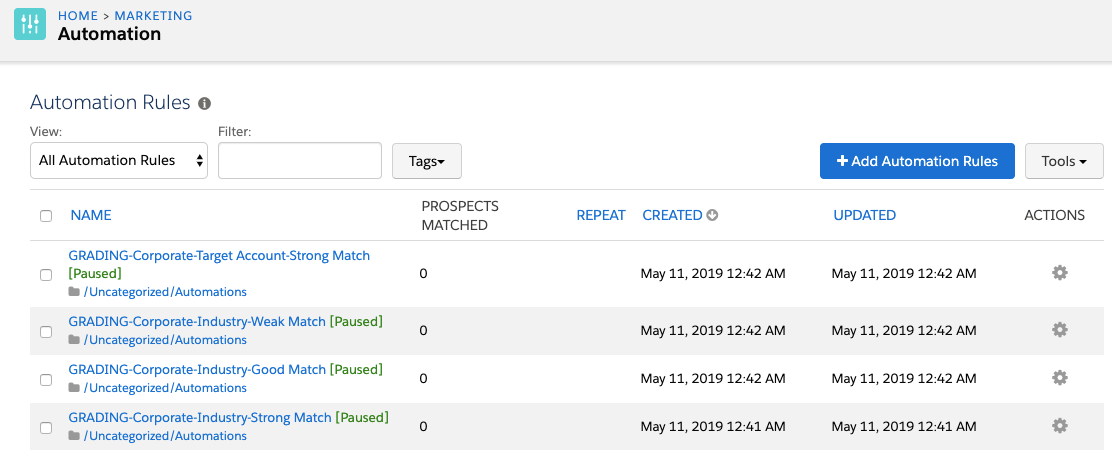
I recommend structuring rule names like:
GRADING-[name of profile]-[name of criteria]-[match level]
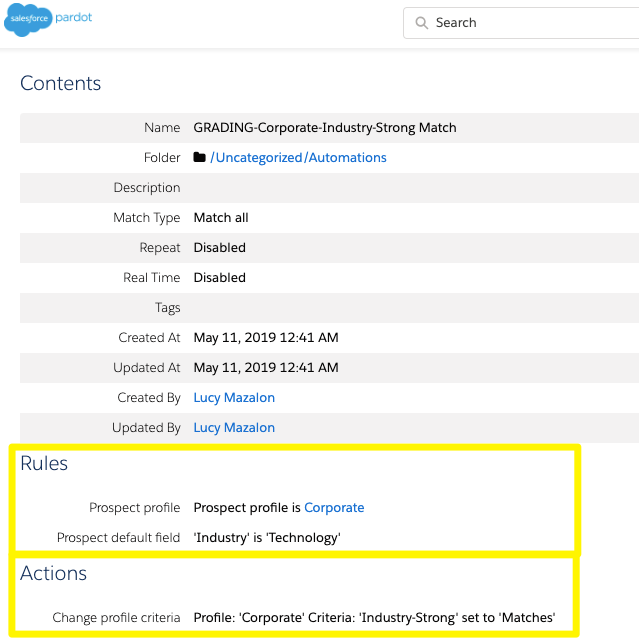
Example: GRADING-Corporate-Industry-Strong Match
Tell Pardot which prospects
First, we tell Pardot which prospects should be included in the automation – in other words:
- Include prospects who are assigned to the specific grading profile,
- And include prospects whose field value/s fit the criteria.
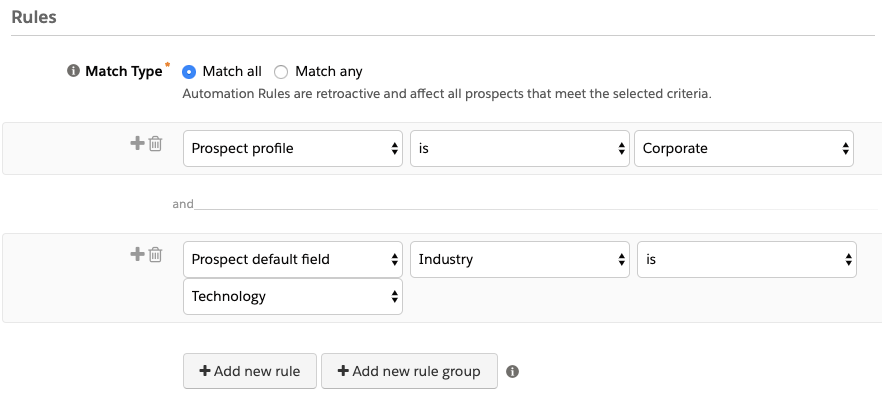
Let’s put that into play. In the ‘Rules’ section:
- Set the match type to: Match all
- Add a new rule: “Prospect profile” — is — [name of your profile]
- Add a new rule: [name of criteria] — is — [list of your criteria values]
I’m going to show this in a working example. The table below could look similar to the grading criteria matrix you built. In my example, I have chosen two criteria: industry, and whether the prospect is part of a target account.
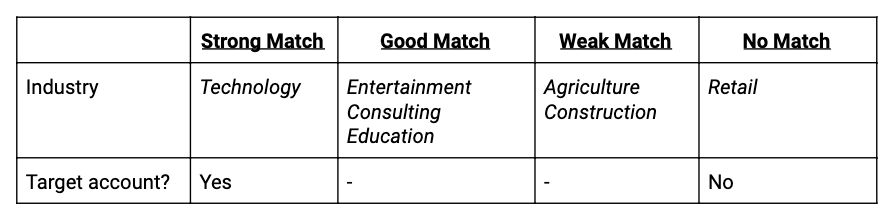
My first automation rule for the Industry field, called “GRADING-Corporate-Industry-Strong Match” would have two rules:
- Search for prospects who are assigned to the “Corporate clients” grading profile,
- And prospects whose Industry is “technology” (a strong match).
Tell Pardot which action to take
Next, we tell Pardot which action to take regarding the prospect’s grade – which profile criteria to increase, and how much by. Luckily, this is already set up on the grading profile itself, however, we need to add this fuel to the grading machine.
In the actions section:
- Select “Change profile criteria” — [name of your profile] — [name of criteria] — Matches

Automation to reset grades
There are more actions to add, to ensure that we are appropriately resetting the grade if a prospect’s field value changes.
Example: one day a prospect has an Industry value of ‘Manufacturing’, which you have defined as a strong match. Tomorrow, their industry is updated to ‘Recruitment’ which you have defined as a good match.
To prevent grade increases from stacking up on top of each other, you need to tell Pardot that all the other matches should be set to ‘not known’.
This means that you end up with multiple actions on your automation rule – the table below outlines all the combinations:
| When the value is… ↓ | Strong Profile Criteria | Good Profile Criteria | Weak Profile Criteria |
|---|---|---|---|
| A strong match | ‘matches’ | ‘Not known’ | ‘Not known’ |
| A good match | ‘Not known’ | ‘matches’ | ‘Not known’ |
| A weak match | ‘Not known’ | ‘Not known’ | ‘matches’ |
| Has no value | ‘Not known’ | ‘Not known’ | ‘Not known’ |
Add these to the “Actions” section of your automation rule:

Don’t forget to add one automation rule that will reset everything if the Industry field value is cleared completely!

As you probably know already, automation rules are saved in a paused mode – but don’t activate your rule just yet! We will do that in the next section after running some final checks.
Repeat these rule creation steps for every criteria and level of match you have. You will end up with a list of rules similar to this:
“Does not match” automation rules
You may notice the “Does not match” option when constructing automation actions. “Does not match” will decrease the grade, thereby making a big statement about disqualification. If it’s easier to describe what a disqualified lead looks like (than the characteristics of a qualified lead), this is an interesting, alternative route for you to take with your grading profiles.
6. Complete the Final Checks
As you probably know already, automation rules are saved in a paused mode, giving you the chance to preview what data the rule would locate and update if it was activated.
- When copying multiple rules, it’s easy to make mistakes. Check each one of your rules carefully, or risk some bizarre results!
- Refer back to the ‘sense checking’ exercise once more for peace of mind.
- Never run an automation rule without previewing it first.
Finally, once you are satisfied, ‘resume’ each of your automation rules, and watch your grades populate magically.
Summary
Now you have Pardot grading up and running, you can report on how closely a prospect fits your ideal customer profile, thanks to their assigned letter grade.
Luckily for you, you have not only set up the framework yourself, but you understand each moving part, and have nice documentation to accompany the Pardot setup! Now when anyone across your organization, such as the sales team, asks what Pardot grade means, you have diagrams that explain what it means to be an “A-grade” prospect, etc.
Next, you can check out how to track and communicate prospect grades by building a grading dashboard in Salesforce.






Comments: