


Smart home gadgets are perfect for those who want more convenience when micromanaging and automating every aspect of their living space. Thanks to a host of affordable smart home appliances flooding the market, you don’t have to shell out thousands of dollars just to outfit your house with smart peripherals.
Sadly, the extra choice can serve as a double-edged sword, as you may need to install a multitude of apps to fine-tune all your smart home devices. But if you’re a proud owner of a Raspberry Pi, you can easily turn the SBC into a hub capable of controlling and automating all your smart gadgets.
What you’ll need
The Raspberry Pi will serve as the core of the project, and you’ll need a capable board if you’re planning to run automation scripts and install multiple add-ons for all smart home peripherals. I’ve used a Raspberry Pi 5 for the tutorial because Home Assistant, the tool featured in this project, has an OS image created specifically for the SBC. But you can go as low as a Raspberry Pi 3 if you don’t mind a slightly slower experience.
The next requirement is a microSD card, where you’ll store the operating system alongside the add-ons, scripts, and any media (like images or videos) captured by your devices. As such, I recommend grabbing one with at least 16GB of storage space. Also, you’ll have to connect your Raspberry Pi to a router, and I advise using an Ethernet connection over Wi-Fi for optimal performance.
-
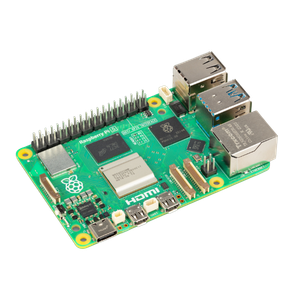
Raspberry Pi 5
- CPU
- Arm Cortex-A76 (quad-core, 2.4GHz)
- Memory
- Up to 8GB LPDDR4X SDRAM
- Operating System
- Raspberry Pi OS (official)
- Ports
- 2× USB 3.0, 2× USB 2.0, Ethernet, 2x micro HDMI, 2× 4-lane MIPI transceivers, PCIe Gen 2.0 interface, USB-C, 40-pin GPIO header
- GPU
- VideoCore VII
- Starting Price
- $60
-

Installing the Home Assistant OS
Once you’ve gathered the necessary components, it’s time to install Home Assistant on your Raspberry Pi. There are a handful of ways to do so, including setting it up on top of an existing operating system. However, it’s better to install the Home Assistant image on a new microSD card using the official Raspberry Pi Imager tool.
- Download Raspberry Pi Imager from the official website and install it on your PC.
- Run the tool as an administrator.
-
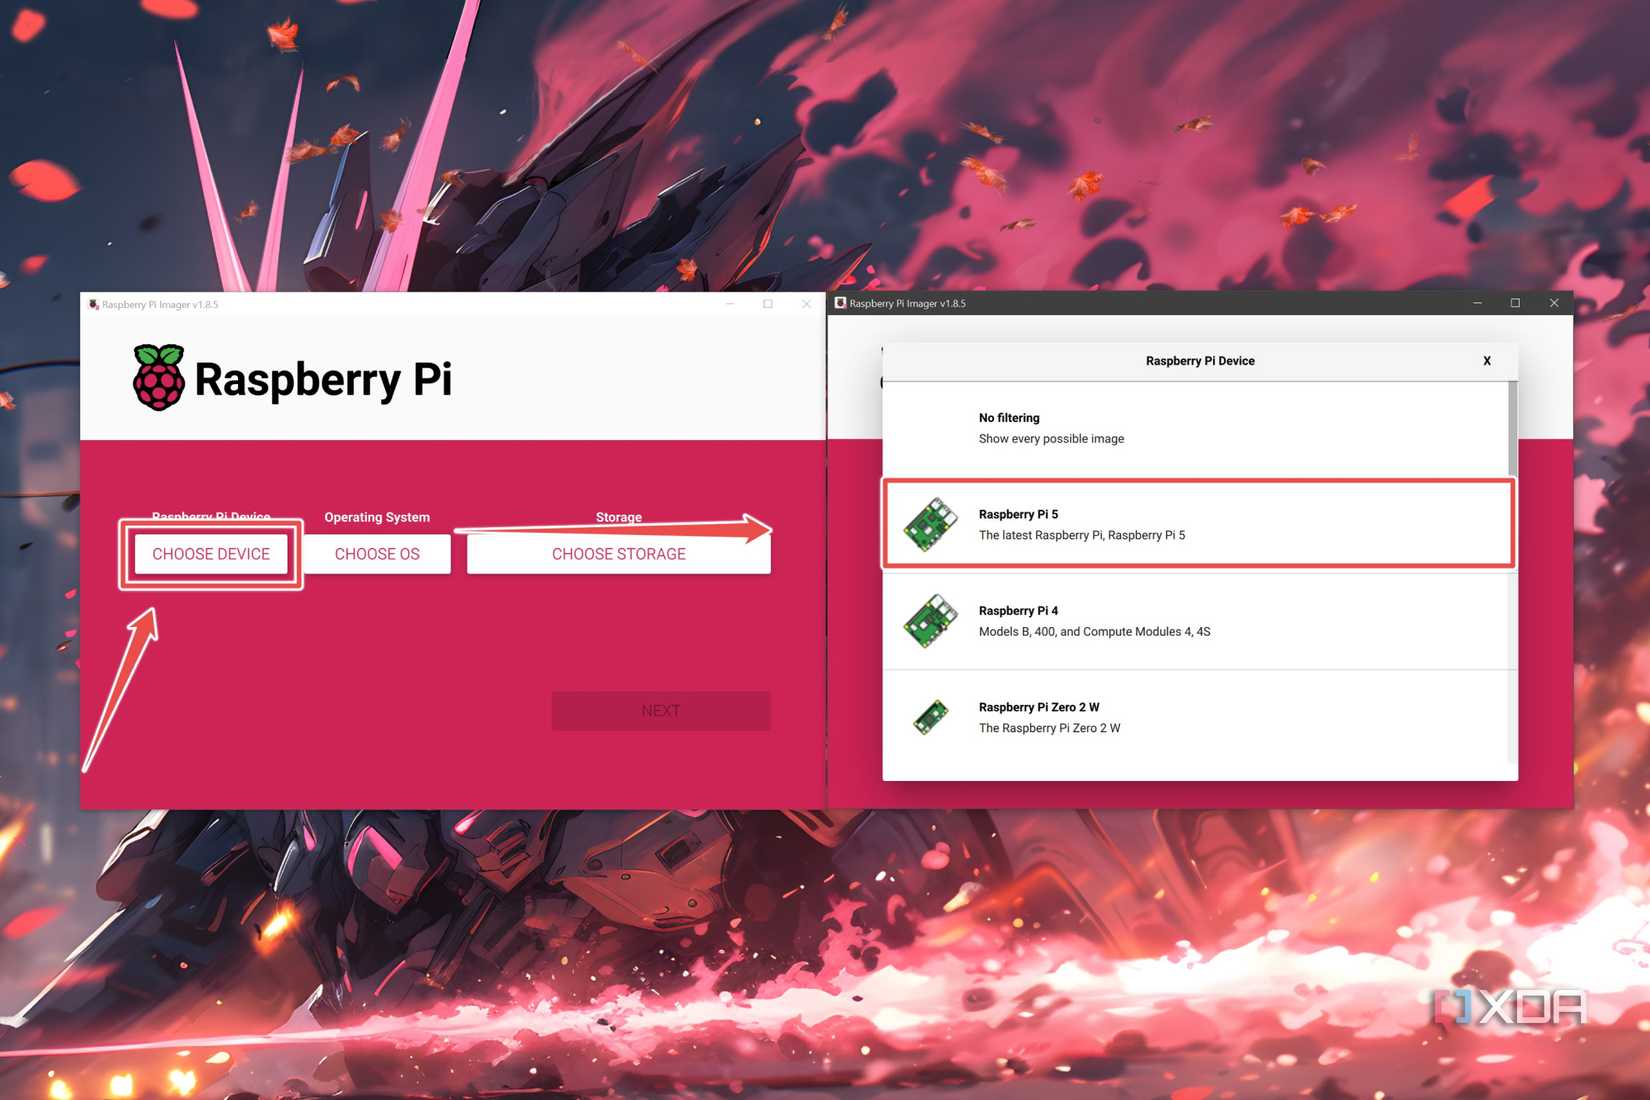
Press the Choose Device option and pick your Raspberry Pi board.
-
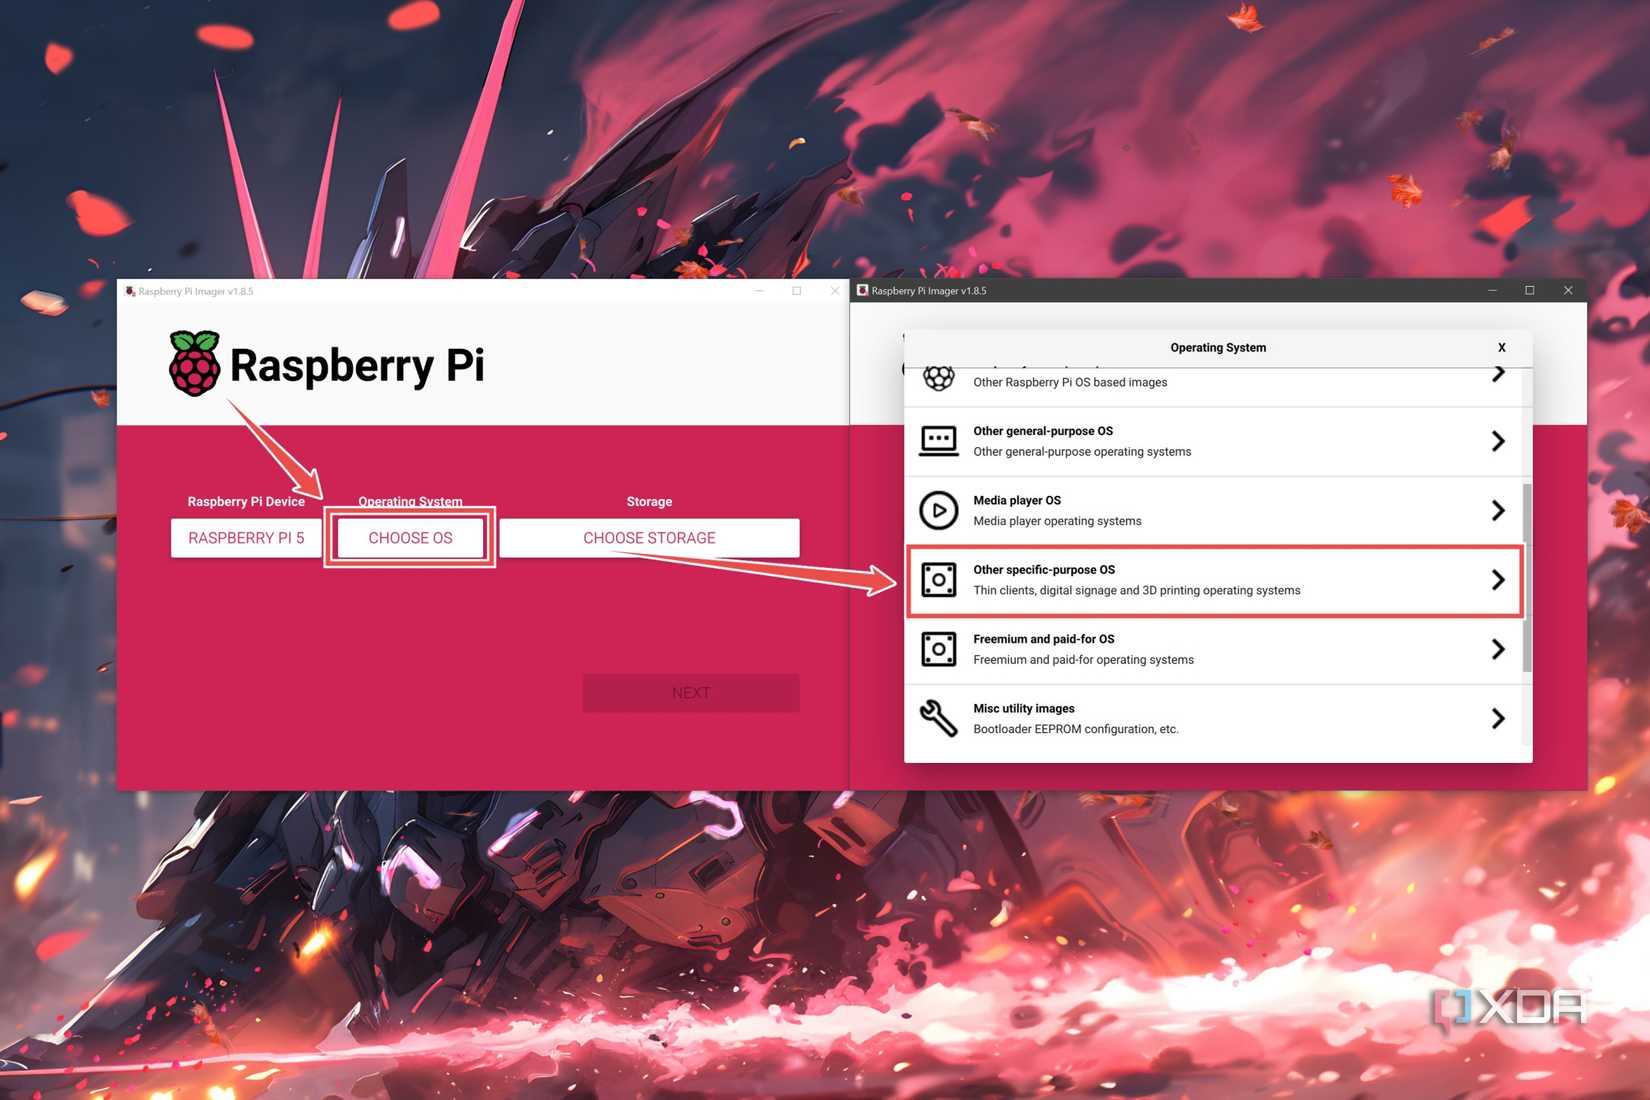
Click on Choose OS and head to the Other specific-purpose OS tab.
-
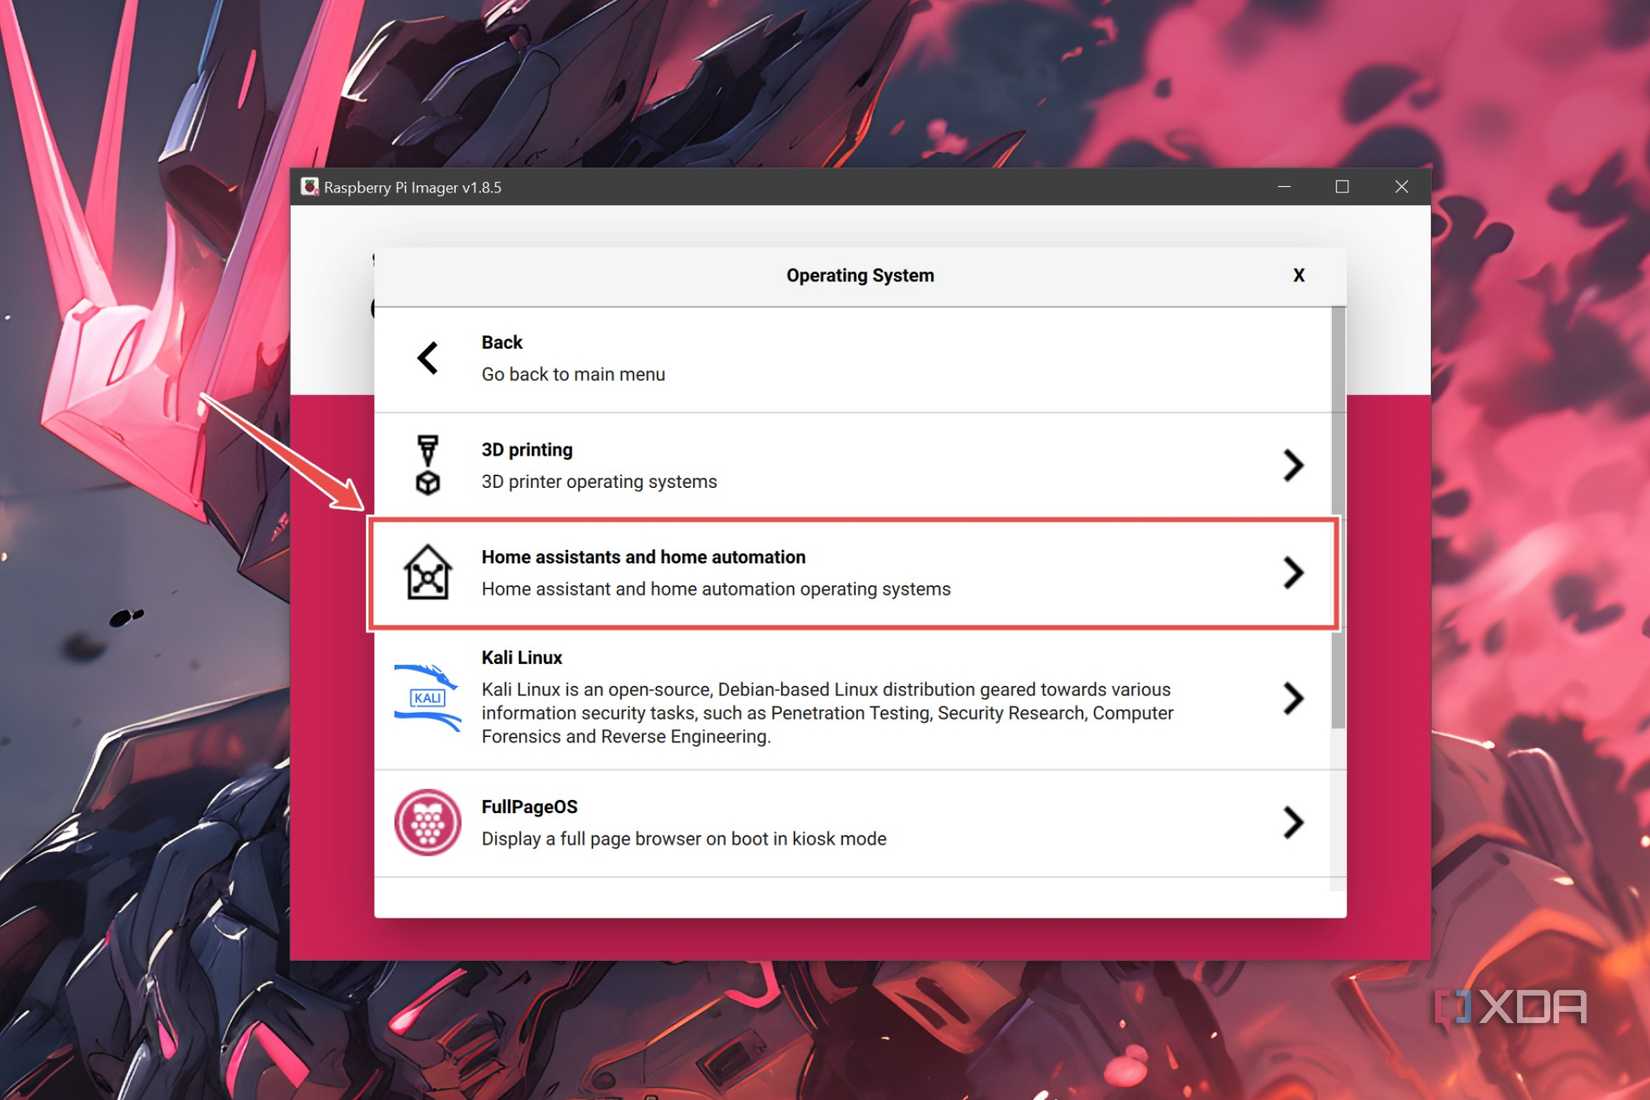
Select Home assistants and home automation.
-
Click on Home Assistant, and choose the latest version of the OS.

-
Select the Choose Storage setting, pick your microSD card, and hit Next.

-
Hit Yes when Raspberry Pi Imager prompts for confirmation before waiting for the tool to finish writing the OS files.


Connecting to the Home Assistant web UI
When the Raspberry Pi Imager wraps up the OS installation, you’re free to launch the Home Assistant web interface.
- Insert your microSD card into the Raspberry Pi, plug in the Ethernet and power cables into the SBC, and wait a few minutes for it to start the Home Assistant server.
-
Switch to your PC and paste the following URL into the Search Bar of your favorite web browser.
http://homeassistant.local:8123/

-
Once the server loads, click on the Create My Smart Home button.

-
Enter your Name, Username, and Password before tapping Create Account.

-
Type your geographical location in the Search Bar and hit Next.

-
Home Assistant will prompt you to share your data
Don’t worry, you can choose to keep your data private by leaving the options disabled and clicking Next.

-
Finally, press Finish to enter the Dashboard.


Adding your smart devices and integrations
During the initial startup, Home Assistant tries to locate your smart devices. However, since the OS may not detect all your gadgets, you may need to manually add them using the web UI.
-
Navigate to the Settings tab and click on Devices & services.

-
Inside the Device tab, select the Add Device button.

- While the exact procedure varies depending on the services and device, local gadgets require you to enter the IP address, port number, and/or Device ID. On the other hand, online services require you to add your login credentials.
- Repeat the last two steps for integration, except, everything has to be done on the Integration tab instead of the Devices section.
-
Once you’re done, you can click on the Submit button to add the device or integration to the Dashboard.


Installing add-ons
On its own, Home Assistant is a useful tool, but you can increase its utility to the next level by setting up first and third-party add-ons.
-
Head back to the Settings tab and click on Add-ons.

-
Enter the Add-on Store.

-
Select the add-on that you wish to download and click on the Install button.
We’ll go with motionEye, the OS/application we used when turning the Raspberry Pi into a surveillance system.

-
Once Home Assistant has finished the installation, click on the Start button to launch the add-on.


If you want to access other, experimental add-ons,
-
Click on the User Profile.

- Enable the toggle next to Advanced mode under the User settings section.

Automating your Home Assistant server
A tutorial on Home Assistant would be incomplete without automating your smart gadgets. One of the best aspects of Home Assistant is that it provides both an intuitive GUI and a more complex scripting approach to home automation. For the simple method,
-
Go back to Settings and select the Automations & scenes option.

-
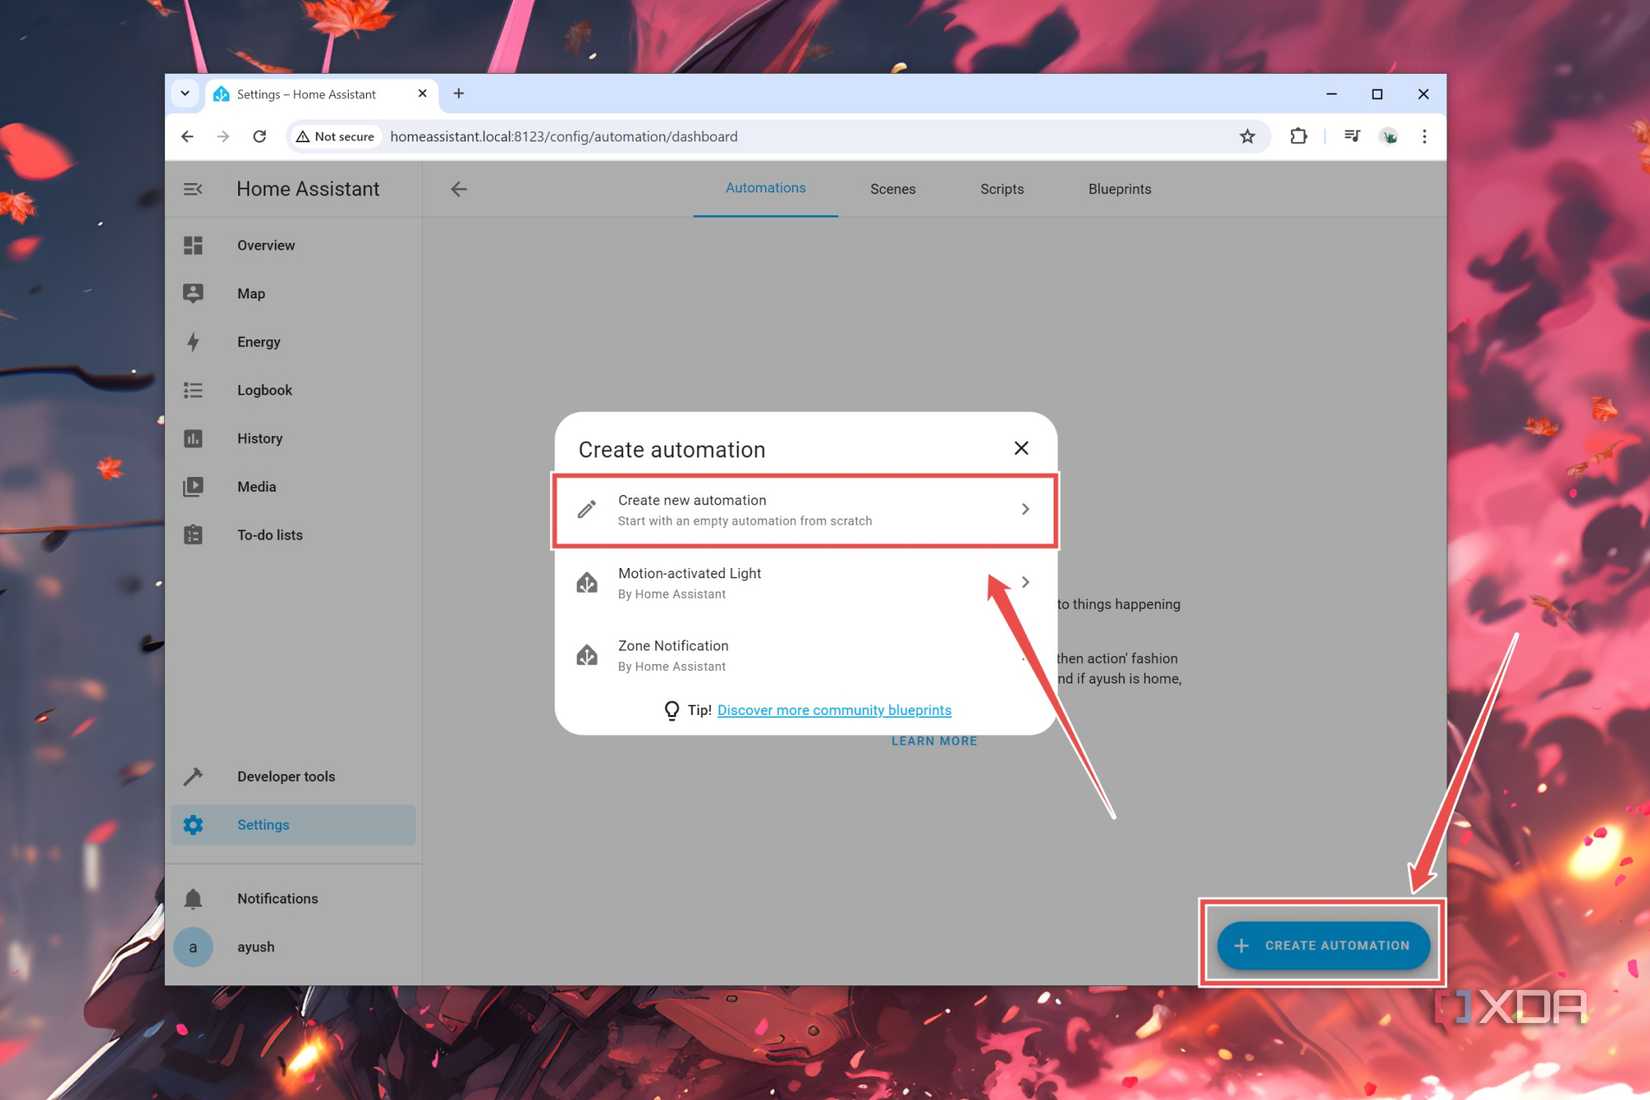
Press the Create Automation button and click on Create new automation.
-
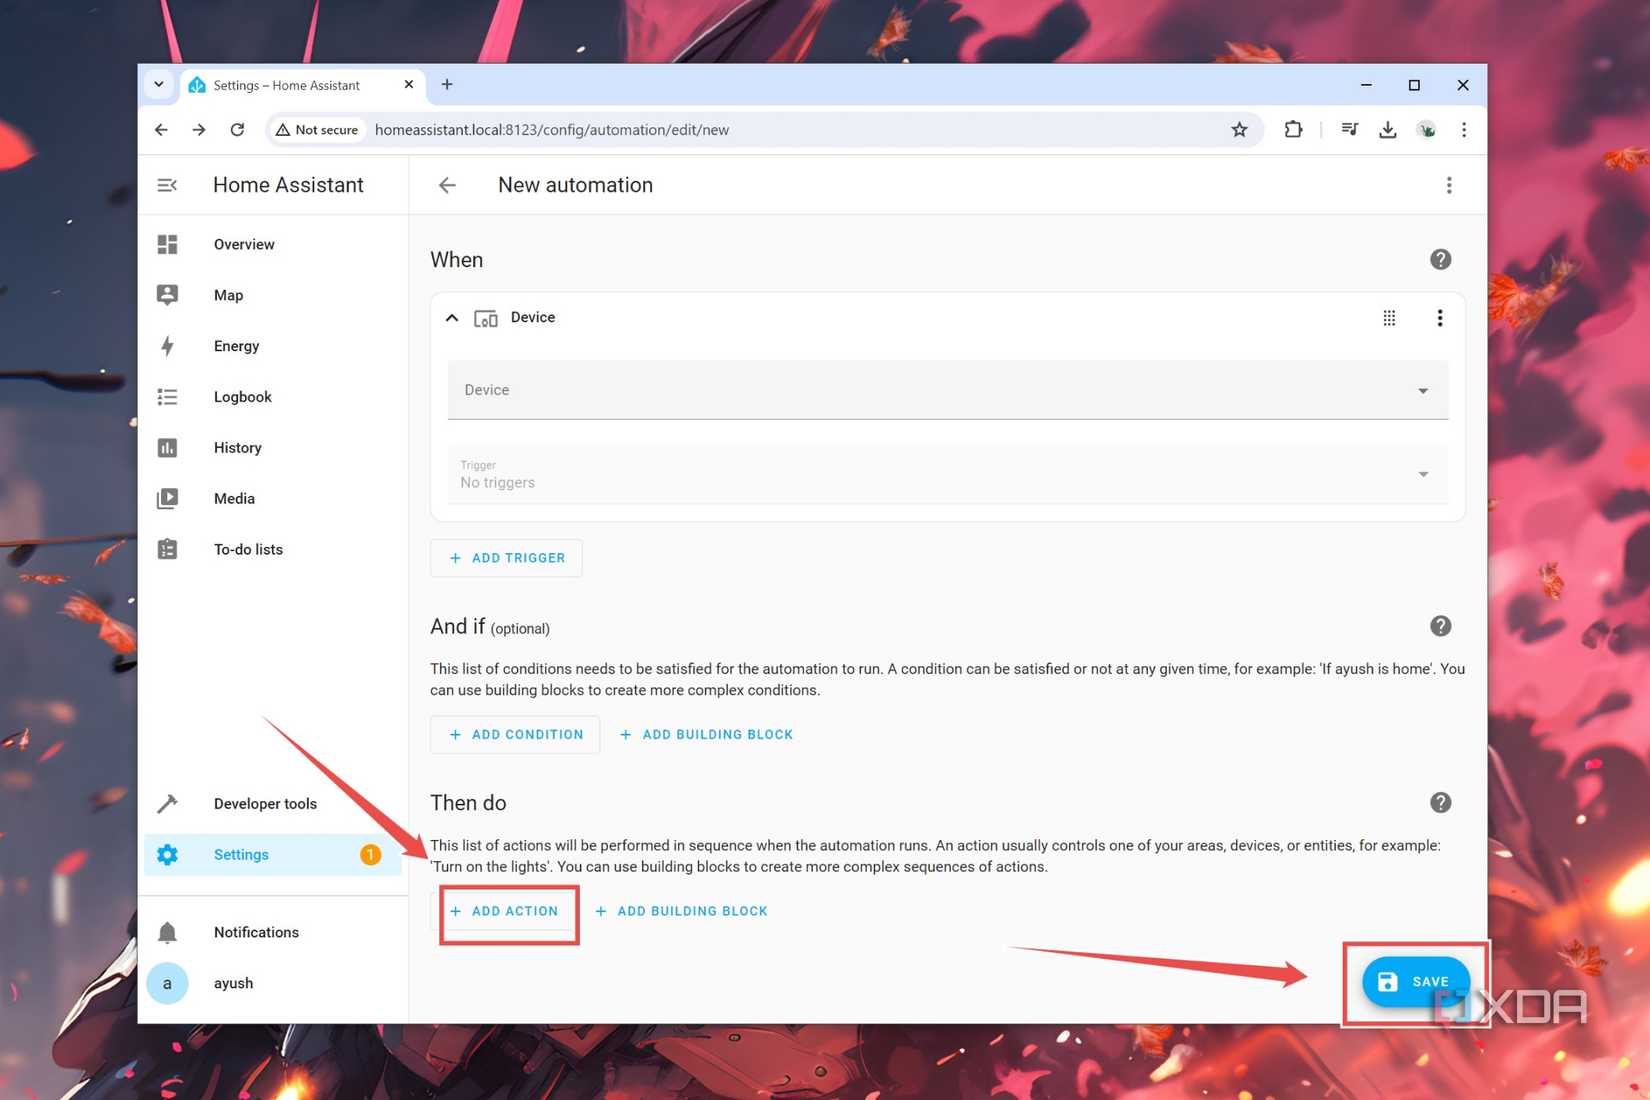
Add the Device and Action under the When header that will serve as the trigger event to execute the automation command.

-
Finally, choose the Action that Home Automation will perform after detecting the trigger condition and hit Save.
-
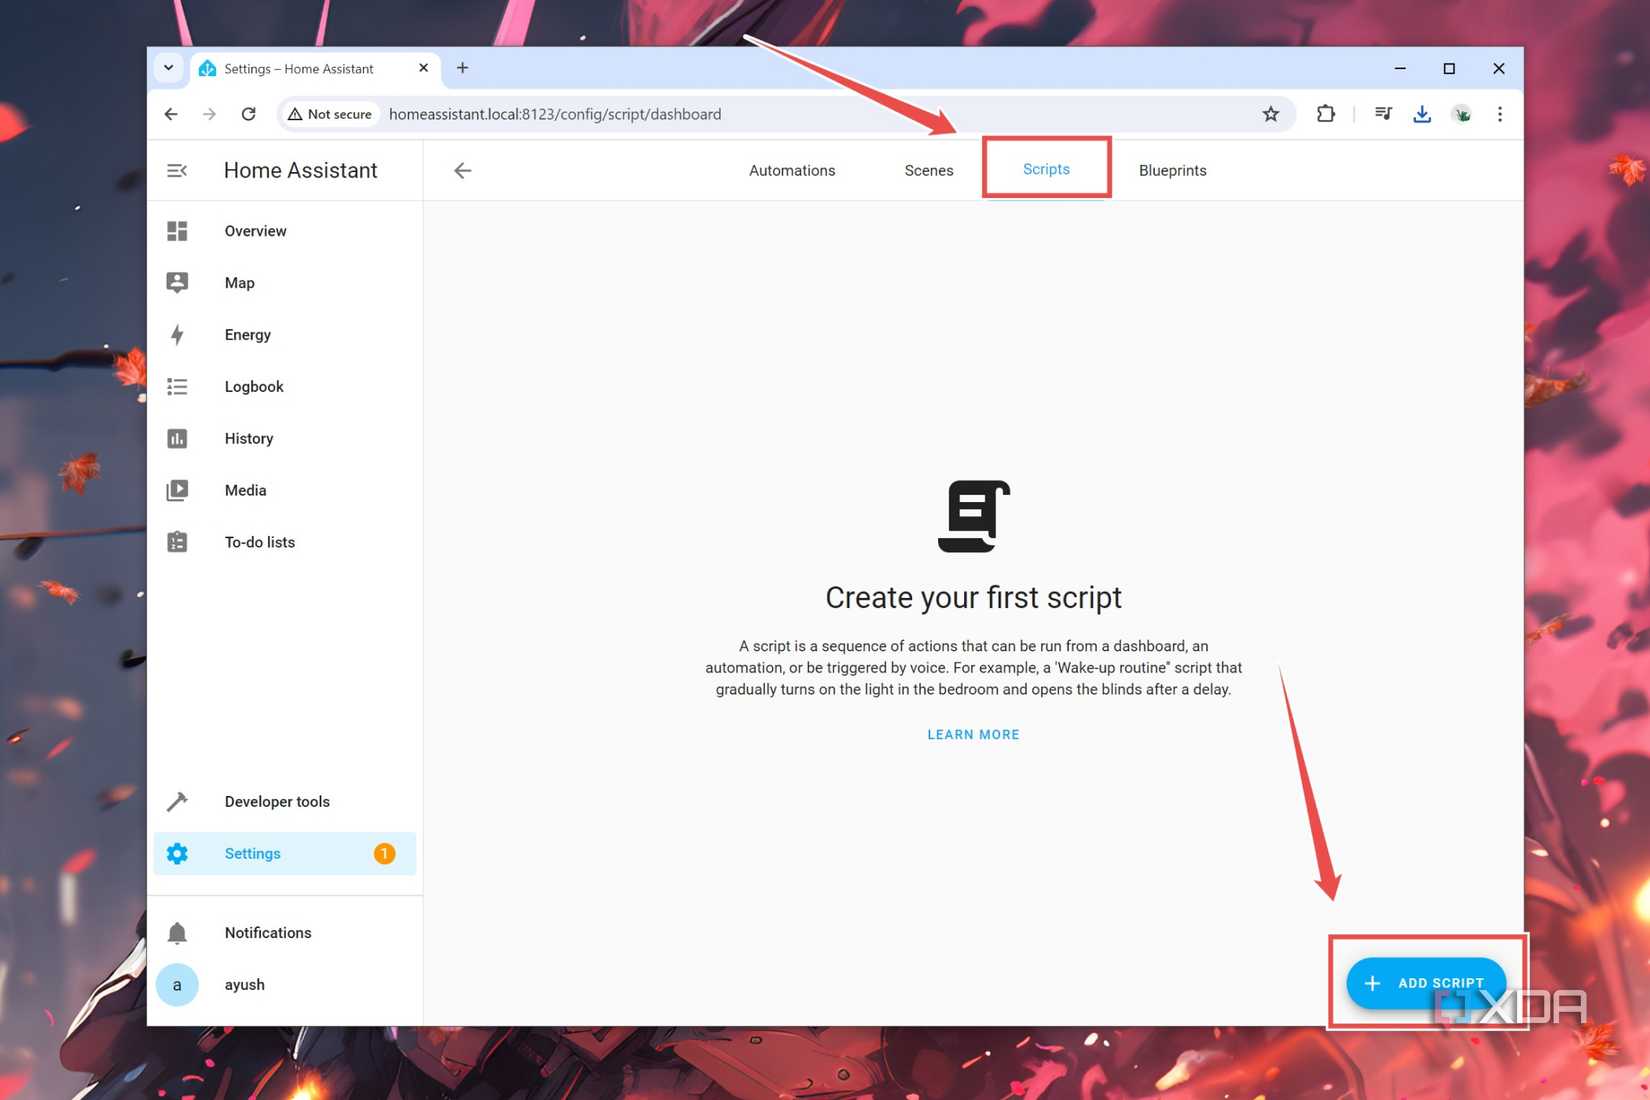
Alternatively, if you’re into programming, you might want to add some automation codes to Home Assistant by heading into the Scripts panel and clicking on the Add Script button.


Turning your home into an automation paradise with the Raspberry Pi

Besides these settings, there are tons of other functionalities you can incorporate into your Raspberry Pi-powered Home Assistant server. For add-ons, I recommend installing the Assistant Microphone to run voice commands by connecting a mic to the Raspberry Pi. Duck DNS and Ngnix Proxy Manager are pretty useful if you wish to access your devices from another network.
Besides home automation, you can design a number of interesting projects with your Raspberry Pi, including a time-lapse camera, web server, or even a full-fledged weather station.
