


📌 学习目标
- 掌握通过切换列表过滤符号的实现方法
- 理解相关API的使用
- 能够独立完成类似功能开发
🎯 核心概念
通过切换列表过滤符号。
💻 完 整 代 码
<!DOCTYPE html>
<html lang="en">
<head>
    <title>Filter symbols by toggling a list</title>
    <meta property="og:description" content="根据数据中的属性值过滤一组符号。" />
    <meta property="og:created" content="2006-06-25" />
    <meta charset='utf-8'>
    <meta name="viewport" content="width=device-width, initial-scale=1">
    <link rel='stylesheet' href='https://unpkg.com/maplibre-gl@5.24.0/dist/maplibre-gl.css' />
    <script src='https://unpkg.com/maplibre-gl@5.24.0/dist/maplibre-gl.js'></script>
    <style>
        body { margin: 0; padding: 0; }
        html, body, #map { height: 100%; }
    </style>
</head>
<body>
<style>
    .filter-group {
        font: 12px/20px 'Helvetica Neue', Arial, Helvetica, sans-serif;
        font-weight: 600;
        position: absolute;
        top: 10px;
        right: 10px;
        z-index: 1;
        border-radius: 3px;
        width: 120px;
        color: #fff;
    }

    .filter-group input[type='checkbox']:first-child + label {
        border-radius: 3px 3px 0 0;
    }

    .filter-group label:last-child {
        border-radius: 0 0 3px 3px;
        border: none;
    }

    .filter-group input[type='checkbox'] {
        display: none;
    }

    .filter-group input[type='checkbox'] + label {
        background-color: #3386c0;
        display: block;
        cursor: pointer;
        padding: 10px;
        border-bottom: 1px solid rgba(0, 0, 0, 0.25);
    }

    .filter-group input[type='checkbox'] + label {
        background-color: #3386c0;
        text-transform: capitalize;
    }

    .filter-group input[type='checkbox'] + label:hover,
    .filter-group input[type='checkbox']:checked + label {
        background-color: #4ea0da;
    }

    .filter-group input[type='checkbox']:checked + label:before {
        content: '✔';
        margin-right: 5px;
    }
</style>
<div id="map"></div>
<nav id="filter-group" class="filter-group"></nav>

<script>
    const places = {
        'type': 'FeatureCollection',
        'features': [
            {
                'type': 'Feature',
                'properties': {
                    'icon': 'theatre'
                },
                'geometry': {
                    'type': 'Point',
                    'coordinates': [-77.038659, 38.931567]
                }
            },
            {
                'type': 'Feature',
                'properties': {
                    'icon': 'theatre'
                },
                'geometry': {
                    'type': 'Point',
                    'coordinates': [-77.003168, 38.894651]
                }
            },
            {
                'type': 'Feature',
                'properties': {
                    'icon': 'bar'
                },
                'geometry': {
                    'type': 'Point',
                    'coordinates': [-77.090372, 38.881189]
                }
            },
            {
                'type': 'Feature',
                'properties': {
                    'icon': 'bicycle'
                },
                'geometry': {
                    'type': 'Point',
                    'coordinates': [-77.052477, 38.943951]
                }
            },
            {
                'type': 'Feature',
                'properties': {
                    'icon': 'music'
                },
                'geometry': {
                    'type': 'Point',
                    'coordinates': [-77.031706, 38.914581]
                }
            },
            {
                'type': 'Feature',
                'properties': {
                    'icon': 'music'
                },
                'geometry': {
                    'type': 'Point',
                    'coordinates': [-77.020945, 38.878241]
                }
            },
            {
                'type': 'Feature',
                'properties': {
                    'icon': 'music'
                },
                'geometry': {
                    'type': 'Point',
                    'coordinates': [-77.007481, 38.876516]
                }
            }
        ]
    };

    const filterGroup = document.getElementById('filter-group');
    const map = new maplibregl.Map({
        container: 'map',
        style: 'https://tiles.openfreemap.org/styles/bright',
        center: [-77.04, 38.907],
        zoom: 11.15
    });

    map.on('load', () => {
        // 添加包含地点坐标和信息的GeoJSON源。
        map.addSource('places', {
            'type': 'geojson',
            'data': places
        });

        places.features.forEach((feature) => {
            const symbol = feature.properties['icon'];
            const layerID = `poi-${symbol}`;

            // 如果此符号类型的图层尚未添加,则添加它。
            if (!map.getLayer(layerID)) {
                map.addLayer({
                    'id': layerID,
                    'type': 'symbol',
                    'source': 'places',
                    'layout': {
                        'icon-image': `${symbol}_11`,
                        'icon-overlap': 'always'
                    },
                    'filter': ['==', 'icon', symbol]
                });

                // 为图层添加复选框和标签元素。
                const input = document.createElement('input');
                input.type = 'checkbox';
                input.id = layerID;
                input.checked = true;
                filterGroup.appendChild(input);

                const label = document.createElement('label');
                label.setAttribute('for', layerID);
                label.textContent = symbol;
                filterGroup.appendChild(label);

                // 当复选框改变时,更新图层的可见性。
                input.addEventListener('change', (e) => {
                    map.setLayoutProperty(
                        layerID,
                        'visibility',
                        e.target.checked ? 'visible' : 'none'
                    );
                });
            }
        });
    });
</script>
</body>
</html>
🔍 代码解析
1. 初始化地图
使用 new maplibregl.Map() 创建地图实例,配置了华盛顿特区区域,展示多个兴趣点(POI)数据。同时获取过滤组容器元素用于动态创建复选框。
2. 关键配置项
- document.createElement(): 动态创建复选框和标签元素
- input.checked: 控制复选框初始状态(默认为选中)
- change事件监听: 响应复选框状态变化
- setLayoutProperty(): 根据复选框状态切换图层可见性
⚙️ 参数说明
| 参数 | 类型 | 必填 | 说明 |
|---|---|---|---|
| icon-image | string | 是 | 图标图片名称,格式为 ${symbol}_11 |
| icon-overlap | string | 否 | 是否允许图标重叠 |
| filter | expression | 是 | 图层过滤条件 |
| visibility | string | 是 | 图层可见性:‘visible’ 或 ‘none’ |
🎨 效果说明
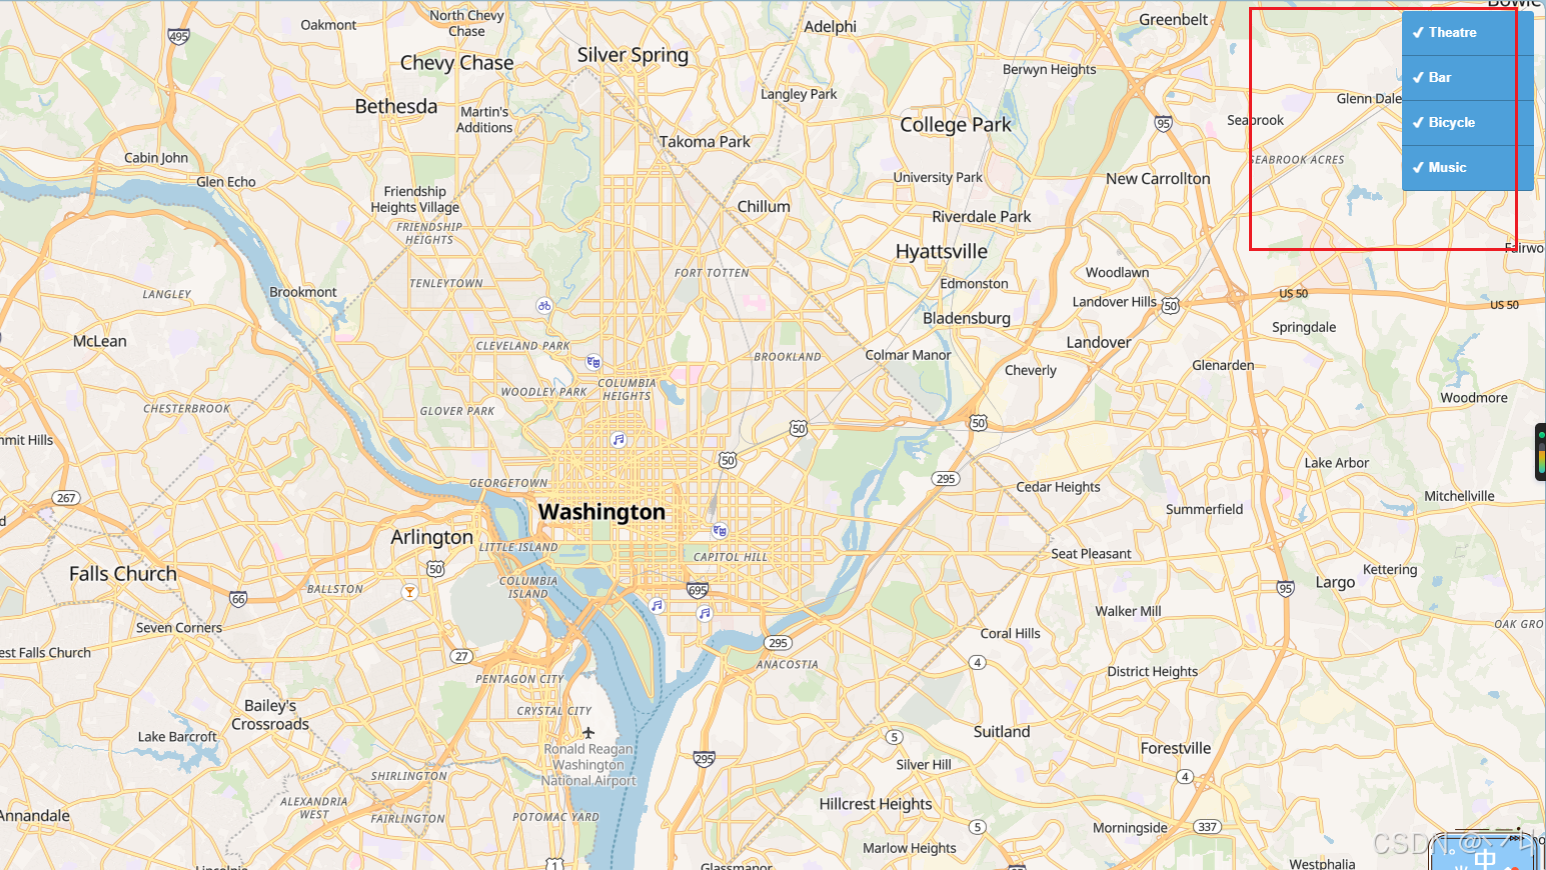
运行代码后,地图显示华盛顿特区的多个POI标记(剧院、酒吧、自行车、音乐等)。页面右上角有一个过滤面板,包含多个复选框:
- 每个复选框对应一种POI类型
- 勾选复选框显示对应类型的标记
- 取消勾选隐藏对应类型的标记
- 默认全部选中
💡 常 见 问 题
Q1: 复选框没有显示?
A: 检查以下几点:
- 确认filter-group容器元素存在且获取正确
- 确认CSS样式正确应用到复选框和标签
- 检查浏览器控制台是否有错误
Q2: 如何实现"全选/全不选"功能?
A: 添加一个"全选"复选框并控制所有子复选框:
const selectAll = document.createElement('input');
selectAll.type = 'checkbox';
selectAll.checked = true;
selectAll.addEventListener('change', (e) => {
    document.querySelectorAll('.filter-group input[type="checkbox"]').forEach(input => {
        input.checked = e.target.checked;
        // 触发change事件更新图层
        input.dispatchEvent(new Event('change'));
    });
});
Q3: 如何保存过滤状态?
A: 使用localStorage保存和恢复过滤状态:
// 保存状态
input.addEventListener('change', (e) => {
    const state = {};
    document.querySelectorAll('.filter-group input').forEach(inp => {
        state[inp.id] = inp.checked;
    });
    localStorage.setItem('filterState', JSON.stringify(state));
});

// 恢复状态
const savedState = JSON.parse(localStorage.getItem('filterState') || '{}');
document.querySelectorAll('.filter-group input').forEach(inp => {
    if (savedState[inp.id] !== undefined) {
        inp.checked = savedState[inp.id];
    }
});
📝 练习任务
- 基础练习:修改过滤面板的样式,优化视觉效果
- 进阶挑战:添加"全选/全不选"功能
- 拓展思考:如何实现过滤状态的持久化存储?
- 综合实践:创建一个支持搜索和多选过滤的综合面板
🌟 最佳实践
- 用户体验: 提供清晰的视觉反馈,区分选中和未选中状态
- 性能优化: 对于大量图层,考虑批量更新可见性
- 可访问性: 为复选框添加适当的label和ARIA属性
- 状态管理: 保持UI状态与图层状态同步
- 响应式设计: 确保过滤面板在移动端也能正常工作
🔗 延伸阅读
-
[下一课预告]:将继续学习地图图层的基础知识
本文是MapLibre GL JS实践课程系列的一部分,欢迎关注收藏


 530
530

 被折叠的 条评论
为什么被折叠?
被折叠的 条评论
为什么被折叠?
 到【灌水乐园】发言


