In a microservices architecture, managing configuration properties across multiple services can become challenging, especially when these configurations need to be updated frequently. Spring Cloud Config provides a centralized configuration management solution, allowing you to manage external properties for applications across all environments. One of the key features of Spring Cloud Config is its ability to dynamically update configurations without the need to restart services.
This article will guide you through the process of setting up dynamic configuration updates with Spring Cloud Config. We will explore how to create a Spring Cloud Config Server, connect it with a client application, and demonstrate how configuration changes can be dynamically applied to a Spring Boot application.
Spring Cloud Config Server
Spring Cloud Config Server provides a centralized configuration service that is distributed and versioned, with support for dynamic updates. It typically fetches configurations from a Git repository and serves them to client applications.
Dynamic Configuration Updates
To enable dynamic updates, Spring Cloud integrates with Spring Cloud Bus, which provides a simple way to refresh configurations across multiple instances of microservices. When a configuration is updated in the Git repository, the Config Server detects the changes, and Spring Cloud Bus triggers a refresh event across all connected clients.
Key Features:
- Centralized Configuration Management: Allows you to manage configuration properties for all microservices from a single location, simplifying configuration management in complex environments.
- Dynamic Configuration Updates: Spring Cloud Config can dynamically update configuration properties without requiring client applications to restart, achieved through integration with Spring Cloud Bus.
- Versioned and Distributed Configuration: Configurations managed by Spring Cloud Config are stored in a version control system like Git, providing versioning and rollback capabilities to track changes and revert to previous configurations if necessary.
- Environment-Specific Configurations: Spring Cloud Config supports environment-specific configurations, allowing you to define configurations for development, staging, and production environments. The appropriate configuration is automatically selected based on the active profile.
- Secure Configuration: Sensitive data, such as passwords and API keys, can be encrypted and stored securely in configuration files, with built-in support for encryption and decryption of configuration properties.
- Scalability: Spring Cloud Config is designed to work in large, distributed environments, ensuring that configuration updates scale to many microservices across multiple environments and data centers.
Implementation of Dynamic Configuration Updates with Spring Cloud Config in a Spring Boot Project
Step 1: Create the Git Repository
Create a Git repository to store configuration files. For example, create an application.yml file with the following configuration:
Message: Default MessageStep 2: Setup the Config Server
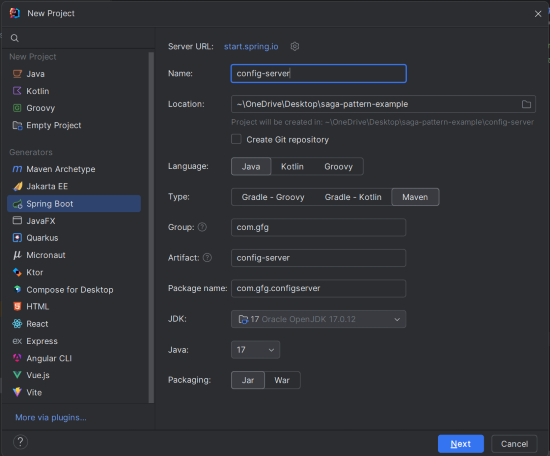
2.1: Create a New Spring Boot Project
Create a new Spring Boot project using IntelliJ IDEA with the following options:
- Name: config-server
- Language: Java
- Type: Maven
- Packaging: Jar
Click on the Next button.
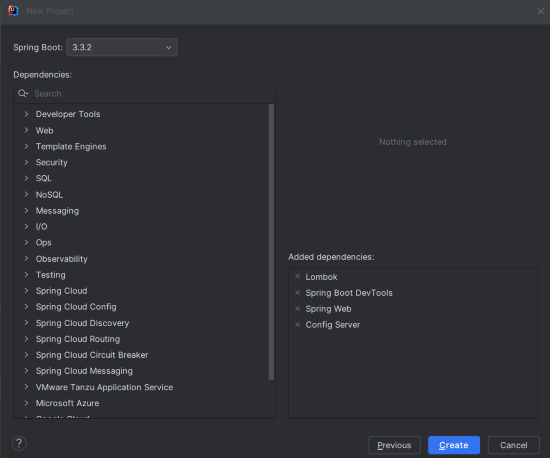
2.2: Add Dependencies
Add the following dependencies into the Spring Boot project.
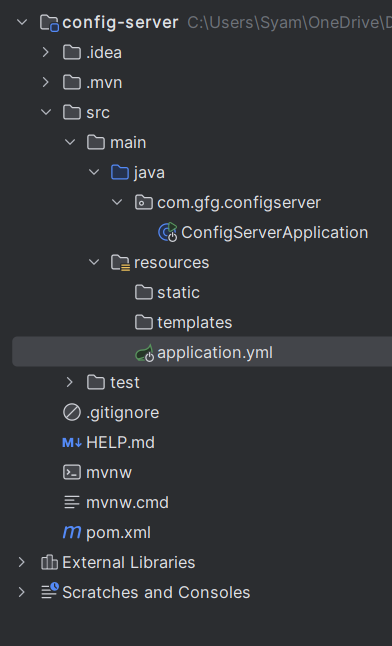
Project Structure
Once the project creation done, the file structure will look like the below image.
2.3: Configure Application Properties
Rename application.properties to application.yml and add the following configuration:
spring:
  cloud:
    config:
      server:
        git:
          uri: https://github.com/iammahesh123/config-repo
          clone-on-start: true
server:
port: 8888- The
urispecifies the location of the Git repository containing the configuration files. clone-on-startensures that the repository is cloned every time the server starts, ensuring the latest configurations are loaded.
2.4: Main Class
This is the entry point of the application. Add the @EnableConfigServer annotation to enable the Config Server functionality.
package com.gfg.configserver;

import org.springframework.boot.SpringApplication;
import org.springframework.boot.autoconfigure.SpringBootApplication;
import org.springframework.cloud.config.server.EnableConfigServer;

@SpringBootApplication
@EnableConfigServer // Enables Config Server functionality
public class ConfigServerApplication {

    public static void main(String[] args) {
        SpringApplication.run(ConfigServerApplication.class, args); // Starts the Config Server application
    }

}
- The
@EnableConfigServerannotation activates the Config Server in the Spring Boot application. SpringApplication.runstarts the application.
pom.xml file:
<?xml version="1.0" encoding="UTF-8"?>
<project xmlns="https://maven.apache.org/POM/4.0.0" xmlns:xsi="https://www.w3.org/2001/XMLSchema-instance"
         xsi:schemaLocation="https://maven.apache.org/POM/4.0.0 https://maven.apache.org/xsd/maven-4.0.0.xsd">
    <modelVersion>4.0.0</modelVersion>
    <parent>
        <groupId>org.springframework.boot</groupId>
        <artifactId>spring-boot-starter-parent</artifactId>
        <version>3.3.2</version>
        <relativePath/> <!-- lookup parent from repository -->
    </parent>
    <groupId>com.gfg</groupId>
    <artifactId>config-server</artifactId>
    <version>0.0.1-SNAPSHOT</version>
    <name>config-server</name>
    <description>config-server</description>
    <url/>
    <licenses>
        <license/>
    </licenses>
    <developers>
        <developer/>
    </developers>
    <scm>
        <connection/>
        <developerConnection/>
        <tag/>
        <url/>
    </scm>
    <properties>
        <java.version>17</java.version>
        <spring-cloud.version>2023.0.3</spring-cloud.version>
    </properties>
    <dependencies>
        <dependency>
            <groupId>org.springframework.boot</groupId>
            <artifactId>spring-boot-starter-web</artifactId>
        </dependency>
        <dependency>
            <groupId>org.springframework.cloud</groupId>
            <artifactId>spring-cloud-starter-bus-amqp</artifactId>
        </dependency>
        <dependency>
            <groupId>org.springframework.cloud</groupId>
            <artifactId>spring-cloud-config-server</artifactId>
        </dependency>

        <dependency>
            <groupId>org.springframework.boot</groupId>
            <artifactId>spring-boot-devtools</artifactId>
            <scope>runtime</scope>
            <optional>true</optional>
        </dependency>
        <dependency>
            <groupId>org.projectlombok</groupId>
            <artifactId>lombok</artifactId>
            <optional>true</optional>
        </dependency>
        <dependency>
            <groupId>org.springframework.boot</groupId>
            <artifactId>spring-boot-starter-test</artifactId>
            <scope>test</scope>
        </dependency>
    </dependencies>
    <dependencyManagement>
        <dependencies>
            <dependency>
                <groupId>org.springframework.cloud</groupId>
                <artifactId>spring-cloud-dependencies</artifactId>
                <version>${spring-cloud.version}</version>
                <type>pom</type>
                <scope>import</scope>
            </dependency>
        </dependencies>
    </dependencyManagement>

    <build>
        <plugins>
            <plugin>
                <groupId>org.springframework.boot</groupId>
                <artifactId>spring-boot-maven-plugin</artifactId>
                <configuration>
                    <excludes>
                        <exclude>
                            <groupId>org.projectlombok</groupId>
                            <artifactId>lombok</artifactId>
                        </exclude>
                    </excludes>
                </configuration>
            </plugin>
        </plugins>
    </build>

</project>
2.5: Run the Application
Run the application. It will start and listen on port 8888.

Step 3: Setup the Client Application
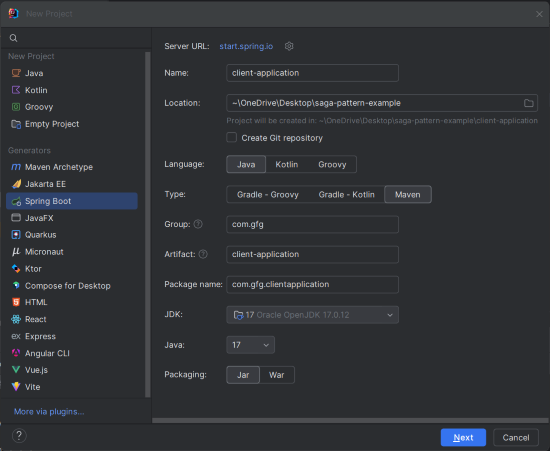
3.1: Create a New Spring Boot Project
Create a new Spring Boot project using IntelliJ IDEA with the following options:
- Name: client-application
- Language: Java
- Type: Maven
- Packaging: Jar
Click on the Next button.
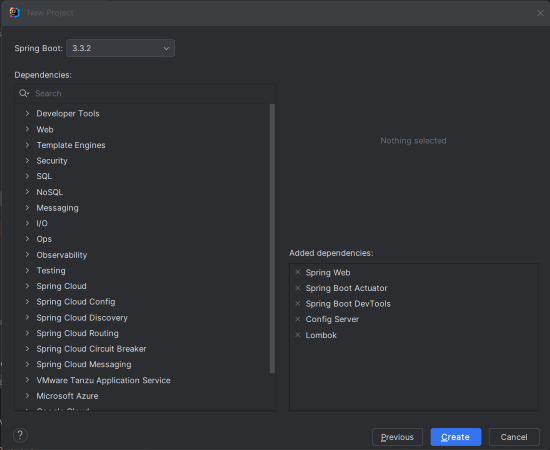
3.2: Add Dependencies
Add the following dependencies into the Spring Boot project.
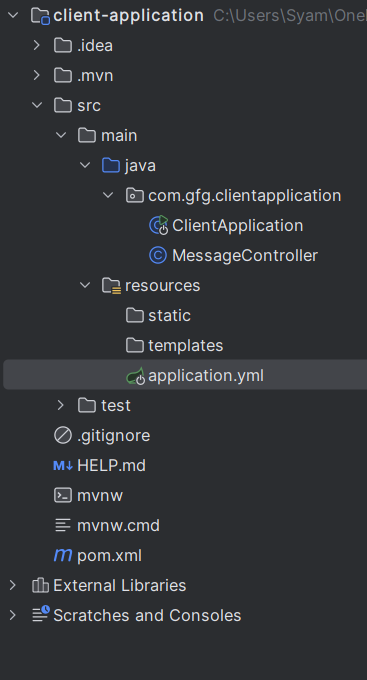
Project Structure
Once the project is created, then the file structure will look like the below image.
spring-boot-starter-actuatoris included to monitor and manage the application.spring-boot-starter-websets up a web application, whilelombokandspring-boot-starter-testprovide code reduction and testing support.
3.3: Configure Application Properties
Rename application.properties to application.yml and add the following configuration:
spring:
  cloud:
    config:
      uri: http://localhost:8888
The uri specifies the location of the Config Server.
3.4: Create the MessageController Class
Create a new class MessageController.java in the com.gfg.clientapplication package to handle incoming HTTP requests.
package com.gfg.clientapplication;

import org.springframework.beans.factory.annotation.Value;
import org.springframework.web.bind.annotation.GetMapping;
import org.springframework.web.bind.annotation.RestController;

@RestController // Indicates that this class is a REST controller
public class MessageController {

    @Value("${message:Default message}") // Injects the 'message' property from the configuration
    private String message;

    @GetMapping("/message") // Maps HTTP GET requests to /message
    public String getMessage() {
        return this.message; // Returns the current value of the 'message' property
    }
}
@RestControllermarks the class as a REST controller.- The
@Valueannotation injects themessageproperty from the configuration, and@GetMappingmaps the/messageendpoint to thegetMessagemethod.
3.5: Main Class
No changes are required in the main class, but for reference:
package com.gfg.clientapplication;

import org.springframework.boot.SpringApplication;
import org.springframework.boot.autoconfigure.SpringBootApplication;

@SpringBootApplication // Indicates this is a Spring Boot application
public class ClientApplication {

    public static void main(String[] args) {
        SpringApplication.run(ClientApplication.class, args); // Starts the Client application
    }

}
pom.xml file:
<?xml version="1.0" encoding="UTF-8"?>
<project xmlns="https://maven.apache.org/POM/4.0.0" xmlns:xsi="https://www.w3.org/2001/XMLSchema-instance"
         xsi:schemaLocation="https://maven.apache.org/POM/4.0.0 https://maven.apache.org/xsd/maven-4.0.0.xsd">
    <modelVersion>4.0.0</modelVersion>
    <parent>
        <groupId>org.springframework.boot</groupId>
        <artifactId>spring-boot-starter-parent</artifactId>
        <version>3.3.2</version>
        <relativePath/> <!-- lookup parent from repository -->
    </parent>
    <groupId>com.gfg</groupId>
    <artifactId>client-application</artifactId>
    <version>0.0.1-SNAPSHOT</version>
    <name>client-application</name>
    <description>client-application</description>
    <url/>
    <licenses>
        <license/>
    </licenses>
    <developers>
        <developer/>
    </developers>
    <scm>
        <connection/>
        <developerConnection/>
        <tag/>
        <url/>
    </scm>
    <properties>
        <java.version>17</java.version>
        <spring-cloud.version>2023.0.3</spring-cloud.version>
    </properties>
    <dependencies>
        <dependency>
            <groupId>org.springframework.boot</groupId>
            <artifactId>spring-boot-starter-actuator</artifactId>
        </dependency>
        <dependency>
            <groupId>org.springframework.boot</groupId>
            <artifactId>spring-boot-starter-web</artifactId>
        </dependency>
        <dependency>
            <groupId>org.springframework.cloud</groupId>
            <artifactId>spring-cloud-config-server</artifactId>
        </dependency>

        <dependency>
            <groupId>org.springframework.boot</groupId>
            <artifactId>spring-boot-devtools</artifactId>
            <scope>runtime</scope>
            <optional>true</optional>
        </dependency>
        <dependency>
            <groupId>org.projectlombok</groupId>
            <artifactId>lombok</artifactId>
            <optional>true</optional>
        </dependency>
        <dependency>
            <groupId>org.springframework.boot</groupId>
            <artifactId>spring-boot-starter-test</artifactId>
            <scope>test</scope>
        </dependency>
    </dependencies>
    <dependencyManagement>
        <dependencies>
            <dependency>
                <groupId>org.springframework.cloud</groupId>
                <artifactId>spring-cloud-dependencies</artifactId>
                <version>${spring-cloud.version}</version>
                <type>pom</type>
                <scope>import</scope>
            </dependency>
        </dependencies>
    </dependencyManagement>

    <build>
        <plugins>
            <plugin>
                <groupId>org.springframework.boot</groupId>
                <artifactId>spring-boot-maven-plugin</artifactId>
                <configuration>
                    <excludes>
                        <exclude>
                            <groupId>org.projectlombok</groupId>
                            <artifactId>lombok</artifactId>
                        </exclude>
                    </excludes>
                </configuration>
            </plugin>
        </plugins>
    </build>

</project>
3.6: Run the Application
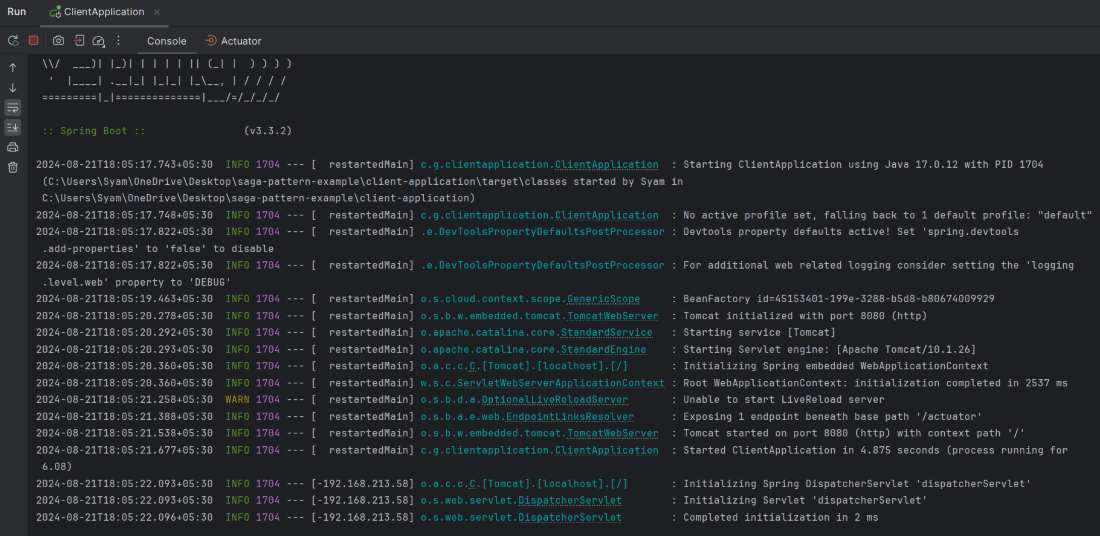
Now run the application, and it will start at port 8080.
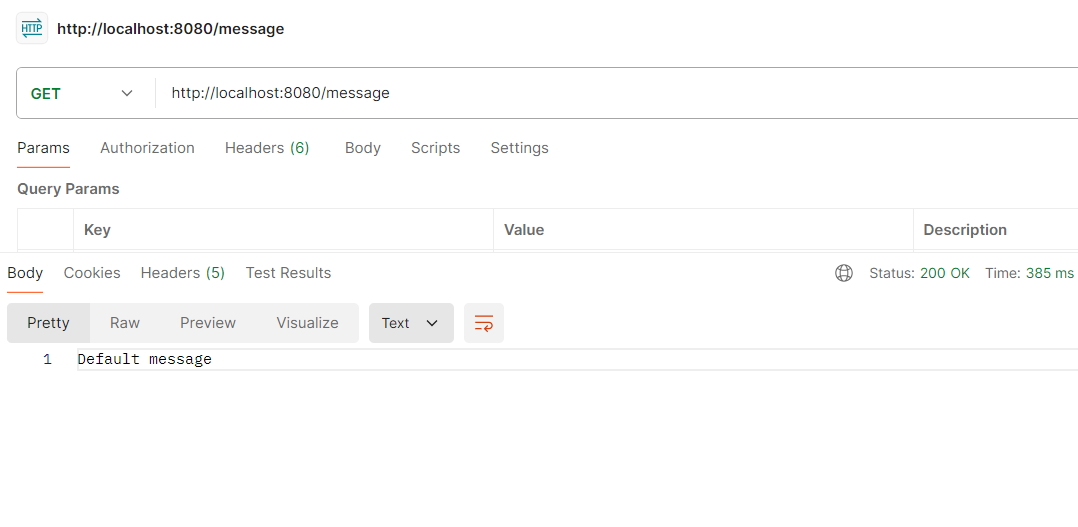
Step 4: Testing the Endpoint
test the /message endpoint by sending a GET request to http://localhost:8080/message. It will return the default message from the configuration.
GET http://localhost:8080/messageOutput:
Updating the Application Properties in GitHub
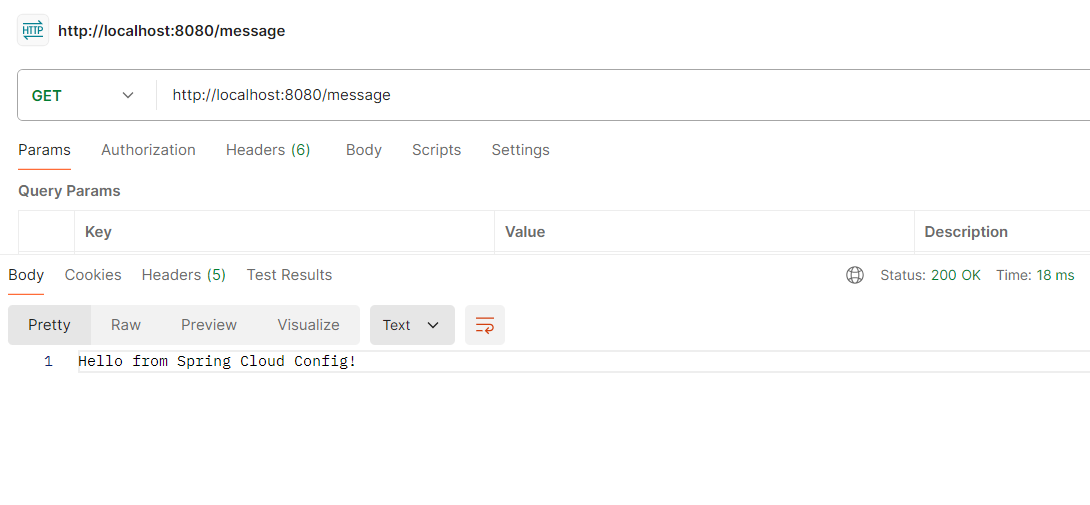
To see dynamic updates in action, update the message property in your GitHub repository to something like:
Message: Hello from Spring Cloud Config!Then, you can trigger the refresh event and verify that the client application reflects the updated configuration without a restart.
Again, run the endpoint,
GET http://localhost:8080/messageOutput:
This example project demonstrates the dynamic configuration with Spring Cloud Config of Spring Boot Project.
