Spring Boot simplifies building REST APIs with auto-configuration, embedded servers and minimal boilerplate. Below is the step-by-step process to create a REST API with Spring Boot 3, MySQL and JPA.
Step-by-Step Implementation to Create a REST API
Below are the steps to implement a REST API in Spring Boot with MySQL and JPA.
Step 1: Set up Development Environment
Before we begin, we need to set up our development environment. We will need to install the following software:
Step 2: Create a Spring Boot Project
The first step is to create a new Spring Boot project using the Spring Initializr. Open any web browser and go to Spring Initializr
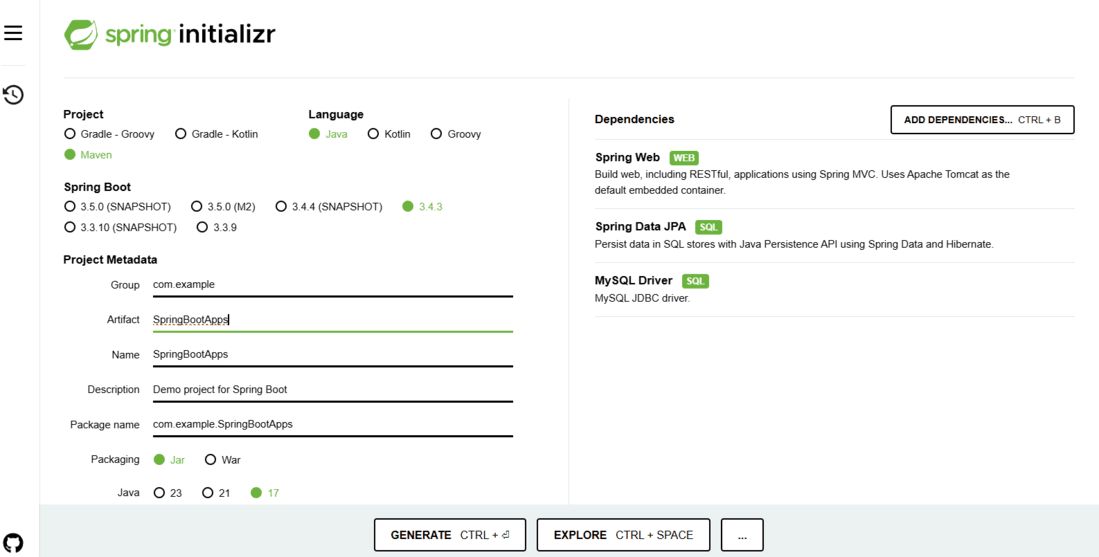
Set the following options:
- Project: Maven Project/Gradle according to your need
- Language: Java
- Spring Boot: 3.x.x (or the latest version)
- Group: com.example
- Artifact: SpringBootApps.
- Packaging: Jar
- Java: 17 or later
Click on the “Add Dependencies” button and add the following dependencies:
- Spring Web
- Spring Data JPA
- MySQL Driver
Select these dependencies and click on the Generate button. Extract the downloaded project ZIP file to your preferred location.
Step 3: Configure Database in application.properties
For MySQL configuration, add the following to src/main/resources/application.properties:
spring.datasource.url=jdbc:mysql://localhost:3306/mydb
spring.datasource.username=root
spring.datasource.password=yourpassword
spring.datasource.driver-class-name=com.mysql.cj.jdbc.Driver
spring.jpa.hibernate.ddl-auto=update
spring.jpa.database-platform=org.hibernate.dialect.MySQL8Dialect
server.port=8080
Step 4: Create Entity Class
Next, we need to create an entity class to represent our data model. In this example, we will create a “Product” entity class.
- Right-click on the “com.example” package and create a package called entity inside it.
- Enter “Product” as the class name in the “entity” package and click on the “Finish” button.
- In the “Product” class, add the following code:
package com.example.entity;
import javax.persistence.*;

@Entity
@Table(name = "product")
public class Product {

    @Id
    @GeneratedValue(strategy = GenerationType.IDENTITY)
    private Long id;

    @Column(nullable = false)
    private String name;

    @Column(nullable = false)
    private double price;

    @Column(nullable = false)
    private int quantity;

    // Constructors, getters and setters, and other methods...

    // Getters
    public Long getId() {
        return id;
    }

    public String getName() {
        return name;
    }

    public double getPrice() {
        return price;
    }

    public int getQuantity() {
        return quantity;
    }

    // Setters
    public void setId(Long id) {
        this.id = id;
    }

    public void setName(String name) {
        this.name = name;
    }

    public void setPrice(double price) {
        this.price = price;
    }

    public void setQuantity(int quantity) {
        this.quantity = quantity;
    }
}
- The @Entity annotation specifies that this class is an entity and should be mapped to a database table.
- The @Table annotation specifies the name of the database table that will store instances of this entity.
- The @Id annotation specifies the primary key of the entity,
- The @GeneratedValue annotation specifies that the primary key should be generated automatically.
Step 5: Create Repository Interface
Now, we need to create a repository interface to handle database operations for the “Product” entity. In the “ProductRepository” interface, add the following code:
package com.example.springbootapi.repository;

import com.example.springbootapi.entity.Product;
import org.springframework.data.jpa.repository.JpaRepository;
import org.springframework.stereotype.Repository;

/**
 * Repository interface for Product entity.
 */
@Repository
public interface ProductRepository extends JpaRepository<Product, Long> {
}
The @Repository annotation specifies that this interface is a repository and Spring will create an instance of it automatically. The JpaRepository interface provides a set of methods for performing CRUD (Create, Read, Update, Delete) operations on the “Product” entity.
Step 6: Create a Service Class
Next, we need to create a service class to handle the business logic for our REST API. In the “ProductService” class, add the following code:
package com.example.springbootapi.service;

import com.example.springbootapi.entity.Product;
import com.example.springbootapi.repository.ProductRepository;
import org.springframework.beans.factory.annotation.Autowired;
import org.springframework.stereotype.Service;

import java.util.List;
import java.util.Optional;

// Service class for managing Product entities.

@Service
public class ProductService {

    private final ProductRepository productRepository;

    @Autowired
    public ProductService(ProductRepository productRepository) {
        this.productRepository = productRepository;
    }
    //  Save a product

    public Product saveProduct(Product product) {
        return productRepository.save(product);
    }
    //   Get all the products.

    public List<Product> getAllProducts() {
        return productRepository.findAll();
    }
    // Get one product by ID.

    public Optional<Product> getProductById(Long id) {
        return productRepository.findById(id);
    }

    //Update a product

    public Product updateProduct(Long id, Product updatedProduct) {
        Optional<Product> existingProduct = productRepository.findById(id);
        if (existingProduct.isPresent()) {
            Product product = existingProduct.get();
            product.setName(updatedProduct.getName());
            product.setPrice(updatedProduct.getPrice());
            product.setQuantity(updatedProduct.getQuantity());
            return productRepository.save(product);
        } else {
            throw new RuntimeException("Product not found");
        }
    }
    // Delete the product by ID.

    public void deleteProduct(Long id) {
        productRepository.deleteById(id);
    }
}
Step 7: Create Controller Class
Next, we need to create a controller class to handle HTTP requests for our REST API. In the “ProductController” class, add the following code:
package com.example.springbootapi.controller;

import com.example.springbootapi.entity.Product;
import com.example.springbootapi.service.ProductService;
import org.springframework.beans.factory.annotation.Autowired;
import org.springframework.http.ResponseEntity;
import org.springframework.web.bind.annotation.*;

import java.util.List;
import java.util.Optional;

@RestController
@RequestMapping("/api/v1")
public class ProductController {

    private final ProductService productService;

    @Autowired
    public ProductController(ProductService productService) {
        this.productService = productService;
    }

    // Create a new product.

    @PostMapping("/product")
    public ResponseEntity<Product> saveProduct(@RequestBody Product product) {
        Product newProduct = productService.saveProduct(product);
        return ResponseEntity.ok(newProduct);
    }

    // Get all products.

    @GetMapping("/products")
    public List<Product> getAllProducts() {
        return productService.getAllProducts();
    }

    // Get a product by ID.

    @GetMapping("/products/{id}")
    public ResponseEntity<Product> getProductById(@PathVariable Long id) {
        Optional<Product> product = productService.getProductById(id);
        return product.map(ResponseEntity::ok).orElseGet(() -> ResponseEntity.notFound().build());
    }

    // Update a product by ID.

    @PutMapping("/products/{id}")
    public ResponseEntity<Product> updateProduct(@PathVariable Long id, @RequestBody Product product) {
        Product updatedProduct = productService.updateProduct(id, product);
        return ResponseEntity.ok(updatedProduct);
    }

    // Delete a product by ID.

    @DeleteMapping("/products/{id}")
    public ResponseEntity<String> deleteProduct(@PathVariable Long id) {
        productService.deleteProduct(id);
        return ResponseEntity.ok("Product deleted successfully");
    }
}
Step 8: Main Application Class
package com.example.springbootapi;

import org.springframework.boot.SpringApplication;
import org.springframework.boot.autoconfigure.SpringBootApplication;

@SpringBootApplication
public class SpringbootapiApplication {
    public static void main(String[] args) {
        SpringApplication.run(SpringbootapiApplication.class, args);
    }
}
Step 9. Run the application:
In IntelliJ/Eclipse: Right-click ->Run SpringBootApps.
Now, after this, we will test our API endpoints in postman. The default port for Spring Boot is 8080.
In this case, the port is 8080. For our Post Request, the endpoint will be like “http://localhost:8080/api/v1/product” and the output is:

For our Get Request, the endpoint will be like “http://localhost:8080/api/v1/products” and the output is:

For our Get by Id Request, the endpoint will be like “http://localhost:8080/api/v1/products/{id}” and the output is:

For our Update Request, the endpoint will be like “http://localhost:8080/api/v1/products/{id}” and the output is:

And finally, for our Delete Request, the endpoint will be like “http://localhost:8080/api/v1/products/{id}" and the output is:

