JPA One-to-Many mapping defines a relationship where one entity is associated with multiple instances of another entity. It is commonly used to represent parent-child relationships in a database.
- Uses @OneToMany annotation to map a collection of related entities
- Can be uni-directional or bi-directional depending on design needs
- Typically mapped using a foreign key in the “many” side table
Real-world example: In an Order and Items system in an e-commerce application, where one order can contain multiple items, but each item belongs to only one order.
Steps to Implement One-to-Many Mapping
Follow these steps to define and manage a one-to-many relationship between entities using JPA annotations in a Spring Boot application.
1. Create Entities
- Define parent (Department) and child (Employee) classes
- Each class should be annotated with
@Entity.
2. Add Annotations
- Use @OneToMany(mappedBy = "department") in parent.
- Use @ManyToOne with @JoinColumn in child.
3. Configure Database
- Set database connection in config file.
- Add JPA/Hibernate properties.
4. Set Relationship
- Assign parent to child using setter method.
- Maintain both sides of the relationship.
5. Persist Data
- Save parent and child entities.
- Use EntityManager or Spring Data JPA.
6. Verify Mapping
- Run the application to test mapping.
- Check foreign key in child table.
Project to Implement One-to-Many Mapping in JPA
Step 1: Create Project
- Open IntelliJ IDEA
- Create a New Maven Project
- Name: jpa-one-to-many-mapping-demo
- Set Java version (11 or above)
Step 2: Add Dependencies (pom.xml)
Add required dependencies:
- Hibernate Core (JPA implementation)
- MySQL Connector
- JAXB (for XML binding)
- JUnit (optional for testing)
Dependencies:
<!-- Database Driver (MySQL in this example) -->
<dependency>
            <groupId>org.hibernate.orm</groupId>
            <artifactId>hibernate-core</artifactId>
            <version>6.0.2.Final</version>
        </dependency>
        <dependency>
            <groupId>org.glassfish.jaxb</groupId>
            <artifactId>jaxb-runtime</artifactId>
            <version>3.0.2</version>
        </dependency>
        <dependency>
            <groupId>org.junit.jupiter</groupId>
            <artifactId>junit-jupiter-api</artifactId>
            <version>${junit.version}</version>
            <scope>test</scope>
        </dependency>
        <dependency>
            <groupId>org.junit.jupiter</groupId>
            <artifactId>junit-jupiter-engine</artifactId>
            <version>${junit.version}</version>
            <scope>test</scope>
        </dependency>
        <dependency>
            <groupId>mysql</groupId>
            <artifactId>mysql-connector-java</artifactId>
            <version>8.0.28</version>
        </dependency>
Once create the project then the file structure looks like the below image.

Step 3: Configure persistence.xml
Path-> src/main/resources/META-INF/persistence.xml
- Define persistence-unit
- Configure database connection: URL, username, password
- Add entity classes
- Set Hibernate properties like:
hbm2ddl.auto = update
<?xml version="1.0" encoding="UTF-8" standalone="yes"?>
<persistence xmlns="https://jakarta.ee/xml/ns/persistence/"
             xmlns:xsi="https://www.w3.org/2001/XMLSchema-instance"
             xsi:schemaLocation="https://jakarta.ee/xml/ns/persistence/ https://jakarta.ee/xml/ns/persistence//persistence_3_0.xsd"
             version="3.0">
    <persistence-unit name="examplePU">
        <class>model.Student</class>
        <class>model.Employee</class>
        <class>model.Department</class>
        <class>model.Course</class>
        <properties>
            <property name="javax.persistence.jdbc.url" value="jdbc:mysql://localhost:3306/example"/>
            <property name="javax.persistence.jdbc.user" value="root"/>
            <property name="javax.persistence.jdbc.password" value=""/>
            <property name="javax.persistence.jdbc.driver" value="com.mysql.jdbc.Driver"/>
            <property name="hibernate.dialect" value="org.hibernate.dialect.MySQL5Dialect"/>
            <property name="hibernate.hbm2ddl.auto" value="update"/>
        </properties>

    </persistence-unit>
</persistence>
Step 4: Create Employee Entity
Create the new Java package named as model in that package create the new Entity Java class named as the Employee.
- Annotate class with @Entity
- Fields: id, name
- Add relationship
Go to src > main > java > model > Employee and put the below code.
package model;

import jakarta.persistence.*;

@Entity
public class Employee {
    @Id
    @GeneratedValue(strategy = GenerationType.IDENTITY)
    private Long id;

    private String name;

    @ManyToOne
    @JoinColumn(name = "department_id")
    private Department department;

    // Constructors, getters, and setters


    public Long getId() {
        return id;
    }

    public void setId(Long id) {
        this.id = id;
    }

    public String getName() {
        return name;
    }

    public void setName(String name) {
        this.name = name;
    }

    public Department getDepartment() {
        return department;
    }

    public void setDepartment(Department department) {
        this.department = department;
    }
}
Step 5: Create Department Entity
Path: model/Department.java
- Annotate with @Entity
- Fields: id, name
- Add relationship
Go to src > main > java > model > Department and put the below code.
package model;

import jakarta.persistence.*;

import java.util.ArrayList;
import java.util.List;

@Entity
public class Department {
    @Id
    @GeneratedValue(strategy = GenerationType.IDENTITY)
    private Long id;

    private String name;

    @OneToMany(mappedBy = "department", cascade = CascadeType.ALL, orphanRemoval = true)
    private List<Employee> employees = new ArrayList<>(); // Initialize the list here


    public Long getId() {
        return id;
    }

    public void setId(Long id) {
        this.id = id;
    }

    public String getName() {
        return name;
    }

    public void setName(String name) {
        this.name = name;
    }

    public List<Employee> getEmployees() {
        return employees;
    }

    public void setEmployees(List<Employee> employees) {
        this.employees = employees;
    }
}
Step 6: Create JPA Utility Class
Path-> JpaUtil.java
- Create EntityManagerFactory
- Provide method to get EntityManager
- Used for DB operations
Go to src > main > java > JPAUtil and put the below code.
import jakarta.persistence.EntityManager;
import jakarta.persistence.EntityManagerFactory;
import jakarta.persistence.Persistence;

public class JpaUtil {
    private static final EntityManagerFactory emFactory;

    static {
        emFactory = Persistence.createEntityManagerFactory("persistence-unit-name");
    }

    public static EntityManager getEntityManager() {
        return emFactory.createEntityManager();
    }

    public static void close() {
        emFactory.close();
    }
}
Step 7: Create Main Application
Path-> MainApplication.java
- Create Department
- Create Employees
- Set relationship: Employee ->Department , Add employees to department list
- Start transaction
- Persist data
- Commit transaction
- Fetch and print data using find()
Go to src > main > java > MainApplication and put the below code.
import jakarta.persistence.EntityManager;
import model.Department;
import model.Employee;

public class MainApplication {
    public static void main(String[] args) {
        // Create entities
        Department department = new Department();
        department.setName("Engineering");

        Employee emp1 = new Employee();
        emp1.setName("Raju");

        Employee emp2 = new Employee();
        emp2.setName("Eswar");

        // Associate employees with the department
        emp1.setDepartment(department);
        emp2.setDepartment(department);

        department.getEmployees().add(emp1);
        department.getEmployees().add(emp2);

        // Persist entities
        EntityManager entityManager = JpaUtil.getEntityManager();
        entityManager.getTransaction().begin();

        entityManager.persist(department);
        entityManager.persist(emp1);
        entityManager.persist(emp2);

        entityManager.getTransaction().commit();

        // Close EntityManager
        entityManager.close();

        // Retrieve and print the persisted data
        entityManager = JpaUtil.getEntityManager();
        Department retrievedDepartment = entityManager.find(Department.class, department.getId());
        System.out.println("Department: " + retrievedDepartment.getName());
        System.out.println("Employees:");
        for (Employee employee : retrievedDepartment.getEmployees()) {
            System.out.println("- " + employee.getName());
        }

        // Close EntityManager
        entityManager.close();

        // Close EntityManagerFactory
        JpaUtil.close();
    }
}
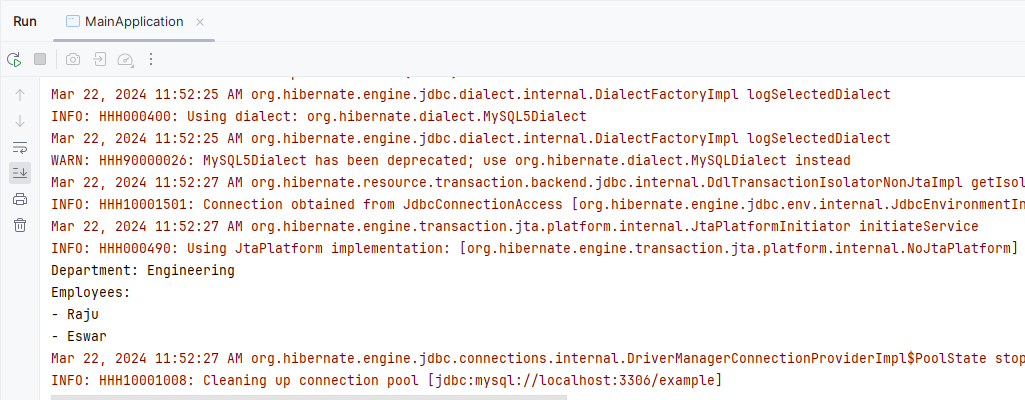
Step 8: Run Application
- Run MainApplication
- Output shows: Department name and List of employees
In the above project, Demonstrating the simple JPA application for implementing the one-to-many mapping using the JPA of the project.
