JUnit 5 introduced several powerful features to make testing in Java more flexible and expressive. One of these features is the @Nested test classes, which allows for better organization of test cases by logically grouping them inside an outer test class. This can be particularly useful when dealing with complex scenarios or hierarchical structures that require the tests to be categorized and scoped in a clear and readable manner.
In this article, we will explore the @Nested annotation in JUnit 5, discussing its signature, how it improves test organization, and how we can implement it effectively in our test suite. By the end, you will have a deep understanding of nested test classes and their applications.
Prerequisites:
- Basic understanding of Java programming.
- Familiarity with JUnit 5.
- Knowledge of Maven as a build dependency management system.
- JDK and IntelliJ IDEA installed in your system.
What is JUnit 5 @Nested Test Class?
The @Nested annotation in JUnit 5 is used to declare inner test classes that are logically grouped within the outer test class. It provides an easy and readable way to organize related test cases under different categories. The @Nested test class can access the outer class's instance variables and methods, sharing the same state and lifecycle as the outer test class.
Key Characteristics of @Nested Test Classes:
- Non-static inner classes: The test class annotated with
@Nestedmust be non-static, meaning it has access to the outer class's fields and methods. - Logical grouping: It allows you to group related test cases based on different functionalities, use cases, or workflows.
- Test scope sharing: The
@Nestedclass can share the outer class context and setup, making it easier to write tests with a shared state or resources. - Better readability: Test cases are naturally organized, resulting in a cleaner and more readable test suite.
Benefits of Using @Nested Test Classes
Here are some major benefits of using @Nested test classes in unit tests:
- Improved Test Organization: Nested test classes allow you to categorize related test methods into separate groups, especially useful for larger classes with distinct functionalities.
- Shared Test Context: The nested test class has access to the outer test class’s variables and methods, eliminating the need to duplicate setup and teardown logic in every nested class.
- Reduced Boilerplate Code: By using the shared context, you can avoid redundant code.
- Test Clarity: Nested classes provide a clear structure, enhancing the readability and maintainability of the test code.
Implementation of @Nested Test Classes of JUnit
Let's create an example project using JUnit 5 @Nested test classes, demonstrating how to organize tests using nested classes to handle different test scenarios.
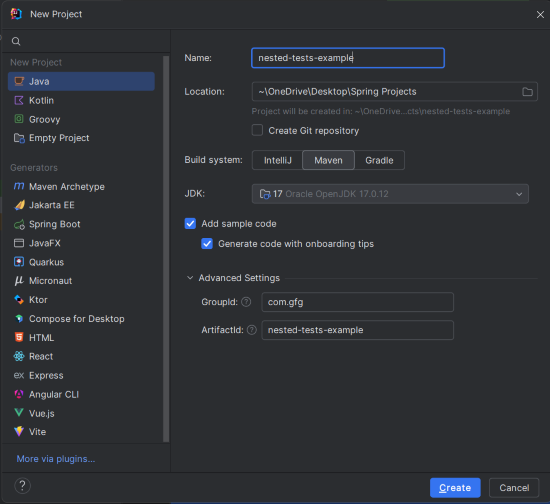
Step 1: Create a New Maven Project
Create a new Maven project using IntelliJ IDEA. Choose the following options:
- Name: nested-tests-example
- Build System: Maven
Click on the Create button.
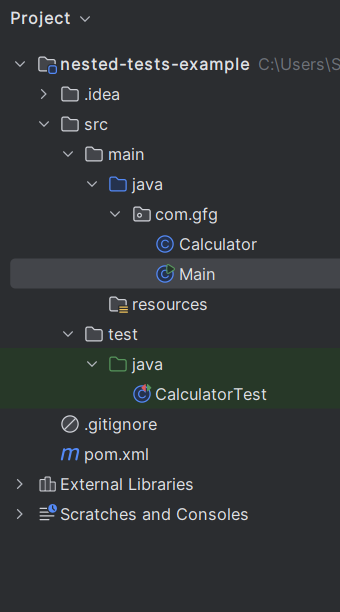
Project Structure
After project creation done successfully, the folder structure will look like the below image:
Step 2: Add JUnit 5 Dependencies to pom.xml
Open the pom.xml file and add the following dependencies for JUnit 5.
<?xml version="1.0" encoding="UTF-8"?>
<project xmlns="https://maven.apache.org/POM/4.0.0"
         xmlns:xsi="https://www.w3.org/2001/XMLSchema-instance"
         xsi:schemaLocation="https://maven.apache.org/POM/4.0.0 https://maven.apache.org/xsd/maven-4.0.0.xsd">
    <modelVersion>4.0.0</modelVersion>

    <groupId>com.gfg</groupId>
    <artifactId>nested-tests-example</artifactId>
    <version>1.0-SNAPSHOT</version>

    <properties>
        <maven.compiler.source>17</maven.compiler.source>
        <maven.compiler.target>17</maven.compiler.target>
        <project.build.sourceEncoding>UTF-8</project.build.sourceEncoding>
    </properties>

    <dependencies>
        <!-- JUnit 5 API -->
        <dependency>
            <groupId>org.junit.jupiter</groupId>
            <artifactId>junit-jupiter-api</artifactId>
            <version>5.9.0</version>
            <scope>test</scope>
        </dependency>

        <!-- JUnit 5 Test Engine -->
        <dependency>
            <groupId>org.junit.jupiter</groupId>
            <artifactId>junit-jupiter-engine</artifactId>
            <version>5.9.0</version>
            <scope>test</scope>
        </dependency>
    </dependencies>

    <build>
        <plugins>
            <plugin>
                <groupId>org.apache.maven.plugins</groupId>
                <artifactId>maven-surefire-plugin</artifactId>
                <version>3.0.0-M5</version>
            </plugin>
        </plugins>
    </build>

</project>
Step 3: Create the Calculator Class
Create the Calculator class, which provides basic mathematical operations.
Calculator.java:
package com.gfg;

public class Calculator {

    // Adds two numbers
    public int add(int a, int b)
    {
        return a + b;
    }

    // Subtracts one number from another
    public int subtract(int a, int b)
    {
        return a - b;
    }

    // Multiplies two numbers
    public int multiply(int a, int b)
    {
        return a * b;
    }

    // Divides one number by another; throws an exception when dividing by zero
    public int divide(int a, int b)
    {
        if (b == 0)
        {
            throw new ArithmeticException("Cannot divide by zero");
        }
        return a / b;
    }
}
Step 4: Main Class
This class demonstrates the usage of the Calculator class.
package com.gfg;

public class Main {
    public static void main(String[] args) {
        Calculator calculator = new Calculator();

        // Example usage of Calculator methods
        int additionResult = calculator.add(10, 5);
        System.out.println("Addition (10 + 5): " + additionResult);

        int subtractionResult = calculator.subtract(10, 5);
        System.out.println("Subtraction (10 - 5): " + subtractionResult);

        int multiplicationResult = calculator.multiply(10, 5);
        System.out.println("Multiplication (10 * 5): " + multiplicationResult);

        try {
            int divisionResult = calculator.divide(10, 2);
            System.out.println("Division (10 / 2): " + divisionResult);
        } catch (ArithmeticException e) {
            System.err.println("Error: " + e.getMessage());
        }
    }
}
Explanation:
- The
Mainclass demonstrates how to use theCalculatorclass methods for addition, subtraction, multiplication, and division. - It handles exceptions for division by zero.
Step 5: Create the CalculatorTest Class (Unit Tests with @Nested)
Create the CalculatorTest class and write the test cases using JUnit 5's @Nested feature.
CalculatorTest.java:
import com.gfg.Calculator;
import org.junit.jupiter.api.BeforeEach;
import org.junit.jupiter.api.Nested;
import org.junit.jupiter.api.Test;

import static org.junit.jupiter.api.Assertions.*;

class CalculatorTest {

    private Calculator calculator; // Instance of Calculator for testing

    @BeforeEach
    void setup() {
        calculator = new Calculator(); // Initialize Calculator before each test
    }

    // Nested class for testing addition
    @Nested
    class AdditionTests {
        @Test
        void shouldReturnCorrectSumForTwoPositiveNumbers() {
            assertEquals(5, calculator.add(2, 3)); // Test addition
        }

        @Test
        void shouldReturnCorrectSumForPositiveAndNegativeNumber() {
            assertEquals(2, calculator.add(5, -3)); // Test addition with negative number
        }

        @Test
        void shouldReturnZeroWhenAddingZero() {
            assertEquals(5, calculator.add(5, 0)); // Test addition with zero
        }
    }

    // Nested class for testing subtraction
    @Nested
    class SubtractionTests {
        @Test
        void shouldReturnCorrectDifferenceForTwoPositiveNumbers() {
            assertEquals(2, calculator.subtract(5, 3)); // Test subtraction
        }

        @Test
        void shouldReturnCorrectDifferenceForPositiveAndNegativeNumber() {
            assertEquals(8, calculator.subtract(5, -3)); // Test subtraction with negative number
        }

        @Test
        void shouldReturnZeroWhenSubtractingSameNumbers() {
            assertEquals(0, calculator.subtract(5, 5)); // Test subtraction of same numbers
        }
    }

    // Nested class for testing multiplication
    @Nested
    class MultiplicationTests {
        @Test
        void shouldReturnCorrectProductForTwoPositiveNumbers() {
            assertEquals(15, calculator.multiply(3, 5)); // Test multiplication
        }

        @Test
        void shouldReturnZeroWhenMultiplyingWithZero() {
            assertEquals(0, calculator.multiply(5, 0)); // Test multiplication with zero
        }

        @Test
        void shouldReturnNegativeProductWhenOneNegativeNumber() {
            assertEquals(-15, calculator.multiply(-3, 5)); // Test multiplication with negative number
        }
    }

    // Nested class for testing division
    @Nested
    class DivisionTests {
        @Test
        void shouldReturnCorrectQuotientForTwoPositiveNumbers() {
            assertEquals(2, calculator.divide(10, 5)); // Test division
        }

        @Test
        void shouldThrowExceptionWhenDividingByZero() {
            assertThrows(ArithmeticException.class, () -> calculator.divide(10, 0)); // Test division by zero
        }

        @Test
        void shouldReturnNegativeQuotientWhenDividingWithNegativeNumber() {
            assertEquals(-2, calculator.divide(-10, 5)); // Test division with negative number
        }
    }
}
- Class Setup: The
CalculatorTestclass uses@BeforeEachto initialize a newCalculatorinstance before each test. - Nested Classes:
- Each nested class (e.g.,
AdditionTests,SubtractionTests) groups related test cases, improving organization and readability. - Each test method is annotated with
@Test, indicating that it is a test case.
- Each nested class (e.g.,
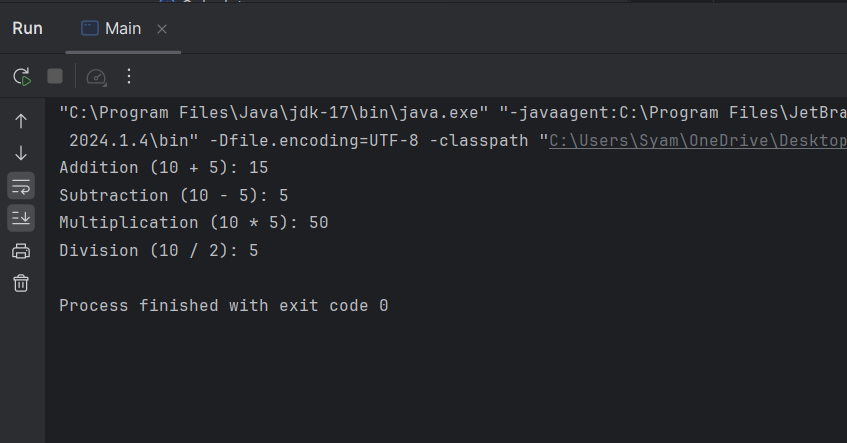
Step 6: Run the Application
After the project completed, run the application, and it will show the below output:
Step 7: Running the Tests
To run the tests, execute the following Maven command in your terminal:
mvn testOutput:
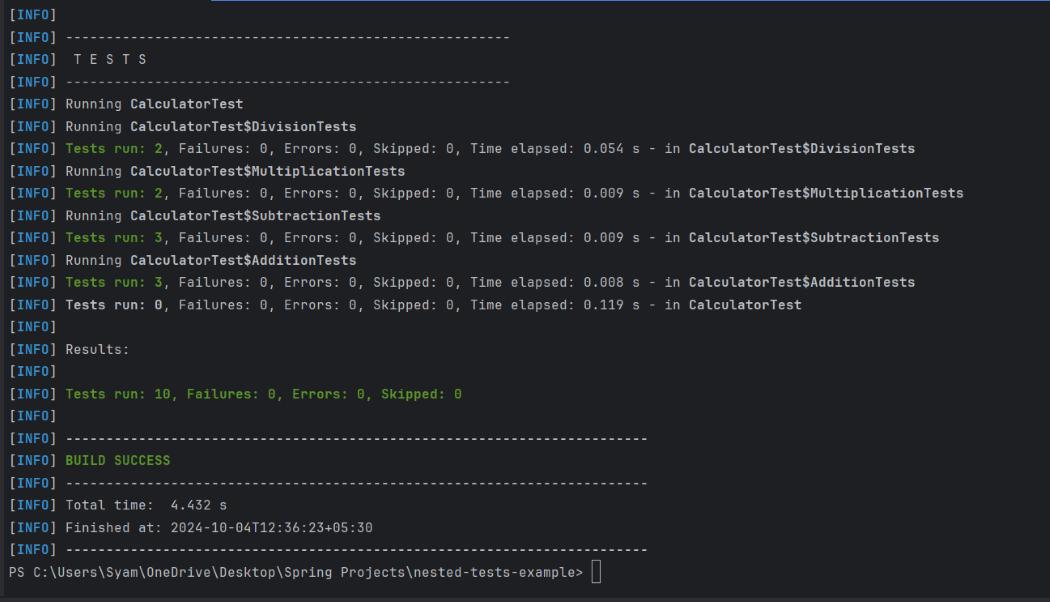
This output confirms that all ten tests (across all nested classes) passed successfully.
