Auto-generated keys are values automatically created by the database when a new record is inserted. In relational databases, these keys are often primary keys, such as IDs, that uniquely identify each row in a table. When using Spring JDBC, it's common to insert data into a table and obtain the auto-generated key immediately after the insert operation. This is useful when you need to use the key for subsequent operations, such as inserting related records into other tables.
In Spring JDBC, the JdbcTemplate class provides convenient methods to execute SQL queries and updates. To obtain auto-generated keys after an insert operation, you can use the GeneratedKeyHolder class along with the PreparedStatementCreator.
Prerequisites:
Before working with the @ResponseStatus annotation in Spring, make sure you have:
- Basic knowledge of Java and the Spring Framework
- Basic understanding of Spring Data JDBC
- Maven for dependency management
- JDK and IntelliJ IDEA installed
Key Steps:
- Use
JdbcTemplate.update()with aPreparedStatementCreatorto insert data into the table. - Pass the
GeneratedKeyHolderto capture the generated keys. - Retrieve the key from the
GeneratedKeyHolderafter the insert operation.
Implementation of Obtaining Auto-generated Keys in Spring JDBC
Step 1: Set Up the Spring Boot Project
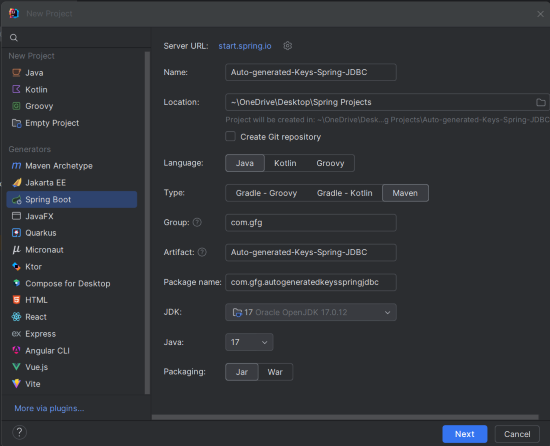
Create a new Spring Boot project using IntelliJ IDEA with the following data:
- Name: Auto-generated-Keys-Spring-JDBC
- Language: Java
- Type: Maven
- Packaging: Jar
Click on the Next button.
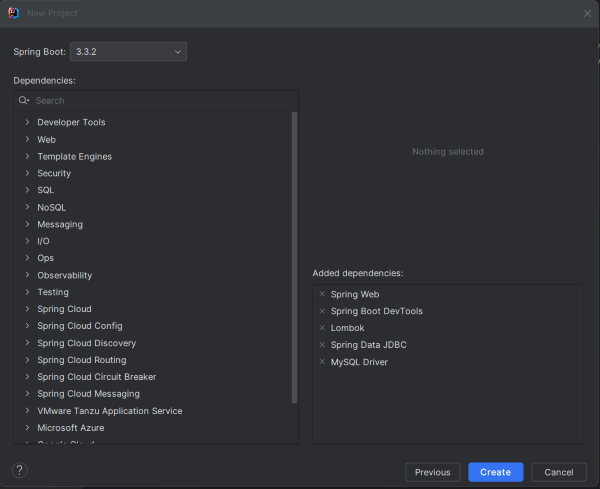
Step 2: Add the Dependencies
Add the following dependencies to the project:
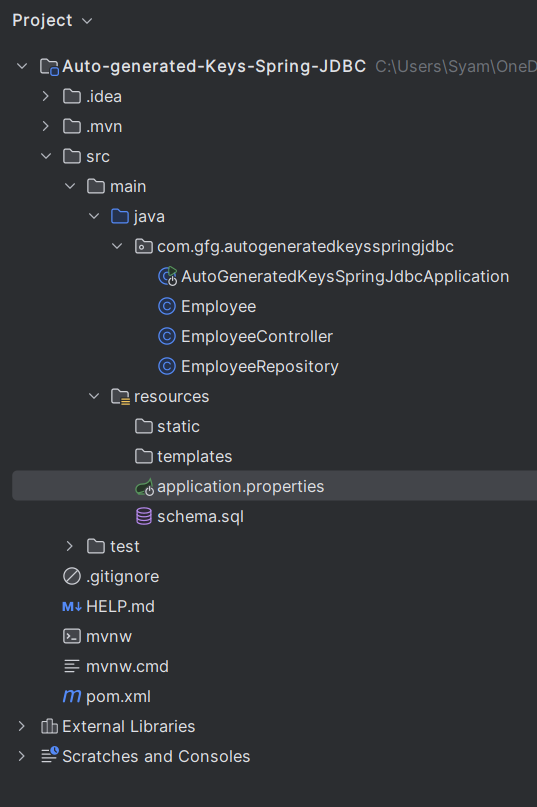
Step 3: Project Structure
Once you create the project, the file structure should look similar to this:
Step 4: Configure the Application Properties
Open application.properties and add the following MySQL and Hibernate configurations:
spring.application.name=Auto-generated-Keys-Spring-JDBC
# MySQL Database configuration
spring.datasource.url=jdbc:mysql://localhost:3306/jdbcDemoDB?useSSL=false&serverTimezone=UTC
spring.datasource.driver-class-name=com.mysql.cj.jdbc.Driver
spring.datasource.username=root
spring.datasource.password=mypassword
spring.sql.init.platform=mysql

# Hibernate properties
spring.jpa.hibernate.ddl-auto=update
spring.jpa.show-sql=true
Step 5: Create the Employees Table
Create an employees table by saving the following SQL script as schema.sql in the src/main/resources directory:
CREATE TABLE employees (
                           id INT AUTO_INCREMENT PRIMARY KEY,
                           name VARCHAR(50),
                           department VARCHAR(50)
);
Step 6: Create the Employees Class
Create a model class for the Employee.
package com.gfg.autogeneratedkeysspringjdbc;


import lombok.AllArgsConstructor;
import lombok.Data;
import lombok.NoArgsConstructor;

@Data
@AllArgsConstructor
@NoArgsConstructor
public class Employee {
    private int id;
    private String name;
    private String department;
}
This class represents the Employee entity with fields for ID, name, and department. Lombok annotations are used to generate boilerplate code like getters, setters, and constructors.
Step 7: Employee Repository
Create the method in the repository class to insert the employee and get the generated ID.
package com.gfg.autogeneratedkeysspringjdbc;

import org.springframework.jdbc.core.JdbcTemplate;
import org.springframework.jdbc.core.PreparedStatementCreator;
import org.springframework.jdbc.support.GeneratedKeyHolder;
import org.springframework.jdbc.support.KeyHolder;
import org.springframework.stereotype.Repository;

import java.sql.Connection;
import java.sql.PreparedStatement;
import java.sql.SQLException;

@Repository
public class EmployeeRepository {

    private final JdbcTemplate jdbcTemplate;

    public EmployeeRepository(JdbcTemplate jdbcTemplate) {
        this.jdbcTemplate = jdbcTemplate;
    }

    public int saveEmployee(Employee employee) {
        String sql = "INSERT INTO employees (name, department) VALUES (?, ?)";

        KeyHolder keyHolder = new GeneratedKeyHolder();

        jdbcTemplate.update(new PreparedStatementCreator() {
            @Override
            public PreparedStatement createPreparedStatement(Connection connection) throws SQLException {
                PreparedStatement ps = connection.prepareStatement(sql, new String[]{"id"});
                ps.setString(1, employee.getName());
                ps.setString(2, employee.getDepartment());
                return ps;
            }
        }, keyHolder);

        return keyHolder.getKey().intValue();
    }
}
Explanation:
- PreparedStatementCreator: It is an interface used to create the PreparedStatement for the insert query.
- GeneratedKeyHolder: It holds the auto-generated key after the insert operation.
- jdbcTemplate.update(): It executes the insert statement and populate the GeneratedKeyHolder with the generated key.
Step 8: Create the EmployeeController Class
Create the endpoint for the saveEmployee method by calling it from the service or controller of the project:
package com.gfg.autogeneratedkeysspringjdbc;

import org.springframework.beans.factory.annotation.Autowired;
import org.springframework.web.bind.annotation.*;

@RestController
@RequestMapping("/employees")
public class EmployeeController {

    @Autowired
    private EmployeeRepository employeeRepository;

    @PostMapping("/add")
    public String addEmployee(@RequestBody Employee employee) {
        int id = employeeRepository.saveEmployee(employee);
        return "Employee added with ID: " + id;
    }
}
This controller provides an endpoint for adding employees. It uses the EmployeeRepository to save the employee and return the generated ID.
Step 9: Main class
No changes are required in the main class.
package com.gfg.autogeneratedkeysspringjdbc;

import org.springframework.boot.SpringApplication;
import org.springframework.boot.autoconfigure.SpringBootApplication;

@SpringBootApplication
public class AutoGeneratedKeysSpringJdbcApplication {

    public static void main(String[] args) {
        SpringApplication.run(AutoGeneratedKeysSpringJdbcApplication.class, args);
    }

}
pom.xml file:
<?xml version="1.0" encoding="UTF-8"?>
<project xmlns="https://maven.apache.org/POM/4.0.0" xmlns:xsi="https://www.w3.org/2001/XMLSchema-instance"
         xsi:schemaLocation="https://maven.apache.org/POM/4.0.0 https://maven.apache.org/xsd/maven-4.0.0.xsd">
    <modelVersion>4.0.0</modelVersion>
    <parent>
        <groupId>org.springframework.boot</groupId>
        <artifactId>spring-boot-starter-parent</artifactId>
        <version>3.3.2</version>
        <relativePath/> <!-- lookup parent from repository -->
    </parent>
    <groupId>com.gfg</groupId>
    <artifactId>Auto-generated-Keys-Spring-JDBC</artifactId>
    <version>0.0.1-SNAPSHOT</version>
    <name>Auto-generated-Keys-Spring-JDBC</name>
    <description>Auto-generated-Keys-Spring-JDBC</description>
    <url/>
    <licenses>
        <license/>
    </licenses>
    <developers>
        <developer/>
    </developers>
    <scm>
        <connection/>
        <developerConnection/>
        <tag/>
        <url/>
    </scm>
    <properties>
        <java.version>17</java.version>
    </properties>
    <dependencies>
        <dependency>
            <groupId>org.springframework.boot</groupId>
            <artifactId>spring-boot-starter-data-jdbc</artifactId>
        </dependency>
        <dependency>
            <groupId>org.springframework.boot</groupId>
            <artifactId>spring-boot-starter-web</artifactId>
        </dependency>

        <dependency>
            <groupId>org.springframework.boot</groupId>
            <artifactId>spring-boot-devtools</artifactId>
            <scope>runtime</scope>
            <optional>true</optional>
        </dependency>
        <dependency>
            <groupId>com.mysql</groupId>
            <artifactId>mysql-connector-j</artifactId>
            <scope>runtime</scope>
        </dependency>
        <dependency>
            <groupId>org.projectlombok</groupId>
            <artifactId>lombok</artifactId>
            <optional>true</optional>
        </dependency>
        <dependency>
            <groupId>org.springframework.boot</groupId>
            <artifactId>spring-boot-starter-test</artifactId>
            <scope>test</scope>
        </dependency>
    </dependencies>

    <build>
        <plugins>
            <plugin>
                <groupId>org.springframework.boot</groupId>
                <artifactId>spring-boot-maven-plugin</artifactId>
                <configuration>
                    <excludes>
                        <exclude>
                            <groupId>org.projectlombok</groupId>
                            <artifactId>lombok</artifactId>
                        </exclude>
                    </excludes>
                </configuration>
            </plugin>
        </plugins>
    </build>

</project>
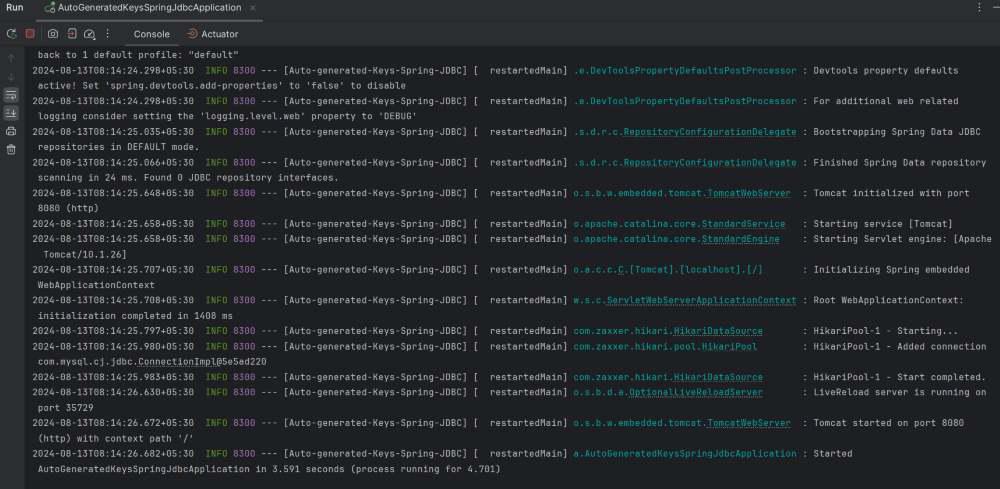
Step 10: Run the application
After completion of all the steps, it will start at port 8080.
Step 11: Testing the Application
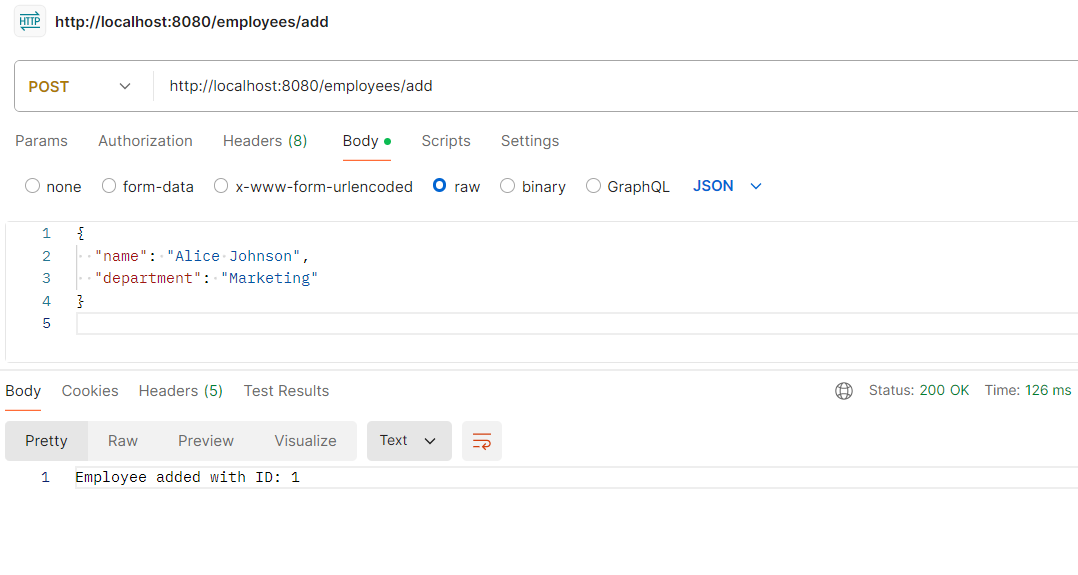
1. Save the Employee
POST http://localhost:8080/employees/addOutput:
2. Again, save the employee
POST http://localhost:8080/employees/addOutput:
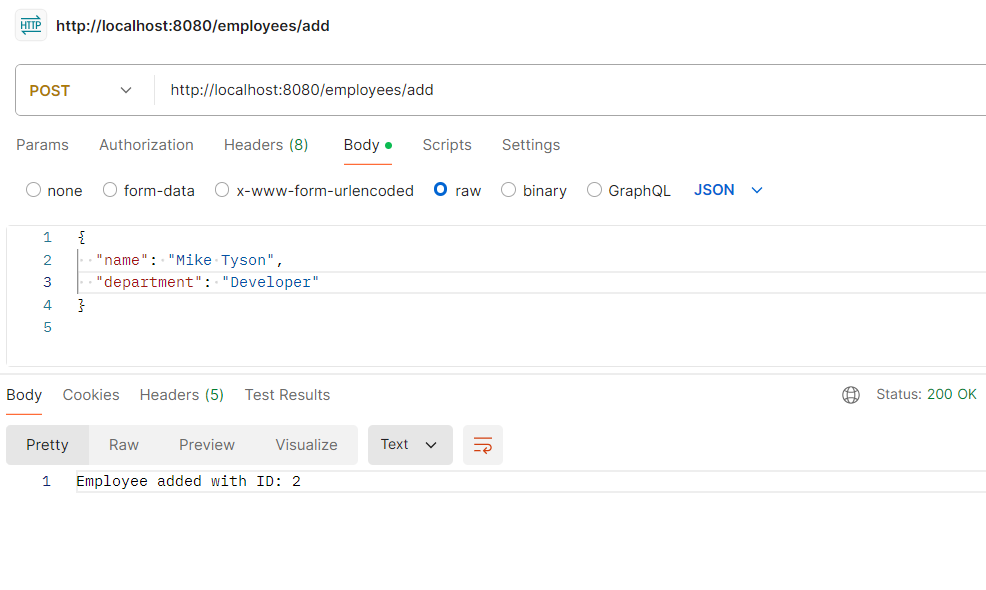
This confirms that the employee has been added to the database with the auto-generated ID of the entities of the table into the database.
This project demonstrates that how to insert the data into the database table and retrieve the auto-generated key in the Spring Boot project using Spring Data JDBC
