When working with large datasets, fetching all records at once can reduce performance and increase load on the application. Efficient data handling techniques are required to manage and process data smoothly.
- Improves application performance and responsiveness
- Helps in handling large volumes of data efficiently
Pagination
Pagination is used to handle large datasets efficiently by breaking them into smaller parts. It helps improve performance and makes data retrieval more manageable.
- Reduces load on the application by fetching limited records
- Improves response time and user experience
- Helps in managing large amounts of data efficiently
Syntax:
Pageable pageable = PageRequest.of(pageNumber, pageSize);
Page<Entity> data = repository.findAll(pageable);
Sorting
Sorting is used to organize data in a specific order, making it easier to read and analyze. It improves how data is presented and accessed in applications.
- Organizes data in ascending or descending order
- Enhances readability and user experience
- Helps in faster data analysis and retrieval
Syntax:
Sort sort = Sort.by("fieldName").ascending(); // or descending()
List<Entity> data = repository.findAll(sort);
Implementation: Pagination and Sorting in Spring Data JPA
Step 1: Create a Spring Boot Project
Create a new Spring Boot project with the following details:
- Name: spring-sorting-pagination-demo
- Language: Java
- Type: Maven
- Packaging: Jar
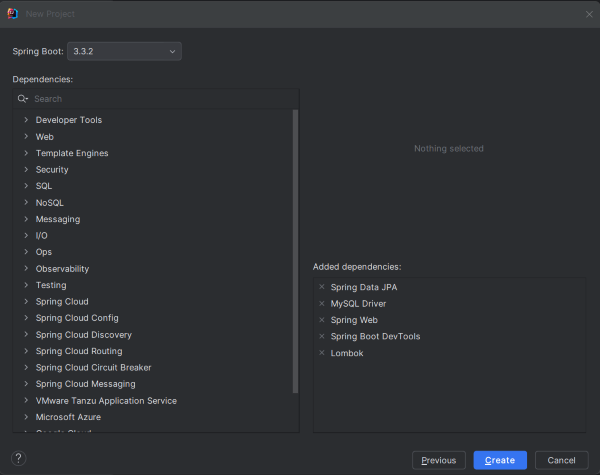
Step 2: Add the dependencies
Add the following dependencies into the project.
- Spring Web
- Spring Data JPA
- MySQL Driver
- These enable REST APIs and database interaction.
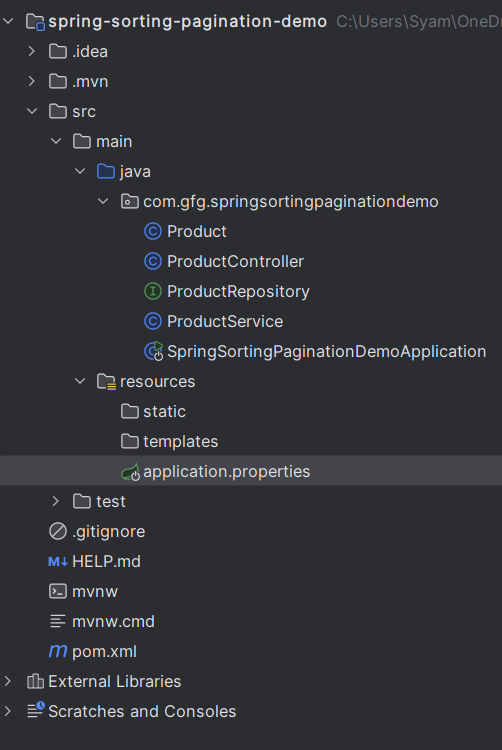
Step 3: Project Structure
Organize project into: Entity Repository Service Controller Helps maintain clean architecture.
Step 4: Configure Application Properties
- Set database details in application.properties.
- Configure: URL , Username/password and Hibernate settings
- Enables connection to MySQL database.
spring.application.name=spring-sorting-pagination-demo
spring.datasource.url=jdbc:mysql://localhost:3306/product_db
spring.datasource.username=root
spring.datasource.password=mypassword
spring.datasource.driver-class-name=com.mysql.cj.jdbc.Driver
spring.jpa.hibernate.ddl-auto=update
spring.jpa.show-sql=true
spring.jpa.properties.hibernate.dialect=org.hibernate.dialect.MySQL8Dialect
Step 5: Create the Entity Class
- Define
Productclass with fields (id, name, price). - Use JPA annotations like
@Entity,@Id. - Represents database table.
Product.java:
package com.gfg.springsortingpaginationdemo;

import jakarta.persistence.*;
import lombok.*;

@Entity
@Data
@NoArgsConstructor
@AllArgsConstructor
public class Product {
    @Id
    @GeneratedValue(strategy = GenerationType.IDENTITY)
    private Long id;
    private String name;
    private Double price;
}
Step 6: Create the Repository Interface
- Create interface extending JpaRepository.
- Provides built-in methods for: CRUD , Pagination and Sorting
- No need to write custom queries.
ProductRepository.java
package com.gfg.springsortingpaginationdemo;

import org.springframework.data.jpa.repository.JpaRepository;
import org.springframework.data.repository.PagingAndSortingRepository;
import org.springframework.stereotype.Repository;

@Repository
public interface ProductRepository extends JpaRepository<Product, Long> {
}
Note: JpaRepository extends PagingAndSortingRepository, so you get pagination and sorting functionality without needing both.
Step 7: Create the Service Class
- Add business logic layer.
- Method:
findAll(Pageable pageable) - Handles pagination request.
ProductService.java:
package com.gfg.springsortingpaginationdemo;

import org.springframework.data.domain.*;
import org.springframework.stereotype.Service;

@Service
public class ProductService {

    private final ProductRepository productRepository;

    public ProductService(ProductRepository productRepository) {
        this.productRepository = productRepository;
    }

    public Page<Product> findAll(Pageable pageable) {
        return productRepository.findAll(pageable);
    }
}
Step 8: Create the Controller Class
Create REST API endpoint /products. Accept parameters:
- page -> page number
- size -> number of records
- sortBy -> field to sort
- ascending -> sort order
- Uses PageRequest and Sort
ProductController.java:
package com.gfg.springsortingpaginationdemo;

import org.springframework.data.domain.*;
import org.springframework.web.bind.annotation.*;

@RestController
@RequestMapping("/products")
public class ProductController {

    private final ProductService productService;

    public ProductController(ProductService productService) {
        this.productService = productService;
    }

    @GetMapping
    public Page<Product> getAllProducts(
            @RequestParam(defaultValue = "0") int page,
            @RequestParam(defaultValue = "5") int size,
            @RequestParam(defaultValue = "id") String sortBy,
            @RequestParam(defaultValue = "true") boolean ascending) {

        Sort sort = ascending ? Sort.by(sortBy).ascending() : Sort.by(sortBy).descending();
        Pageable pageable = PageRequest.of(page, size, sort);
        return productService.findAll(pageable);
    }
}
Step 9: Main Class
- Runs the Spring Boot application.
@EnableSpringDataWebSupporthelps in handling pagination response.
package com.gfg.springsortingpaginationdemo;

import org.springframework.boot.SpringApplication;
import org.springframework.boot.autoconfigure.SpringBootApplication;
import org.springframework.data.web.config.EnableSpringDataWebSupport;

@SpringBootApplication
@EnableSpringDataWebSupport(pageSerializationMode = EnableSpringDataWebSupport.PageSerializationMode.VIA_DTO)
public class SpringSortingPaginationDemoApplication {

    public static void main(String[] args) {
        SpringApplication.run(SpringSortingPaginationDemoApplication.class, args);
    }

}
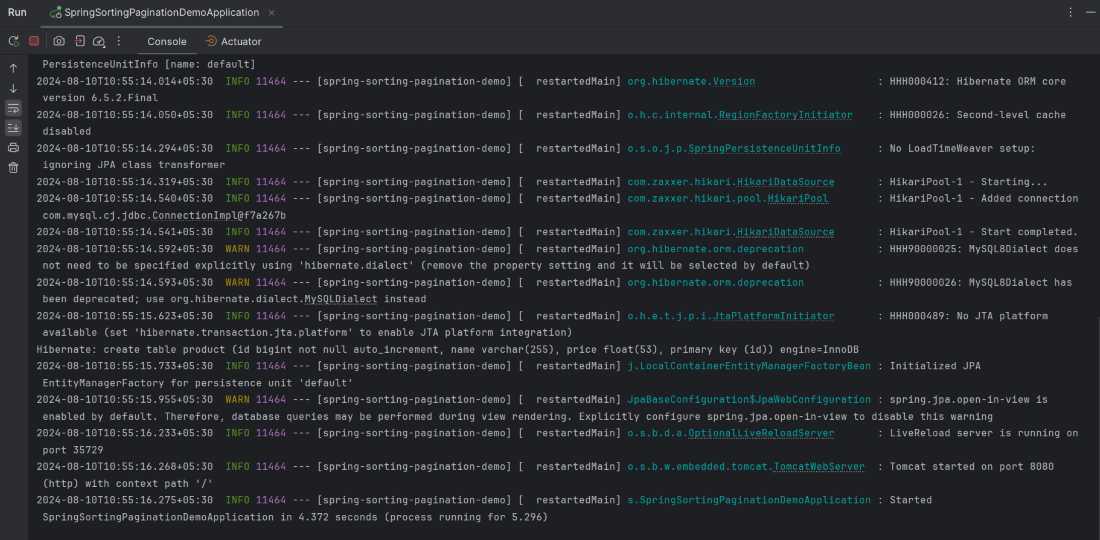
Step 10: Run the Application
Run the application. By default, it will start on port 8080.
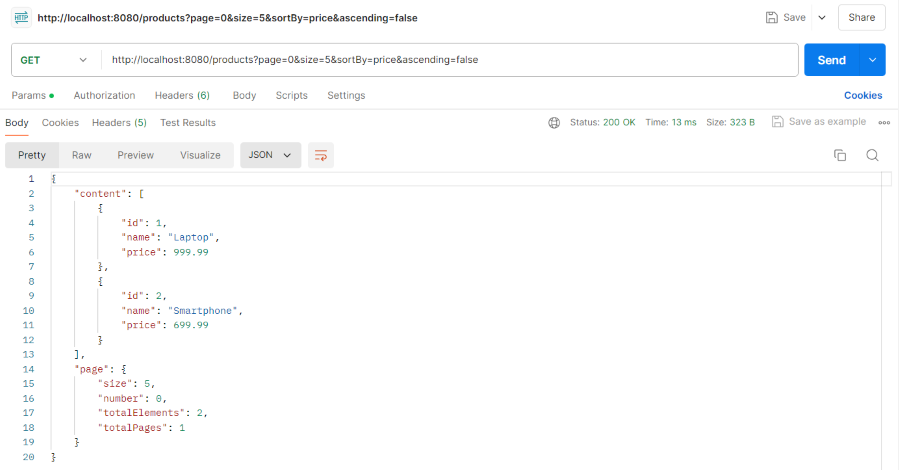
Step 11: Testing the Endpoint
To test the endpoint, use:
http://localhost:8080/products?page=0&size=5&sortBy=price&ascending=false
This fetches the first page of products, showing 5 records sorted by price in descending order.