In Spring, the BeanFactoryPostProcessor interface is used to modify the application's bean definitions before the beans are fully initialized. This can be particularly useful when we want to alter or customize the properties of the bean definitions at runtime. Unlike BeanPostProcessor, which works after bean initialization, BeanFactoryPostProcessor operates on the bean definitions themselves.
One common use case of the BeanFactoryPostProcessor is loading an external properties file and injecting those properties into Spring Beans dynamically. This approach allows us to decouple application configuration from the source code and manage configurations more effectively.
BeanFactoryPostProcessor in Spring for External Properties Management
BeanFactoryPostProcessor comes into play during the initialization phase of the Spring IoC (Inversion of Control) container but before any beans are instantiated. This allows us to modify or add bean definitions, and property values, or even replace beans dynamically before they are created.
In Spring, we can load properties files into the context and inject them into beans via PropertySourcesPlaceholderConfigurer, which is often registered as a BeanFactoryPostProcessor. This allows us to define properties in an external file (like application.properties), which can then be injected into the beans.
Flow of Execution
- Properties are loaded into the Spring context.
BeanFactoryPostProcessormanipulates the property values.- Beans are created with the modified properties injected.
Implementation of Properties in BeanFactoryPostProcessor
This example project demonstrates how to use BeanFactoryPostProcessor in Spring to load properties from a file and inject them into beans before they are fully initialized.
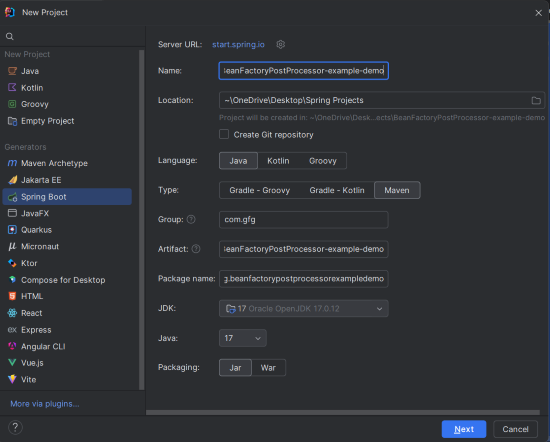
Step 1: Create a New Spring Boot Project
Create a new Spring Boot project using IntelliJ IDEA. Choose the following options:
- Name:
BeanFactoryPostProcessor-example-demo - Language: Java
- Type: Maven
- Packaging: Jar
Click on the Next button.
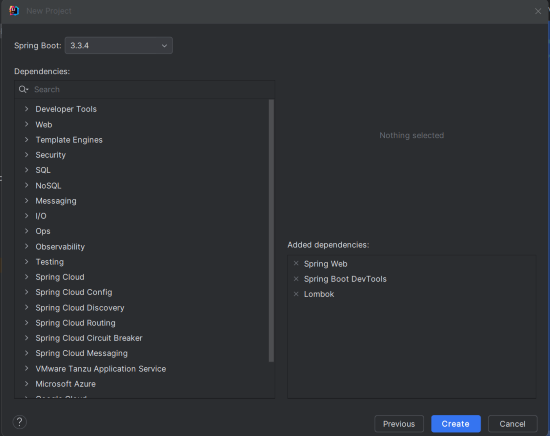
Step 2: Add the Dependencies
Add the following dependencies into the Spring Boot project:
- Spring web
- Spring Boot DevTools
- Lombok
Click on the Create button.
Spring Context Dependency:
Add the following dependency in your pom.xml file:
<!-- https://mvnrepository.com/artifact/org.springframework/spring-context -->
<dependency>
    <groupId>org.springframework</groupId>
    <artifactId>spring-context</artifactId>
    <version>6.1.13</version>
</dependency>
Step 3: Configure Application Properties
Add the following properties to your application.properties file:
spring.application.name=BeanFactoryPostProcessor-example-demo
server.port=8080
Step 4: Create the Config.properties File
Create a file named config.properties in the src/main/resources folder. This file will contain the key-value pairs that will be injected into the beans of the Spring Boot Project.
app.name=MySpringApp
app.version=1.0
Step 5: The Bean Class
Create the AppConfig class, which is the Java bean where we will inject the properties from the config.properties file.
AppConfig.java
package com.gfg.beanfactorypostprocessorexampledemo.config;

public class AppConfig {
    private String appName;
    private String appVersion;

    // Getters and Setters
    public String getAppName() {
        return appName;
    }

    public void setAppName(String appName) {
        this.appName = appName;
    }

    public String getAppVersion() {
        return appVersion;
    }

    public void setAppVersion(String appVersion) {
        this.appVersion = appVersion;
    }

    @Override
    public String toString() {
        return "AppConfig [appName=" + appName + ", appVersion=" + appVersion + "]";
    }
}
Explanation:
- This class represents a simple bean with
appNameandappVersionfields. - These fields will be injected with the values defined in
config.properties.
Step 6: Configuration Class with BeanFactoryPostProcessor
Create the Config class to register the BeanFactoryPostProcessor that loads the properties from the config.properties file and injects them into the AppConfig bean of the Spring Application.
package com.gfg.beanfactorypostprocessorexampledemo.config;

import org.springframework.beans.factory.config.PropertyPlaceholderConfigurer;
import org.springframework.context.annotation.Bean;
import org.springframework.context.annotation.Configuration;
import org.springframework.context.support.PropertySourcesPlaceholderConfigurer;

import java.io.IOException;

@Configuration
public class AppConfig {
    private String appName;
    private String appVersion;

    // Getters and Setters

    @Bean
    public static PropertyPlaceholderConfigurer propertyConfigurer() throws IOException {
        PropertySourcesPlaceholderConfigurer configurer = new PropertySourcesPlaceholderConfigurer();
        configurer.setLocation(new ClassPathResource("config.properties"));
        return configurer;
    }

    @Bean
    public AppConfig appConfig() {
        AppConfig appConfig = new AppConfig();
        appConfig.setAppName(appName);
        appConfig.setAppVersion(appVersion);
        return appConfig;
    }
}
Explanation:
- This class is annotated with
@Configurationand contains the Spring configuration. - The
propertyConfigurer()method defines theBeanFactoryPostProcessor(specificallyPropertyPlaceholderConfigurer), which loads the properties file (config.properties) and makes those properties available for injection. - The
appConfig()method defines theAppConfigbean that will have its properties injected.
Step 7: Main Class
Create the main class that runs the Spring application and prints the injected values from the properties file..
package com.gfg.beanfactorypostprocessorexampledemo;

import com.gfg.beanfactorypostprocessorexampledemo.config.AppConfig;
import org.springframework.boot.SpringApplication;
import org.springframework.boot.autoconfigure.SpringBootApplication;
import org.springframework.context.ApplicationContext;
import org.springframework.context.annotation.AnnotationConfigApplicationContext;

@SpringBootApplication
public class BeanFactoryPostProcessorExampleDemoApplication {

    public static void main(String[] args) {
        // Create the Spring application context
        ApplicationContext context = new AnnotationConfigApplicationContext("com.gfg.beanfactorypostprocessorexampledemo.config");

        // Get the AppConfig bean
        AppConfig appConfig = context.getBean(AppConfig.class);

        // Print the values injected from the config.properties file
        System.out.println(appConfig);
    }
}
Explanation:
- This class creates the application context (
AnnotationConfigApplicationContext) and retrieves theAppConfigbean. - Finally, it prints the values of the properties (
appNameandappVersion), which have been injected from theconfig.propertiesfile.
pom.xml File:
Here’s a sample pom.xml for our Spring Boot application:
<?xml version="1.0" encoding="UTF-8"?>
<project xmlns="https://maven.apache.org/POM/4.0.0" xmlns:xsi="https://www.w3.org/2001/XMLSchema-instance"
         xsi:schemaLocation="https://maven.apache.org/POM/4.0.0 https://maven.apache.org/xsd/maven-4.0.0.xsd">
    <modelVersion>4.0.0</modelVersion>
    <parent>
        <groupId>org.springframework.boot</groupId>
        <artifactId>spring-boot-starter-parent</artifactId>
        <version>3.3.4</version>
        <relativePath/> <!-- lookup parent from repository -->
    </parent>
    <groupId>com.gfg</groupId>
    <artifactId>BeanFactoryPostProcessor-example-demo</artifactId>
    <version>0.0.1-SNAPSHOT</version>
    <name>BeanFactoryPostProcessor-example-demo</name>
    <description>BeanFactoryPostProcessor-example-demo</description>
    <properties>
        <java.version>17</java.version>
    </properties>
    <dependencies>
        <dependency>
            <groupId>org.springframework.boot</groupId>
            <artifactId>spring-boot-starter-web</artifactId>
        </dependency>
        <dependency>
            <groupId>org.springframework</groupId>
            <artifactId>spring-context</artifactId>
            <version>6.1.13</version>
        </dependency>
        <dependency>
            <groupId>org.springframework.boot</groupId>
            <artifactId>spring-boot-devtools</artifactId>
            <scope>runtime</scope>
            <optional>true</optional>
        </dependency>
        <dependency>
            <groupId>org.projectlombok</groupId>
            <artifactId>lombok</artifactId>
            <optional>true</optional>
        </dependency>
        <dependency>
            <groupId>org.springframework.boot</groupId>
            <artifactId>spring-boot-starter-test</artifactId>
            <scope>test</scope>
        </dependency>
    </dependencies>
    <build>
        <plugins>
            <plugin>
                <groupId>org.springframework.boot</groupId>
                <artifactId>spring-boot-maven-plugin</artifactId>
            </plugin>
        </plugins>
    </build>
</project>
Step 8: Run the Application
To run the application, execute the following command:
mvn spring-boot:runYou should see the output similar to below:
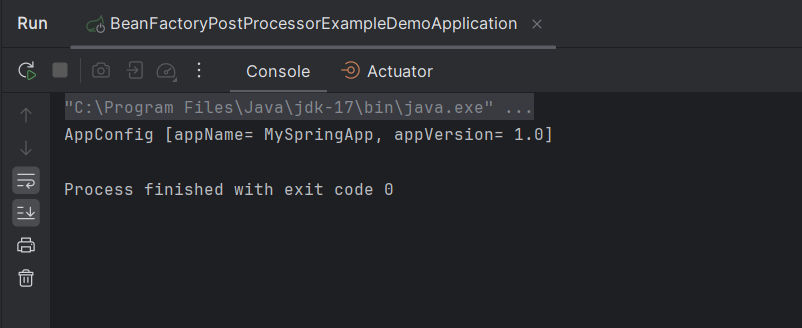
This confirms that the properties were successfully loaded from the config.properties file and injected into the AppConfig bean.
Conclusion
In this article, we explored how to use BeanFactoryPostProcessor in Spring to load properties from an external file (config.properties) and inject them into a bean (AppConfig) dynamically. This approach allows for flexible configuration management, separating application logic from configuration settings. By utilizing BeanFactoryPostProcessor, you can customize and manipulate your Spring application's properties effectively, enhancing maintainability and scalability.
