Spring Boot simplifies RESTful API and microservice development by minimizing configuration. Its core concepts are Dependency Injection (DI) and Spring Beans. DI implements Inversion of Control (IoC) by letting Spring manage object creation and dependencies, while Spring Beans are the managed objects forming the foundation of a Spring application.
Dependency Injection (DI)
Dependency Injection is a design pattern in which an object’s dependencies are provided by an external entity rather than the object itself creating them. This approach promotes loose coupling, enhances testability, and makes the application more maintainable.
In Spring, Dependency Injection can be implemented in three primary ways:
1. Constructor Injection
Dependencies are injected through the class constructor. It ensures that all required dependencies are provided at the time of object creation, which promotes immutability.
Example:
import org.springframework.beans.factory.annotation.Autowired;
import org.springframework.stereotype.Service;

@Service
public class MyServiceClass {
    private final Dependency dependency;

    @Autowired
    public MyServiceClass(Dependency dependency) {
        this.dependency = dependency;
    }

    public Dependency getDependency() {
        return dependency;
    }
}
- @Service marks this class as a Spring Bean.
- @Autowired injects the Dependency instance into the constructor.
- Constructor injection is preferred for mandatory dependencies and ensures better testability.
2. Setter Injection
Dependencies are injected via setter methods. This approach allows changing dependencies even after the object is created and supports optional dependencies.
Example:
import org.springframework.beans.factory.annotation.Autowired;
import org.springframework.stereotype.Service;

@Service
public class MyService {
    private Dependency dependency;

    // Setter Injection
    @Autowired
    public void setDependency(Dependency dependency) {
        this.dependency = dependency;
    }

    // Getter method (optional)
    public Dependency getDependency() {
        return dependency;
    }
}
- @Autowired injects the dependency into the setter method.
- Useful when dependencies are optional or may change at runtime.
3. Field Injection
Dependencies are injected directly into fields using annotations. While concise, it is generally discouraged because it hides dependencies and complicates testing.
Example:
import org.springframework.beans.factory.annotation.Autowired;
import org.springframework.stereotype.Service;

@Service
public class MyService {
    @Autowired
    private Dependency dependency;

    public Dependency getDependency() {
        return dependency;
    }
}
- Directly injects the dependency into the field.
- Should be avoided in favor of constructor injection for cleaner, testable code.
Spring Beans
Spring Beans are objects managed by the Spring IoC container. Their lifecycle including creation, initialization, and destruction is handled by Spring. Beans can be defined using annotations or configuration classes.
Defining Beans:
1. Using the Annotations
Common stereotype annotations used in Spring are:
- @Component: A general-purpose annotation to mark a class as a Spring Bean.
- @Service: Specialized for service-layer classes.
- @Repository: Specialized for persistence-layer classes.
- @Controller: Specialized for controller classes in Spring MVC.
Example:
import org.springframework.stereotype.Service;

@Service
public class MyService {
    public String serve() {
        return "Service is running!";
    }
}
- @Service registers the class as a service-layer bean.
- The method serve() provides business functionality.
2. Using the @Bean Annotation
Beans can also be defined within a configuration class using the @Bean annotation. This method provides explicit control over bean instantiation.
Example:
import org.springframework.context.annotation.Bean;
import org.springframework.context.annotation.Configuration;

@Configuration
public class AppConfig {

    @Bean
    public MyService myService() {
        return new MyService();
    }
}
- @Configuration marks the class as a source of bean definitions.
- @Bean defines and registers a bean explicitly.
Bean Scopes:
Spring supports several bean scopes that determine the lifecycle of a bean instance:
- Singleton: A single shared instance across the application (default scope).
- Prototype: A new instance is created each time the bean is requested.
- Request: A new instance is created for each HTTP request (used in web apps).
- Session: A new instance is created for each HTTP session.
Step-by-step Implementation
Let's create a simple Spring Boot project to demonstrate Dependency Injection and Spring Beans.
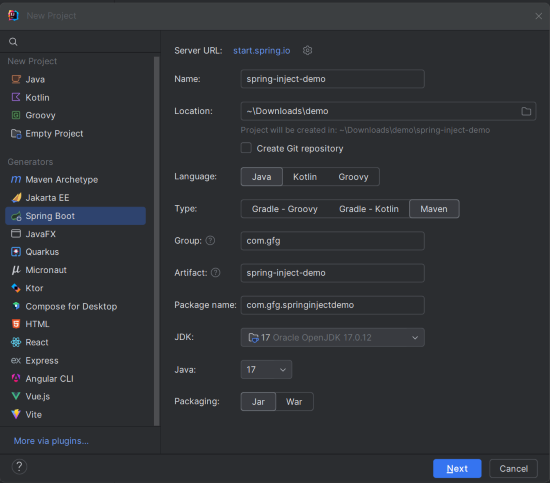
Step 1: Create a Spring Boot Project
Create a new Spring Boot project named spring-inject-demo using IntelliJ IDEA or Spring Initializr with the following settings:
- Project Type: Maven
- Language: Java
- Packaging: Jar
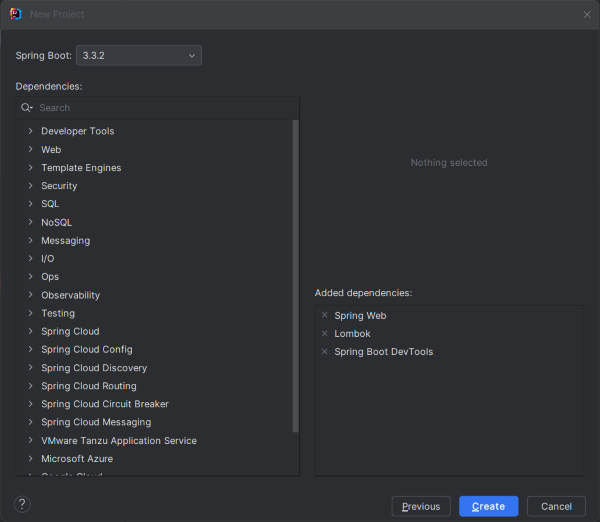
Step 2: Add Dependencies
Add the following dependencies in the pom.xml file:
- spring-boot-starter-web: For building RESTful web applications.
- spring-boot-devtools: Enables automatic restarts during development.
- lombok: Reduces boilerplate code (optional).
- spring-boot-starter-test: Provides testing libraries.
pom.xml:
<dependencies>
    <dependency>
        <groupId>org.springframework.boot</groupId>
        <artifactId>spring-boot-starter-web</artifactId>
    </dependency>

    <dependency>
        <groupId>org.springframework.boot</groupId>
        <artifactId>spring-boot-devtools</artifactId>
        <scope>runtime</scope>
        <optional>true</optional>
    </dependency>

    <dependency>
        <groupId>org.projectlombok</groupId>
        <artifactId>lombok</artifactId>
        <optional>true</optional>
    </dependency>

    <dependency>
        <groupId>org.springframework.boot</groupId>
        <artifactId>spring-boot-starter-test</artifactId>
        <scope>test</scope>
    </dependency>
</dependencies>
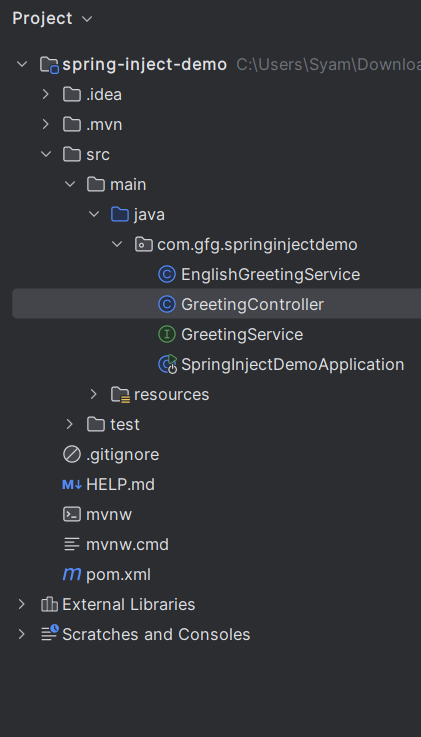
Project Structure:
After creating the project, the file structure will look like this:
Step 3: Define the Service Interface
Create an interface named GreetingService to define a method for greeting.
package com.gfg.springinjectdemo;

public interface GreetingService {
    String greet();
}
Defines a contract that different services can implement.
Step 5: Implement the Service Interface
package com.gfg.springinjectdemo;

import org.springframework.stereotype.Service;

@Service
public class EnglishGreetingService implements GreetingService {
    @Override
    public String greet() {
        return "Hello, World!";
    }
}
Explanation:
- @Service registers the implementation as a Spring Bean.
- The greet() method returns a greeting message.
Step 6: Create the Controller
Create a GreetingController to use the GreetingService.
package com.gfg.springinjectdemo;

import org.springframework.beans.factory.annotation.Autowired;
import org.springframework.web.bind.annotation.GetMapping;
import org.springframework.web.bind.annotation.RestController;

@RestController
public class GreetingController {

    private final GreetingService greetingService;

    @Autowired
    public GreetingController(GreetingService greetingService) {
        this.greetingService = greetingService;
    }

    @GetMapping("/greet")
    public String greet() {
        return greetingService.greet();
    }
}
- @RestController marks this class as a REST controller.
- @Autowired performs constructor-based injection of GreetingService.
- /greet endpoint returns the greeting message.
Step 7: Main Application Class
The main class remains unchanged.
package com.gfg.springinjectdemo;

import org.springframework.boot.SpringApplication;
import org.springframework.boot.autoconfigure.SpringBootApplication;

@SpringBootApplication
public class SpringInjectDemoApplication {

    public static void main(String[] args) {
        SpringApplication.run(SpringInjectDemoApplication.class, args);
    }
}
- @SpringBootApplication: Indicates that this is a Spring Boot application.
- main(): The entry point of the application.
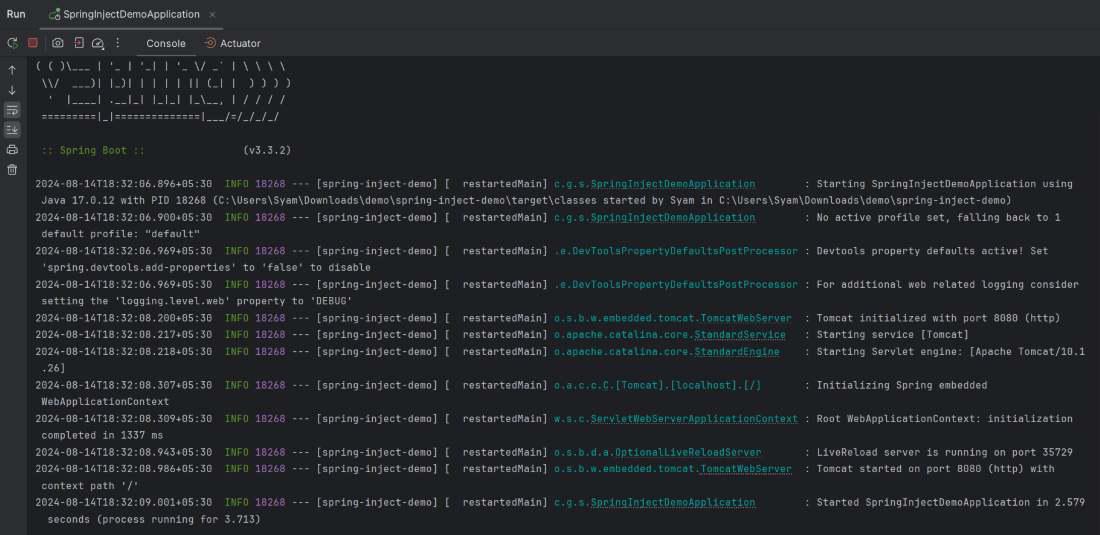
Step 8: Run the application
Run the project, and the application will start on port 8080.
Step 9: Test the Endpoint
Open the browser and access:
http://localhost:8080/greet
Output:

