Event handling in Spring is a powerful mechanism that allows different components of a Spring application to communicate with each other in a loosely coupled manner. This is achieved through the Observer Pattern, where a publisher sends events and multiple listeners react to them.
Event Handling in Spring Boot
Spring Event Handling enables various components of an application to communicate loosely. It utilizes the Observer Design Pattern, involving three main components:
1. Event: The Custom Event Class
The event in Spring represents something significant that has happened in the application. It could range from a user logging in to a file being uploaded. In Spring, custom events are typically subclasses of ApplicationEvent.
Key Points:
- The event class can hold information related to the event, accessible by listeners.
- It extends the
ApplicationEventclass.
package com.gfg.springeventhandling.event;

import org.springframework.context.ApplicationEvent;

public class CustomSpringEvent extends ApplicationEvent {
    private final String message;

    public CustomSpringEvent(Object source, String message) {
        super(source);
        this.message = message;
    }

    public String getMessage() {
        return message;
    }
}
CustomSpringEventextendsApplicationEvent.- It contains a
messagefield to hold event-related information. - The constructor accepts the event source and the message.
- The
getMessage()method allows listeners to retrieve the event message.
2. Publisher: Publishing the Event
The publisher generates and broadcasts events to the Spring context. This is usually done using the ApplicationEventPublisher interface, which provides the publishEvent() method.
Key Points:
- The publisher triggers the event and sends it to all interested listeners.
- It uses
ApplicationEventPublisherto publish events.
package com.gfg.springeventhandling.event;

import org.springframework.context.ApplicationEventPublisher;
import org.springframework.stereotype.Component;

@Component
public class CustomSpringEventPublisher {

    private final ApplicationEventPublisher applicationEventPublisher;

    public CustomSpringEventPublisher(ApplicationEventPublisher applicationEventPublisher) {
        this.applicationEventPublisher = applicationEventPublisher;
    }

    public void publishEvent(final String message) {
        System.out.println("Publishing custom event.");
        CustomSpringEvent customSpringEvent = new CustomSpringEvent(this, message);
        applicationEventPublisher.publishEvent(customSpringEvent);
    }
}
CustomSpringEventPublisheris a Spring component that acts as the event publisher.- It injects
ApplicationEventPublisherthrough the constructor. - The
publishEvent()method creates and publishesCustomSpringEvent.
3. Listener: Reacting to the Event
Listeners react to specific events. In Spring, listeners are typically annotated with @EventListener, which registers the method as an event handler for a specific event type.
Key Points:
- The listener component listens for specific events and executes logic when the event is received.
- It uses the
@EventListenerannotation to register the method as the event handler.
package com.gfg.springeventhandling.event;

import org.springframework.context.event.EventListener;
import org.springframework.stereotype.Component;

@Component
public class CustomSpringEventListener {

    @EventListener
    public void handleCustomSpringEvent(CustomSpringEvent event) {
        System.out.println("Received spring custom event - " + event.getMessage());
    }
}
CustomSpringEventListeneris a Spring component that listens forCustomSpringEvent.- The
handleCustomSpringEvent()method, annotated with@EventListener, prints the event message to the console.
Implementation of Event Handling in a Spring Boot Application
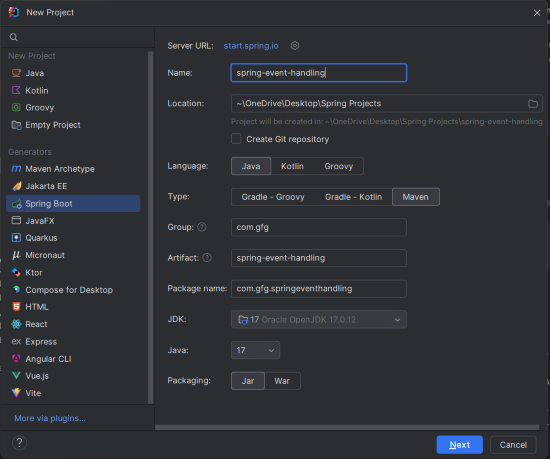
Step 1: Create a new Spring Boot Project
Create a new Spring Boot project using IntelliJ IDEA. Choose the following options:
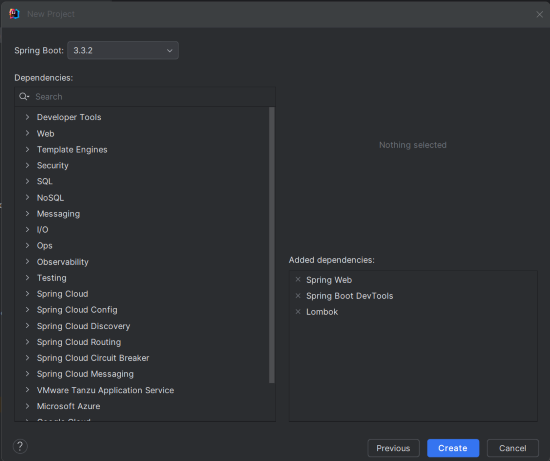
Step 2: Add Dependencies
Add the following dependencies into the Spring Boot project.
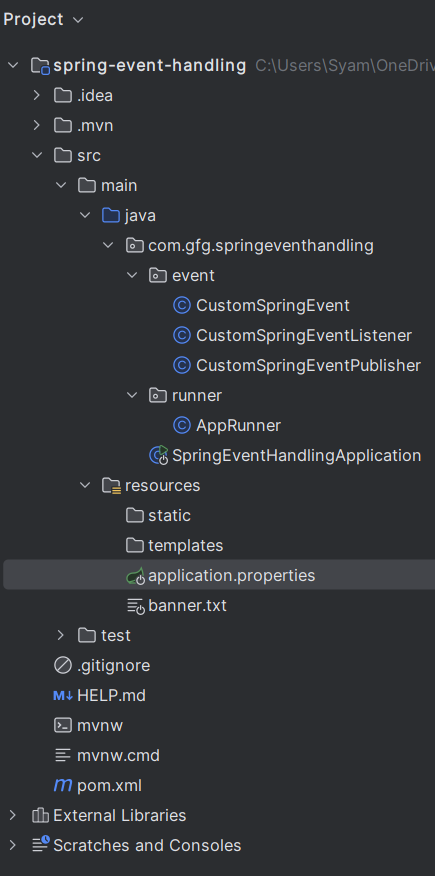
Project Structure
After project creation done, the folder structure will look like the below image.
Step 3: Configure Application Properties
Update the application.properties file.
spring.application.name=spring-event-handling

# application.properties
spring.main.banner-mode=console
Step 4: Create the CustomSpringEvent Class
Define the event class.
event/CustomSpringEvent.java:
package com.gfg.springeventhandling.event;

import org.springframework.context.ApplicationEvent;

public class CustomSpringEvent extends ApplicationEvent {
    private final String message;

    public CustomSpringEvent(Object source, String message) {
        super(source);
        this.message = message;
    }

    public String getMessage() {
        return message;
    }
}
Step 5: Create the CustomSpringEventListener Class
Create the listener that listens for the custom event and react to it.
event/CustomSpringEventListener.java:
package com.gfg.springeventhandling.event;

import org.springframework.context.event.EventListener;
import org.springframework.stereotype.Component;

@Component
public class CustomSpringEventListener {

    @EventListener
    public void handleCustomSpringEvent(CustomSpringEvent event) {
        System.out.println("Received spring custom event - " + event.getMessage());
    }
}
Step 6: Create the CustomSpringEventPublisher Class
The publisher will use the ApplicationEventPublisher to publish the event.
event/CustomSpringEventPublisher.java:
package com.gfg.springeventhandling.event;

import org.springframework.context.ApplicationEventPublisher;
import org.springframework.stereotype.Component;

@Component
public class CustomSpringEventPublisher {

    private final ApplicationEventPublisher applicationEventPublisher;

    public CustomSpringEventPublisher(ApplicationEventPublisher applicationEventPublisher) {
        this.applicationEventPublisher = applicationEventPublisher;
    }

    public void publishEvent(final String message) {
        System.out.println("Publishing custom event.");
        CustomSpringEvent customSpringEvent = new CustomSpringEvent(this, message);
        applicationEventPublisher.publishEvent(customSpringEvent);
    }
}
Step 7: Create the AppRunner Class
Trigger the event from the command-line runner.
runner/AppRunner.java:
package com.gfg.springeventhandling.runner;

import com.gfg.springeventhandling.event.CustomSpringEventPublisher;
import org.springframework.boot.CommandLineRunner;
import org.springframework.stereotype.Component;

@Component
public class AppRunner implements CommandLineRunner {

    private final CustomSpringEventPublisher publisher;

    public AppRunner(CustomSpringEventPublisher publisher) {
        this.publisher = publisher;
    }

    @Override
    public void run(String... args) throws Exception {
        publisher.publishEvent("Hello, Spring Event!");
    }
}
Step 8: Main Class
No changes are required in the main class.
package com.gfg.springeventhandling;

import org.springframework.boot.SpringApplication;
import org.springframework.boot.autoconfigure.SpringBootApplication;

@SpringBootApplication
public class SpringEventHandlingApplication {

    public static void main(String[] args) {
        SpringApplication.run(SpringEventHandlingApplication.class, args);
    }
}
pom.xml file:
<?xml version="1.0" encoding="UTF-8"?>
<project xmlns="https://maven.apache.org/POM/4.0.0" xmlns:xsi="https://www.w3.org/2001/XMLSchema-instance"
         xsi:schemaLocation="https://maven.apache.org/POM/4.0.0 https://maven.apache.org/xsd/maven-4.0.0.xsd">
    <modelVersion>4.0.0</modelVersion>
    <parent>
        <groupId>org.springframework.boot</groupId>
        <artifactId>spring-boot-starter-parent</artifactId>
        <version>3.3.2</version>
        <relativePath/> <!-- lookup parent from repository -->
    </parent>
    <groupId>com.gfg</groupId>
    <artifactId>spring-event-handling</artifactId>
    <version>0.0.1-SNAPSHOT</version>
    <name>spring-event-handling</name>
    <description>spring-event-handling</description>
    <url/>
    <licenses>
        <license/>
    </licenses>
    <developers>
        <developer/>
    </developers>
    <scm>
        <connection/>
        <developerConnection/>
        <tag/>
        <url/>
    </scm>
    <properties>
        <java.version>17</java.version>
    </properties>
    <dependencies>
        <dependency>
            <groupId>org.springframework.boot</groupId>
            <artifactId>spring-boot-starter-web</artifactId>
        </dependency>

        <dependency>
            <groupId>org.springframework.boot</groupId>
            <artifactId>spring-boot-devtools</artifactId>
            <scope>runtime</scope>
            <optional>true</optional>
        </dependency>
        <dependency>
            <groupId>org.projectlombok</groupId>
            <artifactId>lombok</artifactId>
            <optional>true</optional>
        </dependency>
        <dependency>
            <groupId>org.springframework.boot</groupId>
            <artifactId>spring-boot-starter-test</artifactId>
            <scope>test</scope>
        </dependency>
    </dependencies>

    <build>
        <plugins>
            <plugin>
                <groupId>org.springframework.boot</groupId>
                <artifactId>spring-boot-maven-plugin</artifactId>
                <configuration>
                    <excludes>
                        <exclude>
                            <groupId>org.projectlombok</groupId>
                            <artifactId>lombok</artifactId>
                        </exclude>
                    </excludes>
                </configuration>
            </plugin>
        </plugins>
    </build>

</project>
Step 9: Run the Application
Start the application and it will run on port 8080.
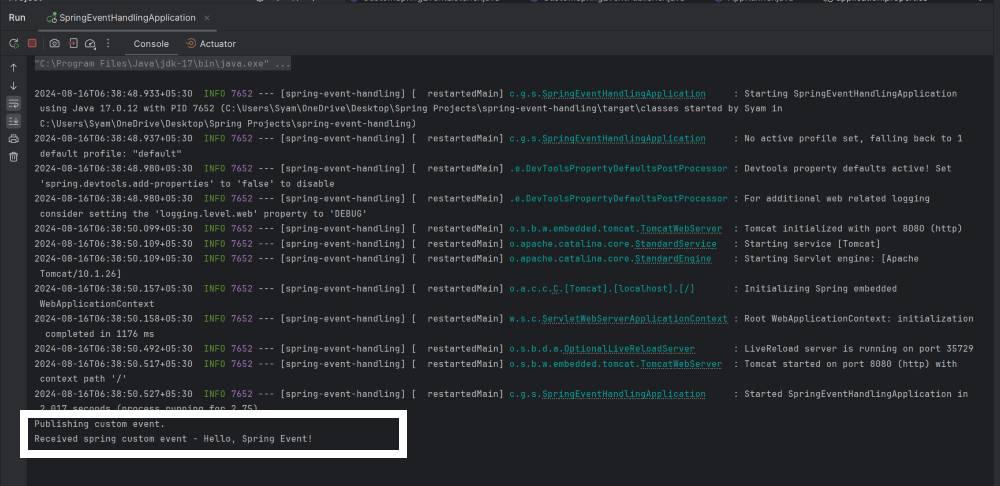
This example project provides clear and practical demonstration of the Spring Event Handling of the Spring Boot application.
How These Components Work Together
- Event Creation: The event class,
CustomSpringEvent, can be defined to represent the event in the application. - Event Publishing: The publisher component,
CustomSpringEventPublisher, is responsible for creating and publishing this event to the Spring context. The event is typically published in response to some application logic. - Event Listening: The listener component,
CustomSpringEventListener, is registered to listen for the specific event type,CustomSpringEvent. When the event is published, the listener's method is triggered, allowing the application to respond to the event.
Advantages of Using Event Handling in Spring
- Loose Coupling: Publishers and listeners do not need to know about each other. They can communicate through events, making the system more modular and easier to maintain.
- Scalability: New listeners can be easily added without modifying the existing publishing logic.
- Flexibility: Different listeners can handle the same event in different ways, allowing for a variety of reactions to a single event.
Conclusion
Spring's event handling mechanism provides a flexible way to manage communication between different components of an application. By using custom events, publishers, and listeners, you can create a robust and loosely-coupled architecture. This approach enhances the maintainability and scalability of your Spring Boot applications.
