


前言
前段时间通过llamafactory实现了对于qwen3vl-2b的多模态sft,样本量为16万对文本对,使用双4070大概训练了50个小时。但是仔细分析所对应的图像-文本信息,其中的对应模式还是很清晰的,所以希望能不能通过更加细致的微调,例如修改损失函数,添加任务头等,增快模型的收敛速度,以及对疾病的诊断准确率。所以有了这篇文章,实现小样本量的模型训练。
硬件信息:
4070 12g*2 、64g内存、操作系统:Ubuntu24.04
数据集:MedTrinity-25M
主要思路
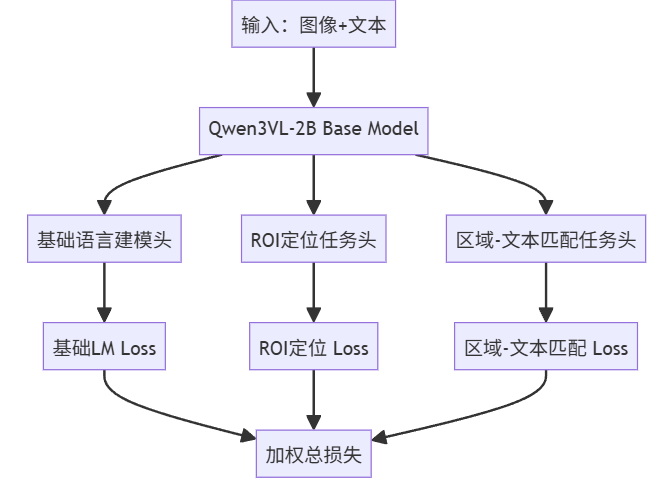
我们的核心思想是对模型进行特定任务的修改,可以总结为,增强roi区域和文本特定部分的注意力,修改大模型的损失函数,提高roi区域和病症文本的loss占比,减少数据量,加快模型学习效率,实现"可解释的精准定位-验证-诊断"。
实现细节:
将模型主要分为三个任务
ROI定位任务、区域-文本匹配任务、诊断生成任务。三个功能互相协同ROI定位模块的输出作为区域-文本匹配的输入,匹配成功后才允许诊断生成,形成"定位→验证→诊断"的临床安全流程。
一、数据清洗
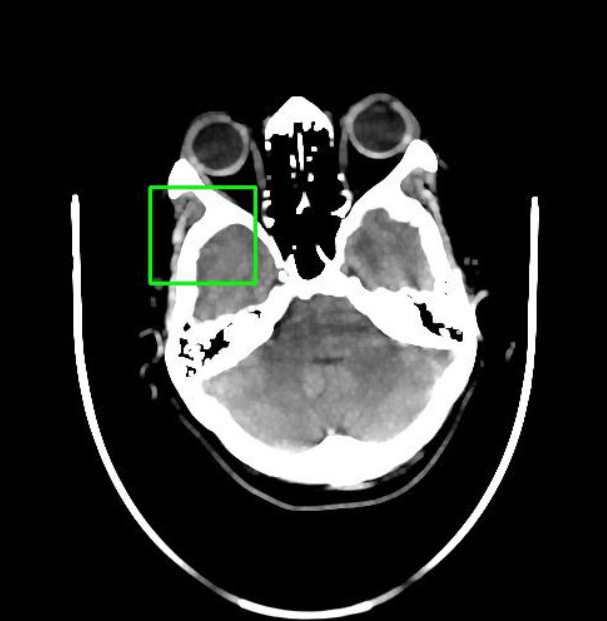
1.ROI任务
这是我们的源数据格式,已经在图片中标注出绿色的ROI区域,现在仅需编写一个python程序来获取ROI坐标,输入到模型训练中。
import cv2
import numpy as np
import matplotlib.pyplot as plt
def detect_and_visualize_bounding_box(image_path):
"""
识别图像中的绿色矩形框并可视化结果
参数:
image_path (str): 图像文件路径
"""
# 读取图像
img = cv2.imread(image_path)
if img is None:
raise FileNotFoundError(f"无法找到图像文件: {image_path}")
# 转换为HSV颜色空间
hsv = cv2.cvtColor(img, cv2.COLOR_BGR2HSV)
# 定义绿色的HSV阈值范围
# 注意:实际值可能需要根据图像调整
lower_green = np.array([35, 50, 50]) # 绿色下限
upper_green = np.array([85, 255, 255]) # 绿色上限
# 创建掩码
mask = cv2.inRange(hsv, lower_green, upper_green)
kernel = np.ones((5, 5), np.uint8)
mask = cv2.morphologyEx(mask, cv2.MORPH_OPEN, kernel)
mask = cv2.morphologyEx(mask, cv2.MORPH_CLOSE, kernel)
contours, _ = cv2.findContours(mask, cv2.RETR_EXTERNAL, cv2.CHAIN_APPROX_SIMPLE)
# 确定目标矩形框
detected = False
result_img = img.copy()
if contours:
# 选择面积最大的轮廓作为目标框
largest_contour = max(contours, key=cv2.contourArea)
x, y, w, h = cv2.boundingRect(largest_contour)
detected = True
# 在原图上绘制红色检测框
cv2.rectangle(result_img, (x, y), (x + w, y + h), (0, 0, 255), 2) # 红色框
print(f"✅ 检测到绿色框选区域:")
print(f" 左上角坐标: ({x}, {y})")
print(f" 宽度: {w}, 高度: {h}")
print(f" 右下角坐标: ({x+w}, {y+h})")
# 可视化结果
plt.figure(figsize=(12, 6))
plt.subplot(1, 2, 1)
plt.imshow(cv2.cvtColor(img, cv2.COLOR_BGR2RGB))
plt.title("原始图像 (带绿色框)")
plt.axis('off')
plt.subplot(1, 2, 2)
if detected:
plt.imshow(cv2.cvtColor(result_img, cv2.COLOR_BGR2RGB))
plt.title("检测结果 (红色框)")
else:
plt.imshow(cv2.cvtColor(img, cv2.COLOR_BGR2RGB))
plt.title("未检测到绿色框")
plt.axis('off')
plt.tight_layout()
plt.savefig("detection_result.png", dpi=300, bbox_inches='tight')
plt.show()
print("\n可视化结果已保存为: detection_result.png")
if __name__ == "__main__":
image_path = "7d4e8a52-1b5c-11ef-927b-000066532ca8.jpg"
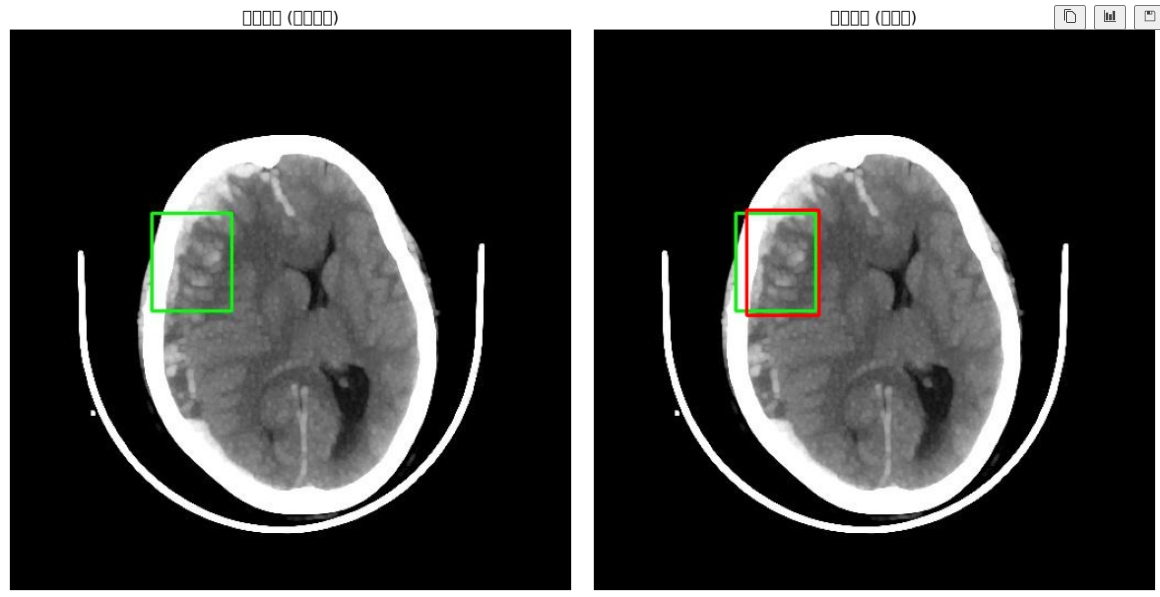
detect_and_visualize_bounding_box(image_path)红框为程序检测的坐标范围,效果还不错
 2.文本对结构化提取
作为医疗模型,力求输出的简介准确,同时希望希望数据集能简洁有力的分块指出症状和原因。
我们的原始数据显然不符合这种要求,需要对原数据集进行数据清洗,清洗成下图这样的结构化信息,实现更简洁的图像-文本对配对,具体如何结构化文本可以看我之前的帖子。使用本地LLM模型对文本进行结构化提取(基于ollama)-CSDN博客
{
  "messages": [...],
  "images": ["mllm_data/8031efe0-1b5c-11ef-8929-000066532cad.jpg"],
  "roi_coords": [0.23, 0.45, 0.78, 0.92],  // 归一化坐标
  "target_diag": "suggestive of a brain hemorrhage"  // 用于匹配任务
}
二、loss函数的重新设计
重新设计损失函数,使模型诊断结果更贴近实用案例
漏诊惩罚机制:假阴性(模型漏诊)损失权重×10,符合临床"宁可误诊不可漏诊"原则
focal_loss = -α * (1-p)^γ * log(p)  # 解决正负样本不平衡
false_negative_penalty = 10.0 * (label==0) * (pred>0.5)  # 重点惩罚漏诊
之后汇总三个任务的总损失率
这里的总损失率设计一个技术点,因为我们的roi区域相对于模型来说是全新设计的任务,而文本输出是base model本身就具有的能力。所以在一开始时roi任务的loss会非常爆炸,但是文本的的loss会很低。在训练一段时间后,roi的loss会急剧下降。如果固定比例汇总到总loss中,会导致训练前期和后期的loss占比非常不合理,所以我们引入自适应loss。具体技术细节可以看我之前的文章。读Multi-Task Learning Using Uncertainty to Weigh Losses for Scene Geometry and Semantics的总结-CSDN博客
        precision_roi = torch.exp(-log_vars[0])
        loss_roi_weighted = 0.5 * precision_roi * l_roi + 0.5 * log_vars[0]

        precision_match = torch.exp(-log_vars[1])
        loss_match_weighted = 0.5 * precision_match * l_match + 0.5 * log_vars[1]

        precision_lm = torch.exp(-log_vars[2])
        loss_lm_weighted = 0.5 * precision_lm * l_lm + 0.5 * log_vars[2]

        # 总损失
        total_loss = loss_roi_weighted + loss_match_weighted + loss_lm_weighted
三、构建对比样本数据集
核心作用是在 DataLoader 加载数据时,将一批独立的样本整合成模型可输入的 Tensor,并在整理过程中动态构造负样本,不需要离线构建负样本数据集,直接在内存中通过 Batch 内随机打乱。设计这个动态负样本的主要原因是,不能让模型只会输出对的答案,他理解的这个对的答案可能是错的。
上面的话有些难理解,我们来举一个例子,我们把一个苹果公司的标志传输给ai,ai告诉我们这是苹果。但是实际上ai理解的苹果是吃的苹果,只是误打误撞,因为苹果公司的logo长得像我们吃的苹果,所以输出了“苹果”这个正确的答案。但是ai并不理解吃的苹果和苹果公司的logo有非常大的区别。
上述这种情况在通用语言中或许有时候还能蒙混过关,但是对于医疗模型,我们需要ai真真切切的学会疾病在图像上的特征,所以需要构建负样本,加强ai对特征的理解能力。
具体代码如下:
class MedDataCollator:
    def __init__(self, processor, negative_ratio=0.3):
        self.processor = processor
        self.negative_ratio = negative_ratio

    def __call__(self, features):
        # 1. 基础处理:生成 input_ids, labels 等
        input_ids = [f["input_ids"] for f in features]
        attention_mask = [f["attention_mask"] for f in features]

        labels = []
        for ids, mask in zip(input_ids, attention_mask):
            label = ids.clone()
            label = label.masked_fill(mask == 0, -100)
            labels.append(label)

        # 2. 图像处理与负样本构造
        pixel_values = [f["pixel_values"] for f in features]
        roi_coords = [torch.tensor(f["roi_coords"], dtype=torch.float32) for f in features]
        match_labels = torch.ones(len(features), dtype=torch.float32)

        # 仅当 Batch 大于 1 时才能构造负样本
        if len(features) > 1:
            # 随机选择索引进行负采样
            indices = torch.randperm(len(features))
            num_negatives = int(len(features) * self.negative_ratio)
            neg_indices = indices[:num_negatives]

            # 对于选中的负样本:
            for idx in neg_indices:
                # A. 替换图片:使用 batch 中下一个样本的图片 (循环移位)
                replace_idx = (idx + 1) % len(features)
                pixel_values[idx] = features[replace_idx]["pixel_values"]

                # B. 修改标签:匹配标签设为 0
                match_labels[idx] = 0.0

                # C. 屏蔽生成 Loss:错误的图文对不应参与文本生成训练
                labels[idx] = torch.full_like(labels[idx], -100)

                # D. 屏蔽 ROI Loss: 图片换了,原来的 ROI 坐标无效了
                roi_coords[idx] = torch.tensor([-1.0, -1.0, -1.0, -1.0])

        # 3. 堆叠与 Padding
        padded = self.processor.tokenizer.pad(
            {"input_ids": input_ids, "attention_mask": attention_mask, "labels": labels},
            padding=True, return_tensors="pt"
        )

        # 处理图像堆叠
        if pixel_values[0].dim() == 3:
            padded["pixel_values"] = torch.stack(pixel_values)
        else:
            padded["pixel_values"] = torch.cat([pv.unsqueeze(0) for pv in pixel_values], dim=0)

        # 处理 image_grid_thw
        if "image_grid_thw" in features[0]:
            grid_thws = [f["image_grid_thw"] for f in features]
            # 注意:如果进行了图片替换,理论上 grid_thw 也要替换,但为简化代码,
            # 假设所有图片 resize 策略一致或 grid 影响较小。
            # 严谨做法应同步替换 grid_thw。
            processed_grids = []
            for i, grid in enumerate(grid_thws):
                # 如果是负样本,应该取替换图片的 grid,这里简单处理保持原样,
                # 实际生产环境建议完全同步替换 features 里的所有图像属性
                if grid.dim() == 1: processed_grids.append(grid.unsqueeze(0))
                else: processed_grids.append(grid)
            padded["image_grid_thw"] = torch.cat(processed_grids, dim=0)

        padded["roi_coords"] = torch.stack(roi_coords)
        padded["match_labels"] = match_labels

        return padded
代码详解
这几步是重新构建我们的数据集,获取roi区域,并将结构化的数据传入到dataset中
# ======================
# 1. ROI坐标提取工具函数
# ======================
def extract_roi_coords(image_path):
    """提取归一化ROI坐标,无ROI时返回None"""
    try:
        img = cv2.imread(image_path)
        if img is None:
            return None

        hsv = cv2.cvtColor(img, cv2.COLOR_BGR2HSV)
        lower_green = np.array([35, 50, 50])
        upper_green = np.array([85, 255, 255])
        mask = cv2.inRange(hsv, lower_green, upper_green)

        kernel = np.ones((5, 5), np.uint8)
        mask = cv2.morphologyEx(mask, cv2.MORPH_OPEN, kernel)
        mask = cv2.morphologyEx(mask, cv2.MORPH_CLOSE, kernel)

        contours, _ = cv2.findContours(mask, cv2.RETR_EXTERNAL, cv2.CHAIN_APPROX_SIMPLE)
        if not contours:
            return None

        largest_contour = max(contours, key=cv2.contourArea)
        x, y, w, h = cv2.boundingRect(largest_contour)
        img_h, img_w = img.shape[:2]

        return [
            x / img_w,
            y / img_h,
            (x + w) / img_w,
            (y + h) / img_h
        ]
    except Exception as e:
        print(f"ROI提取失败: {e}")
        return None

# ======================
# 2. 数据集预处理
# ======================
def preprocess_dataset(raw_data_path, image_dir, output_path):
    """预处理数据集,添加ROI坐标和目标诊断文本"""
    with open(raw_data_path, 'r', encoding='utf-8') as f:
        data = json.load(f)

    processed = []
    for item in tqdm(data, desc="预处理数据集"):
        # 获取图像完整路径
        img_name = item["images"][0].split("/")[-1]
        img_path = os.path.join(image_dir, img_name)

        # 提取ROI
        roi_coords = extract_roi_coords(img_path)
        if roi_coords is None:
            continue

        # 提取诊断文本
        try:
            diag_text = item["messages"][1]["content"]["extractions"]["Clinical Diagnosis Tips"]
        except (KeyError, TypeError, IndexError):
            continue

        # 添加新字段
        item["roi_coords"] = roi_coords
        item["target_diag"] = diag_text
        processed.append(item)

    with open(output_path, 'w', encoding='utf-8') as f:
        json.dump(processed, f, indent=2, ensure_ascii=False)
    print(f"✅ 预处理完成! 保留 {len(processed)}/{len(data)} 个样本")
    return processed

# ======================
# 3. 自定义Dataset类 (修正版)
# ======================
class MedDataset(Dataset):
    def __init__(self, data, processor, image_dir):
        self.data = data
        self.processor = processor
        self.image_dir = image_dir

    def __len__(self):
        return len(self.data)

    def __getitem__(self, idx):
        item = self.data[idx]
        img_path = os.path.join(self.image_dir, item["images"][0].split("/")[-1])

        # 读取并转换为RGB格式
        image = cv2.imread(img_path)
        image = cv2.cvtColor(image, cv2.COLOR_BGR2RGB)

        # 转换为PIL图像
        image_pil = Image.fromarray(image)

        # 获取原始用户查询和诊断文本
        user_query = item["messages"][0]["content"]
        target_diag = item["target_diag"]


        conversation = [
            {
                "role": "user",
                "content": [
                    {"type": "image"},
                    {"type": "text", "text": f"{user_query}\nFocus on the region of interest."}
                ]
            },
            {
                "role": "assistant",
                "content": [
                    {"type": "text", "text": target_diag}
                ]
            }
        ]

        # 使用processor的apply_chat_template方法格式化对话
        text = self.processor.apply_chat_template(
            conversation,
            tokenize=False,
            add_generation_prompt=False
        )

        # 处理多模态输入
        inputs = self.processor(
            images=image_pil,
            text=text,
            padding="max_length",
            max_length=1024,
            truncation=True,
            return_tensors="pt"
        )


        for k, v in inputs.items():
            if isinstance(v, torch.Tensor) and v.dim() > 0:
                # 如果是batch维度为1的张量,移除batch维度
                if v.dim() > 1 and v.shape[0] == 1:
                    inputs[k] = v.squeeze(0)
                # 特别处理image_grid_thw - 它应该是[3]形状,不是[1, 3]
                elif k == "image_grid_thw" and v.dim() == 2 and v.shape[0] == 1:
                    inputs[k] = v.squeeze(0)

        # 添加ROI坐标
        inputs["roi_coords"] = torch.tensor(item["roi_coords"], dtype=torch.float32)
        inputs["target_diag"] = target_diag

        return inputs
接下来改造我们的模型,将刚刚设计的多任务添加到我们的模型中
class SpatialAttentionPooling(torch.nn.Module):
    """简单的空间注意力聚合层"""
    def __init__(self, hidden_size):
        super().__init__()
        self.attn = torch.nn.Sequential(
            torch.nn.Linear(hidden_size, 512),
            torch.nn.Tanh(),
            torch.nn.Linear(512, 1),
            torch.nn.Softmax(dim=1)
        )

    def forward(self, hidden_states):
        # hidden_states: [Batch, Seq_Len, Hidden]
        # weights: [Batch, Seq_Len, 1]
        weights = self.attn(hidden_states)
        # context: [Batch, Hidden]
        context = torch.sum(hidden_states * weights, dim=1)
        return context

class Qwen3VLMultiTask(torch.nn.Module):
    def __init__(self, base_model, hidden_size=2048):
        super().__init__()
        self.base_model = base_model

        # 1. 改进:引入空间注意力池化,替代简单的 hidden_states[:, 0]
        self.spatial_pooler = SpatialAttentionPooling(hidden_size)

        # 2. 改进:定义可学习的损失权重参数 (Log Variance)
        # 初始化为0,对应权重 exp(0)=1
        self.loss_log_vars = torch.nn.Parameter(torch.zeros(3))

        self.task_heads = torch.nn.ModuleDict({
            "roi_head": torch.nn.Sequential(
                torch.nn.Linear(hidden_size, 512),
                torch.nn.ReLU(),
                torch.nn.Dropout(0.1), # 增加Dropout防止过拟合
                torch.nn.Linear(512, 4)
            ),
            "match_head": torch.nn.Sequential(
                torch.nn.Linear(hidden_size, 256),
                torch.nn.ReLU(),
                torch.nn.Linear(256, 1)
            )
        })

    def forward(self, pixel_values, input_ids, attention_mask, image_grid_thw=None, labels=None, **kwargs):
        device = pixel_values.device

        # 基础模型前向传播
        outputs = self.base_model(
            pixel_values=pixel_values,
            input_ids=input_ids,
            attention_mask=attention_mask,
            image_grid_thw=image_grid_thw,
            labels=labels,
            output_hidden_states=True,
            return_dict=True
        )

        # 提取特征:使用 Attention Pooling 聚合整个序列的信息
        # Qwen-VL 的 hidden_states 包含了图像和文本的混合序列
        last_hidden_state = outputs.hidden_states[-1]
        pooled_features = self.spatial_pooler(last_hidden_state)

        # 任务头预测
        roi_preds = self.task_heads["roi_head"](pooled_features)
        match_logits = self.task_heads["match_head"](pooled_features).squeeze(-1)

        return {
            "lm_outputs": outputs,
            "roi_preds": roi_preds,
            "match_logits": match_logits,
            "loss_weights": self.loss_log_vars # 将权重传出给 Trainer
        }
编写trainer
class SpatialAttentionPooling(torch.nn.Module):
    """简单的空间注意力聚合层"""
    def __init__(self, hidden_size):
        super().__init__()
        self.attn = torch.nn.Sequential(
            torch.nn.Linear(hidden_size, 512),
            torch.nn.Tanh(),
            torch.nn.Linear(512, 1),
            torch.nn.Softmax(dim=1)
        )

    def forward(self, hidden_states):
        # hidden_states: [Batch, Seq_Len, Hidden]
        # weights: [Batch, Seq_Len, 1]
        weights = self.attn(hidden_states)
        # context: [Batch, Hidden]
        context = torch.sum(hidden_states * weights, dim=1)
        return context

class Qwen3VLMultiTask(torch.nn.Module):
    def __init__(self, base_model, hidden_size=2048):
        super().__init__()
        self.base_model = base_model

        # 1. 改进:引入空间注意力池化,替代简单的 hidden_states[:, 0]
        self.spatial_pooler = SpatialAttentionPooling(hidden_size)

        # 2. 改进:定义可学习的损失权重参数 (Log Variance)
        # 初始化为0,对应权重 exp(0)=1
        self.loss_log_vars = torch.nn.Parameter(torch.zeros(3))

        self.task_heads = torch.nn.ModuleDict({
            "roi_head": torch.nn.Sequential(
                torch.nn.Linear(hidden_size, 512),
                torch.nn.ReLU(),
                torch.nn.Dropout(0.1), # 增加Dropout防止过拟合
                torch.nn.Linear(512, 4)
            ),
            "match_head": torch.nn.Sequential(
                torch.nn.Linear(hidden_size, 256),
                torch.nn.ReLU(),
                torch.nn.Linear(256, 1)
            )
        })

    def forward(self, pixel_values, input_ids, attention_mask, image_grid_thw=None, labels=None, **kwargs):
        device = pixel_values.device

        # 基础模型前向传播
        outputs = self.base_model(
            pixel_values=pixel_values,
            input_ids=input_ids,
            attention_mask=attention_mask,
            image_grid_thw=image_grid_thw,
            labels=labels,
            output_hidden_states=True,
            return_dict=True
        )

        # 提取特征:使用 Attention Pooling 聚合整个序列的信息
        # Qwen-VL 的 hidden_states 包含了图像和文本的混合序列
        last_hidden_state = outputs.hidden_states[-1]
        pooled_features = self.spatial_pooler(last_hidden_state)

        # 任务头预测
        roi_preds = self.task_heads["roi_head"](pooled_features)
        match_logits = self.task_heads["match_head"](pooled_features).squeeze(-1)

        return {
            "lm_outputs": outputs,
            "roi_preds": roi_preds,
            "match_logits": match_logits,
            "loss_weights": self.loss_log_vars # 将权重传出给 Trainer
        }
开始主训练流程,对双卡机器添加了deepspeed优化,如果是单卡训练请删除deepspeed模块
if __name__ == "__main__":
    # 配置路径
    RAW_DATA_PATH = "raw_data.json"
    IMAGE_DIR = "mllm_data"
    PROCESSED_DATA_PATH = "processed_med_data.json"
    # 请确保路径正确,Windows路径在WSL/Linux下可能需要转换格式
    MODEL_PATH = "Qwen3-VL-2B-Instruct"

    # 1. 预处理数据集 (仅需执行一次)
    # 注意:在多卡分布式环境下,通常建议只让主进程(rank 0)进行数据预处理,或者提前处理好。
    if not os.path.exists(PROCESSED_DATA_PATH):
        preprocess_dataset(RAW_DATA_PATH, IMAGE_DIR, PROCESSED_DATA_PATH)

    # 2. 加载处理器
    processor = AutoProcessor.from_pretrained(MODEL_PATH)

    # 3. 加载基础模型
    # 【修改点 2】device_map 必须设为 None,不要手动 .to("cuda")
    base_model = Qwen3VLForConditionalGeneration.from_pretrained(
        MODEL_PATH,
        device_map=None,  # DeepSpeed 接管内存分配
        torch_dtype=torch.bfloat16, # 推荐使用 bf16
        _attn_implementation="flash_attention_2" # 如果安装了 flash-attn 库建议开启,否则删除此行
    )

    # 【修改点 3】开启梯度检查点 (Gradient Checkpointing)
    # 对于 12G 显存微调 VL 模型,这是必须开启的,否则必然 OOM
    base_model.gradient_checkpointing_enable()

    # 4. 应用Lora
    lora_config = LoraConfig(
        r=8,
        lora_alpha=32,
        target_modules=[
            "self_attn.q_proj",
            "self_attn.v_proj",
            "mlp.gate_proj"
        ],
        lora_dropout=0.05,
        task_type="CAUSAL_LM",
    )
    model = get_peft_model(base_model, lora_config)

    # 5. 添加多任务头
    # 【修改点 4】动态获取 hidden_size,而不是硬编码 2048
    # Qwen2-VL-2B 的 hidden_size 通常是 1536,7B 是 3584
    actual_hidden_size = base_model.config.hidden_size
    print(f"Model Hidden Size: {actual_hidden_size}")

    model = Qwen3VLMultiTask(model, hidden_size=actual_hidden_size)

    # 【修改点 5】确保自定义参数参与梯度计算
    model.loss_log_vars.requires_grad = True
    for param in model.task_heads.parameters():
        param.requires_grad = True

    # 注意:千万不要在这里调用 model.to("cuda") !!!

    # 6. 加载数据集
    with open(PROCESSED_DATA_PATH, 'r', encoding='utf-8') as f:
        data = json.load(f)

    dataset = MedDataset(data, processor, IMAGE_DIR)

    # 7. 配置训练参数
    training_args = TrainingArguments(
        output_dir="./qwen3vl-med-finetune",
        per_device_train_batch_size=2, # 【建议】12G 显存建议从 2 开始尝试,如果 OOM 改为 1
        gradient_accumulation_steps=4, # 配合 batch_size 减小,增加累积步数
        learning_rate=2e-5,
        num_train_epochs=3,
        warmup_ratio=0.1,
        lr_scheduler_type="cosine",
        logging_steps=10,
        save_strategy="epoch",
        bf16=True,   # 【修改点 6】开启 BF16 (CUDA 12.8 支持),比 fp16 更稳
        fp16=False,
        report_to="none",
        gradient_checkpointing=True, # 确保 Trainer 也知道开启了 checkpointing
        remove_unused_columns=False,
        # 【修改点 7】DeepSpeed 配置
        deepspeed="./ds_config.json",
        ddp_find_unused_parameters=False # 自定义模型头通常需要关闭这个检查
    )

    # 8. 初始化训练器
    trainer = MultiTaskTrainer(
        model=model,
        args=training_args,
        train_dataset=dataset,
        data_collator=MedDataCollator(processor),
    )

    # 9. 开始训练
    print("🚀 开始 DeepSpeed 分布式训练...")
    trainer.train()

    # 10. 保存模型
    trainer.save_model("./final_model")
    print("✅ 训练完成! 模型已保存至 ./final_model")
训练过程
开始训练!!
看到我们的loss稳定下降和双卡4070猛猛输出,终于流下了感动的泪水
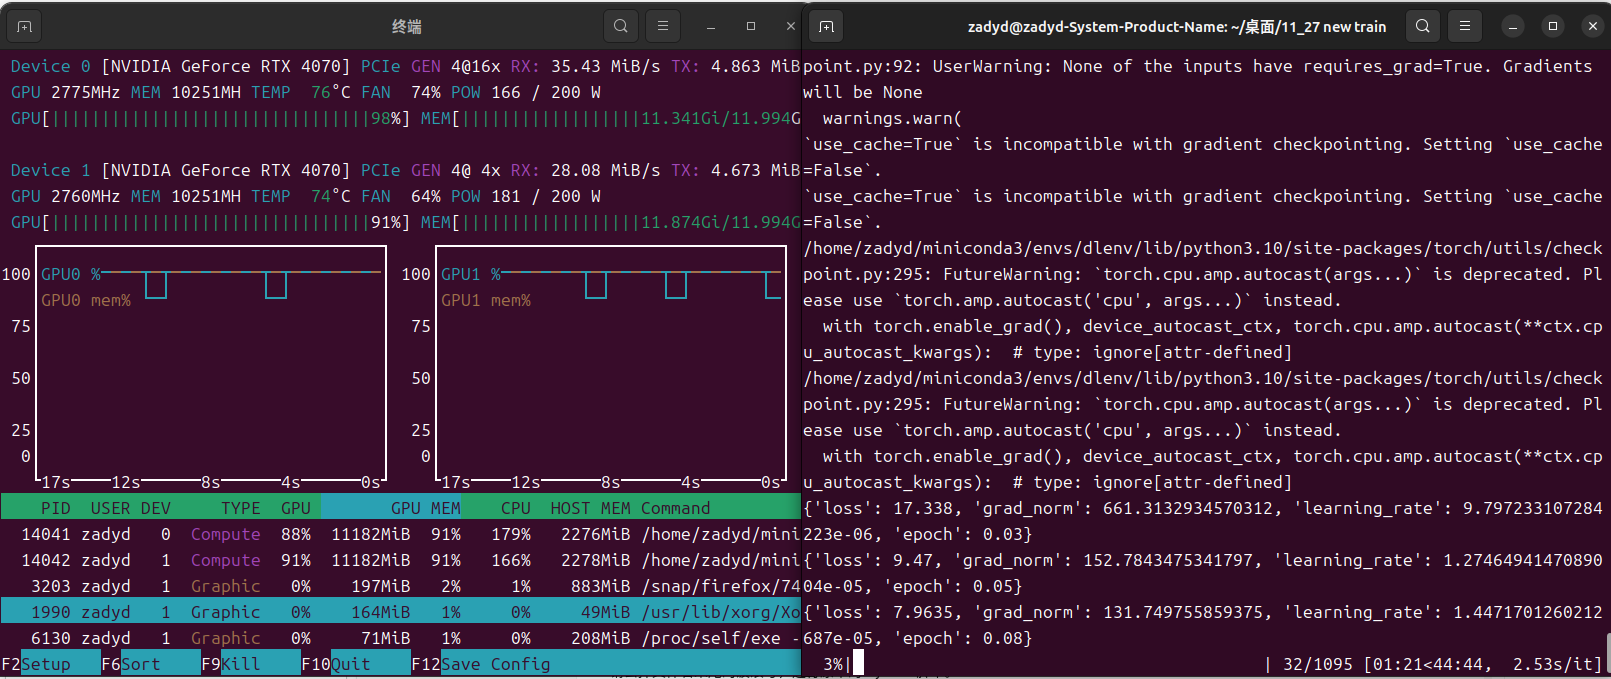
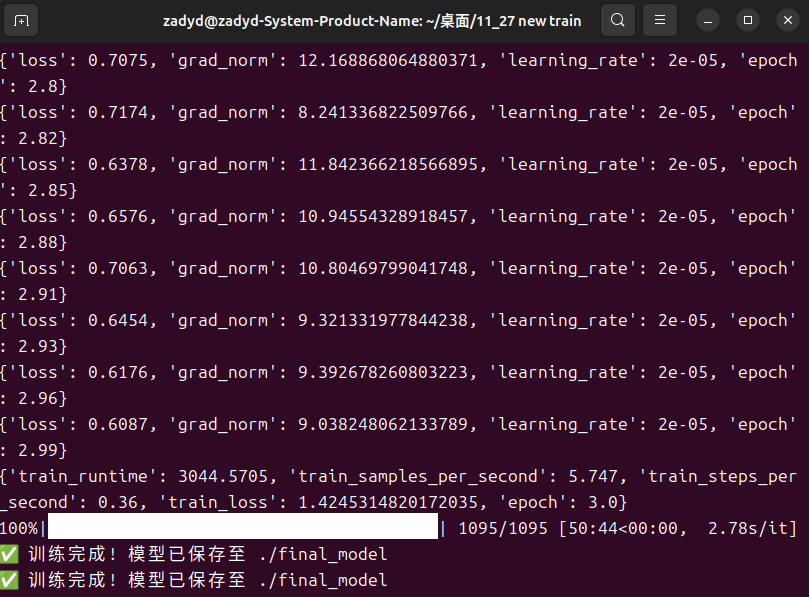
正常来说,loss的下降是十分快的,如果模型不能学习到数据的话,建议去检查datacollator模块,可能是掩码的问题(不要问我是怎么知道的,曾经被这个问题至少折磨了五六个小时)
模型推理和测试
我们编写一个推理模块,其实这块才是整个项目里难度最高的一部分😭,因为涉及对模型的改造和多任务头的输出,我们都不能使用transformer中整合的模块,只能自己手搓,不过还好有万能的gemini,我们一个下午就编写好了推理代码
import torch
import cv2
import numpy as np
from PIL import Image
from transformers import AutoProcessor, AutoConfig, Qwen3VLForConditionalGeneration
from peft import LoraConfig, get_peft_model
from safetensors.torch import load_file
import torch.nn.functional as F
import os

# ==========================================
# 1. 模型结构定义
# ==========================================
class SpatialAttentionPooling(torch.nn.Module):
    def __init__(self, hidden_size):
        super().__init__()
        self.attn = torch.nn.Sequential(
            torch.nn.Linear(hidden_size, 512),
            torch.nn.Tanh(),
            torch.nn.Linear(512, 1),
            torch.nn.Softmax(dim=1)
        )

    def forward(self, hidden_states):
        weights = self.attn(hidden_states)
        context = torch.sum(hidden_states * weights, dim=1)
        return context

class Qwen3VLMultiTask(torch.nn.Module):
    def __init__(self, base_model, hidden_size=2048):
        super().__init__()
        self.base_model = base_model

        print(f"🔧 初始化多任务头,使用的 Hidden Size: {hidden_size}")

        self.spatial_pooler = SpatialAttentionPooling(hidden_size)
        # 初始化 Loss 权重参数
        self.loss_log_vars = torch.nn.Parameter(torch.zeros(3))

        self.task_heads = torch.nn.ModuleDict({
            "roi_head": torch.nn.Sequential(
                torch.nn.Linear(hidden_size, 512),
                torch.nn.ReLU(),
                torch.nn.Dropout(0.1),
                torch.nn.Linear(512, 4)
            ),
            "match_head": torch.nn.Sequential(
                torch.nn.Linear(hidden_size, 256),
                torch.nn.ReLU(),
                torch.nn.Linear(256, 1)
            )
        })

    def forward(self, pixel_values, input_ids, attention_mask, image_grid_thw=None, **kwargs):
        outputs = self.base_model(
            pixel_values=pixel_values,
            input_ids=input_ids,
            attention_mask=attention_mask,
            image_grid_thw=image_grid_thw,
            output_hidden_states=True,
            return_dict=True
        )

        last_hidden_state = outputs.hidden_states[-1]
        pooled_features = self.spatial_pooler(last_hidden_state)

        roi_preds = self.task_heads["roi_head"](pooled_features)
        match_logits = self.task_heads["match_head"](pooled_features).squeeze(-1)

        return roi_preds, match_logits

# ==========================================
# 2. 辅助函数:自动探测 Hidden Size
# ==========================================
def get_real_hidden_size(model, default=2048):
    try:
        # 1. 尝试从 config 获取
        config = model.config
        if hasattr(config, "hidden_size"): return config.hidden_size
        if hasattr(config, "text_config") and hasattr(config.text_config, "hidden_size"):
            return config.text_config.hidden_size

        # 2. 暴力探测:检查第一层 Linear 权重
        base = model.get_base_model() if hasattr(model, "get_base_model") else model
        for name, module in base.named_modules():
            # 查找 Qwen 的 transformer blocks
            if ("layers.0" in name or "blocks.0" in name) and isinstance(module, torch.nn.Linear):
                print(f"🕵️ 自动探测 Hidden Size: {module.in_features} (来自 {name})")
                return module.in_features
    except Exception as e:
        print(f"⚠️ 探测失败: {e}")

    print(f"⚠️ 使用默认 Hidden Size: {default}")
    return default

# ==========================================
# 3. 模型加载器 (包含类型转换修复)
# ==========================================
def load_finetuned_model(base_model_path, finetuned_weights_path, device="cuda"):
    print(f"🚀 正在加载基座模型: {base_model_path}")

    processor = AutoProcessor.from_pretrained(base_model_path, trust_remote_code=True)

    # 1. 加载基座 (BFloat16)
    base_model = Qwen3VLForConditionalGeneration.from_pretrained(
        base_model_path,
        torch_dtype=torch.bfloat16,
        device_map="cpu",
        trust_remote_code=True,
        _attn_implementation="flash_attention_2"
    )

    print("🛠️ 正在构建 LoRA 结构...")
    lora_config = LoraConfig(
        r=8,
        lora_alpha=32,
        target_modules=["self_attn.q_proj", "self_attn.v_proj", "mlp.gate_proj"],
        lora_dropout=0.05,
        task_type="CAUSAL_LM",
    )
    peft_model = get_peft_model(base_model, lora_config)

    # 2. 获取维度并构建多任务外壳
    hidden_size = get_real_hidden_size(peft_model, default=2048)
    model = Qwen3VLMultiTask(peft_model, hidden_size=hidden_size)

    # 3. 加载权重
    print(f"📥 正在加载微调权重: {finetuned_weights_path}")
    if os.path.exists(finetuned_weights_path):
        state_dict = load_file(finetuned_weights_path)
        model.load_state_dict(state_dict, strict=False)
        print(f"✅ 权重加载完毕.")
    else:
        raise FileNotFoundError(f"找不到权重文件: {finetuned_weights_path}")

    # ========================================================
    # 【核心修复】强制将整个模型(含自定义头)转为 BFloat16
    # 解决 "mat1 and mat2 must have the same dtype" 错误
    # ========================================================
    print("🔄 正在将模型转换为 BFloat16...")
    model.to(dtype=torch.bfloat16)

    # 最后移动到 GPU
    model.to(device)
    model.eval()
    return model, processor

# ==========================================
# 4. 推理主函数
# ==========================================
def run_inference(model, processor, image_path, prompt_text, device="cuda"):
    if not os.path.exists(image_path):
        print(f"❌ 错误: 图片不存在 {image_path}")
        return

    image_cv = cv2.imread(image_path)
    if image_cv is None:
        print(f"❌ 无法读取图片: {image_path}")
        return

    image_pil = Image.fromarray(cv2.cvtColor(image_cv, cv2.COLOR_BGR2RGB))
    h, w = image_pil.size[1], image_pil.size[0]

    conversation = [
        {
            "role": "user",
            "content": [
                {"type": "image"},
                {"type": "text", "text": f"{prompt_text}\nFocus on the region of interest."}
            ]
        }
    ]

    text_prompt = processor.apply_chat_template(conversation, add_generation_prompt=True)
    inputs = processor(images=image_pil, text=text_prompt, return_tensors="pt")

    # 确保输入数据也在正确的设备上
    inputs = {k: v.to(device) for k, v in inputs.items()}
    # 确保图像 tensor 也是 bf16
    if "pixel_values" in inputs:
        inputs["pixel_values"] = inputs["pixel_values"].to(torch.bfloat16)

    # ---------------------------
    # A. 文本生成
    # ---------------------------
    print("✍️ 正在生成文本诊断...")
    with torch.no_grad():
        generated_ids = model.base_model.generate(
            **inputs,
            max_new_tokens=200,
            do_sample=False
        )
        generated_ids_trimmed = [
            out_ids[len(in_ids):] for in_ids, out_ids in zip(inputs["input_ids"], generated_ids)
        ]
        output_text = processor.batch_decode(
            generated_ids_trimmed, skip_special_tokens=True, clean_up_tokenization_spaces=False
        )[0]

    # ---------------------------
    # B. ROI 与 匹配度预测
    # ---------------------------
    print("🔍 正在预测 ROI 区域...")
    with torch.no_grad():
        roi_pred, match_logit = model(
            pixel_values=inputs["pixel_values"],
            input_ids=inputs["input_ids"],
            attention_mask=inputs["attention_mask"],
            image_grid_thw=inputs.get("image_grid_thw", None)
        )

        roi_norm = roi_pred.cpu().float().numpy()[0]
        roi_norm = np.clip(roi_norm, 0, 1)
        x1, y1, x2, y2 = (
            int(roi_norm[0] * w), int(roi_norm[1] * h),
            int(roi_norm[2] * w), int(roi_norm[3] * h)
        )
        match_score = torch.sigmoid(match_logit).cpu().item()

    # ---------------------------
    # C. 可视化
    # ---------------------------
    result_img = image_cv.copy()
    cv2.rectangle(result_img, (x1, y1), (x2, y2), (0, 255, 0), 3)
    label = f"Conf: {match_score:.2f}"

    # 绘制背景框
    (tw, th), _ = cv2.getTextSize(label, cv2.FONT_HERSHEY_SIMPLEX, 0.6, 2)
    cv2.rectangle(result_img, (x1, y1 - 25), (x1 + tw + 10, y1), (0, 255, 0), -1)
    cv2.putText(result_img, label, (x1 + 5, y1 - 8), cv2.FONT_HERSHEY_SIMPLEX, 0.6, (0, 0, 0), 2)

    save_path = "inference_result.jpg"
    cv2.imwrite(save_path, result_img)

    print("\n" + "="*40)
    print(f"🤖 诊断结果: \n{output_text}")
    print(f"📐 ROI 坐标: [{x1}, {y1}, {x2}, {y2}]")
    print(f"📊 匹配分数: {match_score:.4f}")
    print(f"🖼️ 结果已保存至: {save_path}")
    print("="*40 + "\n")

if __name__ == "__main__":
    BASE_MODEL_DIR = "./Qwen3-VL-2B-Instruct"
    WEIGHTS_PATH = "./final_model/model.safetensors"
    TEST_IMAGE = "mllm_data/7d69e5ba-1b5c-11ef-ab67-000066532ca8.jpg"
    TEST_QUERY = "Describe the abnormality in the ultrasound image."

    # 自动找图
    if not os.path.exists(TEST_IMAGE):
        import glob
        potential = glob.glob("./mllm_data/*.jpg") + glob.glob("./mllm_data/*.png")
        if potential:
            TEST_IMAGE = potential[0]
            print(f"⚠️ 自动使用图片: {TEST_IMAGE}")

    model, processor = load_finetuned_model(BASE_MODEL_DIR, WEIGHTS_PATH)
    run_inference(model, processor, TEST_IMAGE, TEST_QUERY)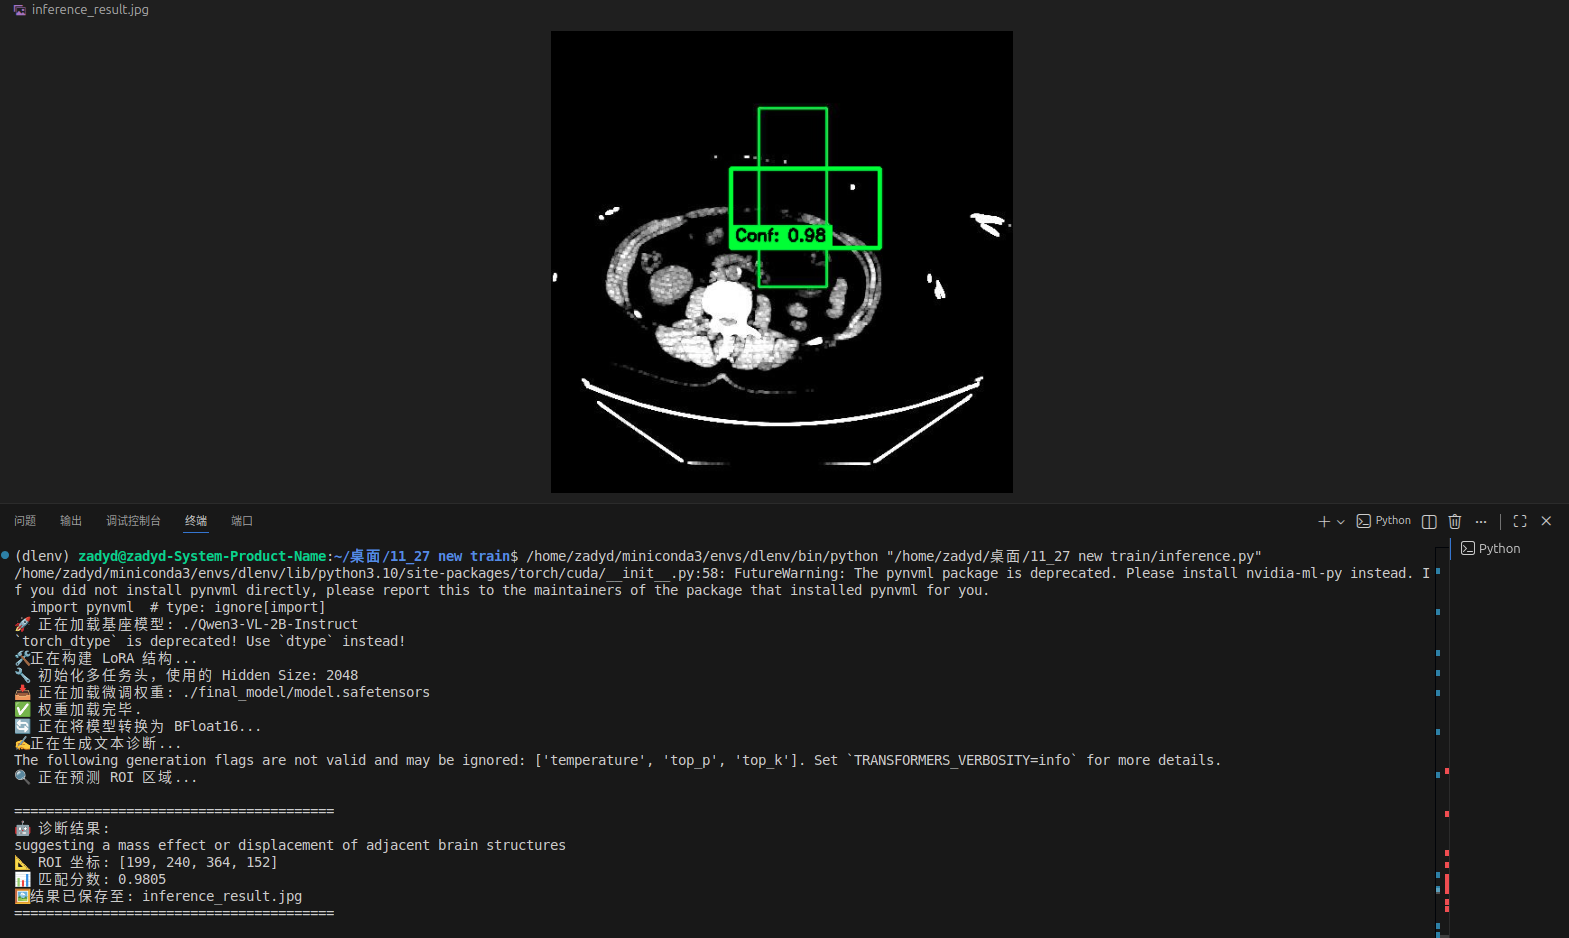
我们从随机抽取一个图像进行推理,发现roi模块能非常好的读取其中的病变特征,并且我认为这个roi区域的识别,关键癌变部分是相交的,但是其余部分没有完全重合,证明模型学习到了异常部位的特征。
总结
这是一个验证性项目,主要用于减少大模型幻觉,和减少微调数据量而研发的。目前测试下来能够实现预期功能。如果有对项目的更好建议,欢迎大家一起讨论。
所有代码均已上传github,与本人csdn同名
https://github.com/zadyd/Full-Workflow-of-Few-Shot-Medical-Multimodal-Training-Based-on-PEFT


&spm=1001.2101.3001.5002&articleId=155196986&d=1&t=3&u=8abd58ff51e94e949498a5d605d11409)
 4015
4015

 被折叠的 条评论
为什么被折叠?
被折叠的 条评论
为什么被折叠?
 到【灌水乐园】发言


