 Balcony, Porch & Deck Ledger Flashing Errors Cause Leaks & Rot

- POST a QUESTION or COMMENT about the cause, inspection, detection & repair of rotted deck components & structures
Deck flashing errors & deck collapse & deck/balcony flashing repair advice: here we provide a case study of the effects of missing or improper deck connections and deck flashing details leading to structural movement, risk of imminent collapse, rot and building leaks at the deck ledger board and at the building to which a deck was attached.
We include an explanation & illustrations showing how to install or repair flashing at the intersection of a deck or balcony when water can not be allowed to pass below that structure.
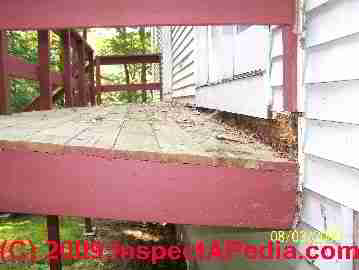
Our page top photo shows a rotting, collapsing residential deck whose deck ledger was separating from the building, threatening imminent collapse. Readers will also see that the deck railings were unsafe (open) and that no building flashing was installed.
This residential deck was very unsafe and should not be walked-on nor should people stay below it as it could collapse at any moment. This photograph and other photographs and text in this article were provided by ASHI home inspector David Grudzinski.
InspectAPedia tolerates no conflicts of interest. We have no relationship with advertisers, products, or services discussed at this website.
- Daniel Friedman, Publisher/Editor/Author - See WHO ARE WE?
Dangerous Rot & Collapse Risk When a Deck is Not Properly Flashed

This where most of the water enters the house [blue arrows]. It is a narrow section of porch that is fully exposed to the elements. We are in [deleted], so the weather is not extreme.

In my posts, I proposed
- removing two to three rows of siding
- and cutting back to the OSB.
- Then using a flashing membrane to cover the gap.
- The Tyvek would overlap the membrane.
- The foam, strapping, and siding would be reinstalled.
Whatever material I used would need to be durable and capable of adhering to OSB and cement.

I am less concerned about the rest of the porch. The overhang from the second story does a pretty good job of keeping things dry below.

This photo shows the area directly underneath the short section of front porch. The concrete slab rests on metal pan material. Most of the water enters where you see the light fixture [red arrow].
Reply:
For this installation to work it looks as if you need L-shaped flashing that extends up behind the lower course of siding (and under any housewrap) for its vertical portion, and that extends out onto the upper (exposed) surface of the concrete walking surface (that forms a roof over the area below).
[Click to enlarge any image]

1. Remove the lower two courses of siding - with care so as to permit re-use. You may need to remove more siding for working space.
2. Clean and seal the concrete to house wall juncture with high quality silicone caulk.
3. Slice the housewrap if needed, horizontally, then install L-shaped aluminum or copper flashing along the exposed length of this patio-to-house- abutment.
I'd like to see 6" or more of vertical height, higher as needed if you have deep snow in your area.
The bottom of the "L" shape should be slightly open - that is bent to less than 90 degrees so that when you install the flashing onto the sidewall the bottom flashing base that is in contact with the concrete surface will be snug and neat (and will of course cover the caulk in step 2).
I'd like to see 3" of horizontal L-flashing along this surface.
This installation will redirect any wall leakage (such as wind-blown rain penetrating the siding) out on top of the concrete rather than behind it and into the space below.
Watch out: this repair will only work if the house wrap and window flashing higher on the wall are all properly installed.
Provided the concrete it itself sloped down away from the house this design should work well.
Send me photos of the job as described if you can and I may be able to comment further.
Watch out: even with this repair, it is important that the ground surface also drains away from this structure or you may find water ultimately leaking into the underground storage area through its outer foundation wall.
See the sketch above. I note that the old, improperly-routed flashing (that sends water below the concrete slab and into the storage area) can be left in place as the combination of (presumably) intact housewrap and properly placed L-flashing will direct any water penetrating the wall back out onto the top of the concrete walking surface.
And it'd be hell trying to get the old improper flashing out anyway.
...
Reader Comments, Questions & Answers About The Article Above
Below you will find questions and answers previously posted on this page at its page bottom reader comment box.
Reader Q&A - also see RECOMMENDED ARTICLES & FAQs
 Question: Cause of severe rot at 5 year old deck rim joists

Please see the attached photos of band board/joist rot found on my deck that is only 5 years old!
The boards were pressure treated, however, I did not receive a warranty. The contractor is claiming ants were the problem and is taking no responsibility. Orkin has inspected and contradicted this assessment.
The contractor used composite stair boards with a scalloped backside as the fascia.
It appears to have trapped water, which is my assessment. What are your comments?
I have to get my deck replaced and don’t want this to happen again. Any comments would be helpful. - Anonymous by private email 2020/10/02
Moderator reply: that's gross wood rot, not insect damage
that is not carpenter ant damage it's brown rot - a typical wood rot.
"Rot" is in essence a fungal attack, not an ant attack.
Yours is characterized by both the roughly rectangular cracks in the softened wood and the dark gray color.
Something is very odd here. I see the white painted end of boards under these rim joists in your first photo - no obvious rot in what's visible there.
I infer that you have removed boards that previously covered these rim joists.
It also looks as if your deck is quite close to ground and that tongue-and-groove decking using composite lumber means that there will be no air flow or ventilation of the framing supporting this deck. Water that leaks through the deck surface to wet the framing below is going to stay trapped there, risking shorter life and rot of the deck joists and girder, not just the rim joist.
There can be no doubt that whatever was covering the rim joists trapped moisture therein.
The combination of trapped moisture and probably not actually treated wood but some other lumber has produced the extreme rot deterioration we see in the photos.
"Treated" wood is a bit vague; But the "sharp" edges of the lumber don't look like typical pressure-treated 2x lumber commonly sold by building suppliers.
So there were probably two errors: using improperly or inadequately treated wood or even the wrong type of lumber as rim joists and the covering of that with material that trapped water.
I've seen this sort of rot on other decks that used synthetic lumber
eg at COMPOSITE LUMBER DURABILITY
If you agree we can post this discussion and photos (our default is to keep you anonymous unless you ask otherwise) at DECK FLASHING LEAKS, ROT - the article above on this page.
where we may invite further reader comment that will be useful.
You might want to also see the Rot Damage and Preservative Treated Lumber articles cited below at our RECOMMENDED READING links.

Reader follow-up:
 Thank you for your reply. The deck boards and stair boards were composite lumber with a plastic coating. I have attached photos of the trim board that the contractor used to wrap around the rim joists. It was stair boards. As you can see the back side was scalloped.
Two boards were installed horizontally around the joists therefore the channels ran horizontally. I suspect, where there is rot, the top row of screws were not as tight as they should be and water was let in. It collected in the channels and soaked into the wood.
Also, since my first email two contractors have come out to give me quotes to repair and we’ve looked closely at the boards underneath and we believe that none of the wood was treated lumber.
I can’t believe I did not notice that when it was installed. I think I was just so happy to see how good this deck looked compared to the old rotting wooden deck that was there before. The contractor’s drawings state these boards would all be treated lumber and the drawings were approved by my city for the permit.
The city also inspected and approved the completed project and did not note the wood was not treated either.
I have learned a big lesson to pay more attention and check everything. You can use my photos and this discussion, however, please keep me anonymous.
Moderator reply:
I agree that this does not look like treated lumber - for the rim joists;
About the fastening of the horizontal trim to the rim joists, no amount of tight nailing or screw-fastening would guarantee to keep the area behind those boards dry; flashing could but isn't normally used;
Better deck design and construction to avoid rot would have included:
- Run the deck floor boards out past the rim joist and trim by about 3/4" or more to give a drip edge. As installed rain or melting snow are directed behind the trim board. With an overhang past the band joist or rim joist you don't normally need a drip edge flashing around the deck except where the deck abuts the building and the ledger board there.
See DECK FLASHING - Best Practices Guide - for details of ledger board flashing
- If using a fascia board on the rim joists, secure the trim with a deliberate gap or drainage plane-path so that water getting behind it can get out and the rim joists can dry.
- The deck framing rot problem is exacerbated by the use of synthetic boards as trim as those are pretty-much waterproof, holding the maximum moisture behind the board and against the un-treated joists.
Other factors that shorten deck life and increase the rate of rot include lack of ventilation: a deck built close to ground and deck boards butted too closely together. See DECK BOARD GAPS & SPACING in the recommended reading below.
...
Continue reading at DECK FLASHING - Best Practices Guide, or select a topic from the closely-related articles below, or see the complete ARTICLE INDEX.
Or see these
Recommended Articles
- FIVE MOST COMMON BUILDING DEFECTS in PORTUGAL - one of which is balcony leaks
- FLASHING MEMBRANES PEEL & STICK
- DECK BOARD GAPS & SPACING
- DECK COLLAPSE Case Study
- DECK CONSTRUCTION BEST PRACTICES - home
- DECK FLASHING - Best Practices Guide
- DECK FLASHING LEAKS, ROT
- DECK & PORCH CONNECTIONS: LEDGER BOARDS
- DECK & PORCH CONSTRUCTION - home
- PRESERVATIVE TREATED LUMBER
- ROT, FUNGUS, INSECT DAMAGE
- ROT, TIMBER FRAME for tools and approaches to assessing the extent of wood timber rot or insect damage.
Suggested citation for this web page
DECK FLASHING LEAKS, ROT at InspectApedia.com - online encyclopedia of building & environmental inspection, testing, diagnosis, repair, & problem prevention advice.
Or see this
INDEX to RELATED ARTICLES: ARTICLE INDEX to BUILDING DECKS & PORCHES
Or use the SEARCH BOX found below to Ask a Question or Search InspectApedia
Or see
INDEX to RELATED ARTICLES: ARTICLE INDEX to BUILDING STRUCTURES
Or use the SEARCH BOX found below to Ask a Question or Search InspectApedia
Ask a Question or Search InspectApedia
Share this article:Search the InspectApedia website
One image per comment; please Bookmark this page to find our response. Comments with an Image or a web link appear after moderator approval.
Private comment? Email editor@inspectApedia.com
Citations & Reviewers
In addition to any citations in the article above, a full list is available on request.
- David Grudzinski, Advantage Home Inspections, ASHI cert # 249089, HUD cert# H-145, is a professional home inspector who contributes on various topics including structural matters. Mr. Grudzinski, Cranston RI serving both Rhode Island and Eastern Connecticut can be reached at 401-935-6547 fax- 401-490-0607 or by email to Davidgrudzinski@aol.com. Mr. Grudzinski is a regular contributor to InspectAPedia.com - see DECK FLASHING LEAKS, ROT Case Study, and< BASEMENT WATER MOLD IMPACT and VERMICULITE INSULATION for examples.
- Best Practices Guide to Residential Construction, by Steven Bliss. John Wiley & Sons, 2006. ISBN-10: 0471648361, ISBN-13: 978-0471648369, Hardcover: 320 pages, available from Amazon.com and also Wiley.com. See our book review of this publication.
- Decks and Porches, the JLC Guide to, Best Practices for Outdoor Spaces, Steve Bliss (Editor), The Journal of Light Construction, Williston VT, 2010 ISBN 10: 1-928580-42-4, ISBN 13: 978-1-928580-42-3, available from Amazon.com
- Manual for the Inspection of Residential Wood Decks and Balconies, by Cheryl Anderson, Frank Woeste (Forest Products Society), & Joseph Loferski, October 2003, ISBN-13: 978-1892529343,
- Building suppliers for building flashing products such as a water tight door pan: use of a pre-fabricated balcony or deck flashing pan available from Jamsill Guard (Jamsill, P.O. Box 485, Talent, OR 97540; 800/526-7455; www.jamsill.com) was discussed and illustrated in this brief Journal of Light Construction Q&A on Making a Balcony Door Watertight
- Decks and Porches, the JLC Guide to, Best Practices for Outdoor Spaces, Steve Bliss (Editor), The Journal of Light Construction, Williston VT, 2010 ISBN 10: 1-928580-42-4, ISBN 13: 978-1-928580-42-3, available from Amazon.com
- The Journal of Light Construction has generously given reprint permission to InspectAPedia.com for certain articles found at this website. All rights and contents to those materials are ©Journal of Light Construction and may not be reproduced in any form.
- Diagnosing & Repairing House Structure Problems, Edgar O. Seaquist, McGraw Hill, 1980 ISBN 0-07-056013-7 (obsolete, incomplete, missing most diagnosis steps, but very good reading; out of print but used copies are available at Amazon.com, and reprints are available from some inspection tool suppliers). Ed Seaquist was among the first speakers invited to a series of educational conferences organized by D Friedman for ASHI, the American Society of Home Inspectors, where the topic of inspecting the in-service condition of building structures was first addressed.
- Design of Wood Structures - ASD, Donald E. Breyer, Kenneth Fridley, Kelly Cobeen, David Pollock, McGraw Hill, 2003, ISBN-10: 0071379320, ISBN-13: 978-0071379328
This book is an update of a long-established text dating from at least 1988 (DJF); Quoting:
This book is gives a good grasp of seismic design for wood structures. Many of the examples especially near the end are good practice for the California PE Special Seismic Exam design questions. It gives a good grasp of how seismic forces move through a building and how to calculate those forces at various locations. THE CLASSIC TEXT ON WOOD DESIGN UPDATED TO INCLUDE THE LATEST CODES AND DATA.
Reflects the most recent provisions of the 2003 International Building Code and 2001 National Design Specification for Wood Construction. Continuing the sterling standard set by earlier editions, this indispensable reference clearly explains the best wood design techniques for the safe handling of gravity and lateral loads.
Carefully revised and updated to include the new 2003 International Building Code, ASCE 7-02 Minimum Design Loads for Buildings and Other Structures, the 2001 National Design Specification for Wood Construction, and the most recent Allowable Stress Design. - In addition to citations & references found in this article, see the research citations given at the end of the related articles found at our suggested
CONTINUE READING or RECOMMENDED ARTICLES.
- Carson, Dunlop & Associates Ltd., 120 Carlton Street Suite 407, Toronto ON M5A 4K2. Tel: (416) 964-9415 1-800-268-7070 Email: info@carsondunlop.com. Alan Carson is a past president of ASHI, the American Society of Home Inspectors.
Thanks to Alan Carson and Bob Dunlop, for permission for InspectAPedia to use text excerpts from The HOME REFERENCE BOOK - the Encyclopedia of Homes and to use illustrations from The ILLUSTRATED HOME .
Carson Dunlop Associates provides extensive home inspection education and report writing material. In gratitude we provide links to tsome Carson Dunlop Associates products and services.
 |
HOME | ABOUT | ASK a QUESTION | CONTACT | CONTENT USE POLICY | DESCRIPTION | POLICIES | PRIVACY | |
| © 2026 - 1985 Publisher InspectApedia.com - Daniel Friedman | |||||||||
