Choosing the wrong test automation tool can increase costs, reduce team productivity, and create test suites that are difficult to maintain. A structured selection process ensures the tool fits your project — not just your instincts.
Before selecting a tool, teams must consider:
- What needs to be tested — web, mobile, APIs, or all three
- Whether the tool fits the existing technology stack and team skills
- How well it integrates with the current CI/CD pipeline
Impact of Wrong Tool Selection
Selecting the wrong test automation tool has consequences that go beyond a poor developer experience. It affects team productivity, release cycles, and long-term maintenance costs.
Key impacts of a wrong tool decision:
- Test suites become fragile and difficult to maintain over time
- Team adoption suffers when the tool does not match existing skills
- Integration failures slow down the CI/CD pipeline and delay releases
Key Criteria to Evaluate
Before comparing tools, establish what matters to your team. These are the core dimensions to assess:
- Technology stack: The tool must support your application's language, framework, and platform.
- Team skill level: A tool the team cannot adopt confidently will never deliver its full value.
- Integration support: It must fit seamlessly into your existing CI/CD pipeline and reporting setup.
- Cost & licensing: Consider the total cost of ownership, not just the upfront llicense fee.
- Scalability: The tool should handle growth in test volume, team size, and project complexity.
- Community & support: Active documentation and a strong community mean faster problem resolution.
Steps to Select the Right Tool
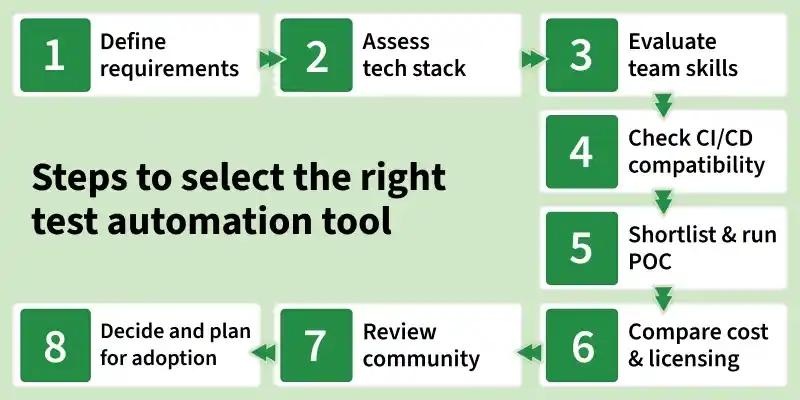
Step 1: Define requirements
Identify what you need to test — web, mobile, API, or desktop. Clarify whether you need functional, regression, performance, or cross-browser coverage. Requirements drive every decision that follows.
Step 2: Assess technology stack
The tool must be compatible with your application's language, framework, and platform. A React frontend and a Java backend may require different tools — or one flexible enough to handle both.
Step 3: Evaluate team skills
A powerful tool is useless if the team cannot adopt it. Assess whether your testers are script-based, codeless, or somewhere in between. A tool that matches existing skills reduces onboarding time significantly.
Step 4: Check CI/CD compatibility
Automation tools must plug into your existing pipeline — Jenkins, GitHub Actions, GitLab CI, or similar. A tool that cannot integrate with a CI/CD environment limits the effectiveness of automation.
Step 5: Shortlist and run a proof of concept
Narrow your list to two or three tools and test each against a real scenario from your project. A proof of concept reveals practical issues — setup friction, flaky behaviour, and reporting gaps — that documentation never mentions.
Step 6: Compare cost and licensing
Factor in not just the licence fee but also the total cost of ownership — training, maintenance, infrastructure, and support. Open-source tools are free to use but not always free to run.
Step 7: Review community
A tool backed by an active community means faster problem resolution. Check GitHub activity, Stack Overflow threads, and official documentation quality before committing.
Step 8: Decision and plan for adoption
Select the tool that scores best across your defined criteria — not the most popular one. Then build an adoption plan: training, a pilot project, and a phased rollout to avoid disrupting active releases.
Common Mistakes to Avoid
- Choosing a tool based on trends rather than project requirements.
- Skipping the proof of concept and committing too early.
- Ignoring the team's ability to learn and maintain the tool.
- Underestimating the total cost of ownership.
- Selecting a tool that cannot scale as the project grows.
